'분류 전체보기'에 해당되는 글 122건
- 2009.05.10 Firefox Wallpaper
- 2009.05.10 Mozilla Firefox 2006 icons
- 2009.05.10 google dork
- 2009.04.14 MBC 뉴스데스크 :: 신경민 앵커 마지막 클로징 멘트
- 2009.03.03 Window 7
- 2009.02.28 투쟁!! MBC 세계인에 전하는 메시지/언론장악 배후▶문지애 아나 [펌]
- 2009.02.20 kernel compile option
- 2009.02.06 Tomcat JSP server 설치 2
- 2009.02.05 MB “닌텐도 만들라” 지시에 네티즌 ‘명텐도 MB’ 초광속 출시 [펌]
- 2009.02.05 촛불 든 이명박
- 2009.01.23 NFS 서버 구축관리
- 2008.12.20 웹서버 구축관리 / Apache , PHP , MySQL 설치 설정
- 2008.12.18 ProFTPD 설치와 설정, 운영
- 2008.12.18 DHCP 서버 설정, 운영
- 2008.12.16 네임서버 설치, 운영 / DNS (bind 9.3)
- 2008.11.22 samba 서버 설치 및 설정
- 2008.10.20 filename 항목을 삭제 할수 없습니다.
- 2008.09.23 VirtualNetworkSetting
- 2008.09.23 Solaris Admin I 과정
- 2008.09.04 NTP(Network Time Protocol)
- 2008.09.04 DHCP(Dynamic Host Configuration Protocol) Server 2
- 2008.09.04 c++ newclass
- 2008.09.03 c++ 연산자 중복오버로딩 , friend 함수
- 2008.09.02 DNS Server Management
- 2008.09.02 nslookup CMD
- 2008.09.02 DNS Server(Domain Name System) 1
- 2008.09.02 c++ operator_overloading
- 2008.09.01 IPv6-IPv4-IPv6 Tunnel Configuration
- 2008.09.01 c++ . object pointer, dynamic binding, virtural
- 2008.08.29 ref_ipv6
 Firefox Wallpaper.part1.rar
 Mozilla Firefox 2006.zip


 googledork.pdf


▶MBC 클로징 멘트
세계인에 전하는 메시지

↑ 클릭..MBC 노동조합 공식카페에 가입하시고 지지와 격려의 말씀..투쟁!!


만사형통 영일대군

대통령의 형 이상득 한나라당의원이 미디어법 기습상정과 관련해 스포트라이트를 받고 있습니다. 한나라당 원내대표단의 한 핵심 의원은 "실컷 야당과 협상을 했는데 '왕대표'는 따로 있다"고 자조섞인 얘기를 늘어놓았습니다.
한나라당 원내지도부는 경제관련법을 우선 처리하고 언론관계법 등 쟁점법안은 뒤로 미루려 했는데 이상득의원이 "방송법은 이번에 가야한다...강하게 가자" 한마디에 국회가 다 뒤집어지고 만 것입니다.
그러고 보니 흥선대원군과 같은 '영일대군'의 '만사형통' 위력 앞에 한나라당의 공식 지도부는 흑싸리 껍데기에 불과하다는 게 드러났고, 한나라당 의원들은 마치 사냥꾼이 부리는 사냥개와 같이 움직였습니다.
원문주소 바로가기
이명박 정부보다 이상득 국회를 조심하라 했던 노무현 대통령의 말씀이 옳았습니다...


언론장악 배후, 이명박-이상득 형제?
[뉴스분석] 고흥길 직권상정, 홍준표 강경기조 변화 '왜'

원문주소 바로가기
공주는 공주일뿐...

반, 그리고 현실...

이번에도 우리가 승리한다!
‘날치기’ 덕분에 다시 만난 문지애 아나운서
[스케치] 언론노조 총파업 거리 홍보 풍경

문지애 아나운서(MBC본부 조합원)는 지난 연말 총파업 때 이후 두 달 여 만에 다시 거리로 나왔다. 그는 다시 파업을 하게 된 심경을 묻자 “작년 총파업 때보다는 시민분들의 관심이 덜한 것 같다”면서 “또 파업하게 되어 안타깝다. 하지만 시청자 여러분께 떳떳하고 당당하게 공정한 방송을 하기 위해서 이렇게 나왔다”고 관심을 부탁했다.
아나운서국과 함께 광화문 홍보에 참가한 시사교양국 <PD수첩>의 오행훈 PD(MBC본부 조합원)는 한나라당의 기습 상정 등을 예로 들면서 “조합원들은 연말보다 더 비장한 각오”라고 내부 분위기를 전했다.
원문주소 바로가기


파업은 멀리 있는 그 무엇이었습니다.
저에게 파업은 멀리있는 그 무엇이었습니다.
쉽게 와닿지 않았습니다. 제가 입사한 2006년은 마지막 파업이 있은지 오랜 시간이 지난 후였고, 선배들이 공정언론을 위해 싸웠고, 싸우다 잡혀갔다는 말은 역사의 한 부분처럼 멀고 아득하게만 느껴졌습니다.
내부집회 첫 날, 김정근 선배와 집회진행을 할 때 무척 어색했습니다. 다른 사람들이 하면 투쟁의 구호로 들리던 말들이 제 입을 통해 나갈 때는 왜 그리 어색하던지요. 섹시한 구호라며 웃어주던 김정근선배와 조합원들이 고맙기까지 느껴졌습니다.
공정방송을 지키기 위해 몸을 던졌던 선배들을 화면으로 만났습니다. 말로만 듣던 것을 살아있는 화면으로 봤을 때, 안에서 무언가 울컥하고 치밀어 올라왔습니다. 하고 싶은 말을 하고 권력에서 자유로운 방송을 하기까지 선배들이 걸어왔던 길을 보고, 문화방송 선배님들의 후배로 지금 이 자리에 서 있다는 사실이 자랑스러웠습니다. 춥고 힘든 싸움의 시간들이었지만, 과거의 선배들과 시간을 달리하며 같은 길을 걷고 있다는 뿌듯함이 있었습니다.
모든 조합원들이 무척 많은 고생을 했습니다. 그리고 우리는 언론장악의 음모를 일단 막아냈습니다. 추운 날, 밖에서 수고 많으셨습니다. 특히 언제나 함께하며 멋진 파업문화를 만들어낸 아나운서 선 후배님들께 고맙다고 사랑한다고 전하고 싶습니다.


(긴급공지) 2. 28 '용산철거민살인진압 책임자처벌, MB악법저지 범국민대회'
4시 청계광장입니다.


여러 게시판에 퍼날라 주세요..^^
용산참극 희생자를 기억합니다..
 Kernel+Compile+Option.hwp
Kernel Compile Option
Ξ Code maturity level options
[ ] Promprt for development and/or incomplete Code/drivers
-->커널 코드의 성숙도를 선택하는 부분으로 개발버전 수준의 소스를 사용하게끔 선택해주는 것입니다. 이것은 알파버전들을 커널에 포함시킬것인지 묻는 항목입니다.
Ξ Processor type and features
(PPro/6x86MX)Processor family
--> 자신의 컴퓨터 CPU 를 골라주면 됩니다.
!!..컴파일후 재부팅시 일어나는 Panic현상의 대부분은 이곳설정 잘못이 많으니 각별히 주의하길 바라며 꼭 다시한번 확인후 넘어가도록 하세요. 잘 모르거나 삐짜CPU(^_^)라면 안전하게 386을 선택하자...!!
( ) 386
( ) 486
(X) 586/k5/5x86/6x86
( ) Pentium/k6/TSC
( ) PPro/6x86MX
(1GB)Maximum Phycical memory
--->커널 2.2버전부터 급격히 올라간 지원메모리입니다....
아마 이것을 2GB까지 사용할 사용자가 있을지 모르겠습니다....
곧 4GB이상까지 지원이 가능할꺼라고 합니다....
(X) 1GB
( ) 2GB
[ ] Math emulation
-->리눅스가 코프로세서가 없는 컴퓨터에서 코프로세서의 기능을 수행해주는 기능을 말합니다. 컴퓨터의 두뇌라 할수 있는 CPU 에서 복잡한 수학계산의 경우는 CPU 에주는 부담이 크기 때문에 코프로세서라는 칩을 별도로 장착하고 있는데 펜티엄이나 486DX 이상의 기종은 코프로세서라는 칩을 따로 장착하고 있기 때문에 이 기능은 별로 필요가 없습니다. 486DX 이하의 기종을 가진 사용자는 선택을 하기 바랍니다. 선택을 하게 되면 보조 프로세서가 사용되고 에뮬레이션은 무시되게 됩니다.
[ ] MTTR (Memory Type Range Register ) Support
-->Pentium Pro이상의 시스템이고 PCI나 AGP버스 비디오카드가 있다면 선택합니다. 이미지를 2배이상 빨리 쓸 수 있기 때문입니다.
[ ] Symmetric multi-processing Support
-->SMP기능의 지원입니다.
이것을 사용시 Charater devices-->Enhanced real time clock support 도 선택해야합니다.또한 General setup---->Advanced power management BIOS support는 "N"
Ξ Loadable module support
[ ] Enable loadable module support
-->커널에서 모듈을 사용할수 있게 해주는것입니다.
동적 모듈 기능을 가능하게끔 해주는 기능으로써 윈하는 기능을 메모리에 올려놓고 필요없는 기능은 메모리에서 빼내는 기능을 해주는것입니다.
[ ] Set version information on all symbols for modules
-->커널이 바뀌어도 기존의 모듈을 사용하게 해 주게 하는것입니다.
[ ] Kernel daemon support(e.g.sutoload of modules)
-->모듈에 대해 커널이 항상 대비해 주도록 설정하는것입니다.
Insmod 나 rmmod 명령을 사용하지 않고 kerneld 라는 프로그램이 자동적으로모듈이 어느 기능을 수행하지 않으면 자동적으로 모듈을 메모리에 올리고,일정시간 그 모듈을 사용하지 않을시에는 자동적으로 모듈을 메모리에서 제거하는 기능을 가진 유용한 프로그램입니다.
Ξ General Setup
[ ] Networking support
-->리눅스에 네트워킹을 사용하게 해주는 기능입니다.
리눅스가 다른 사용운영체제와의 비교에 있어서 강점은 바로 네크워킹에 있습니다. 리눅스에서 네트워킹을 하려면 꼭 선택합니다.
[ ] PCI bios(---확인할것--) support
-->pci 바이오스를 지원하는 항목입니다. 펜티엄 이상의 프로세서가 달린 컴퓨터에서는 pci 가 내장되어 있으므로 선택하기 바랍니다.
(Any)PCI acess mode
-->Any는 커널이 바이오스 도움없이 직접접근해 보고 반응이 없으면 bios로 가는 설정모드입니다.. 이외에 "bios"와 "direct"가 있으며.. 말그대로 전자는 bios의존이고 후자는 비의존입니다.
[ ] PCI quirks
-->"Y" ; BIOS가 깨졌을때
"N" ; " 정상일때
[ ] PCI bridge optimization (Experimental)
-->PCI 브릿지를 지원하게 해주는 항목입니다.
CPU 와 PCI , PCI와 ISA 사이에 브리지가 있어 서로 다른 버스사이에서 데이터를 전송할 수 있도록 논리적인 기능을 합니다. 바이오스에 굳이 문제가 없다면 "N" ,있다면 "Y"실험적인것은 되도록 선택에 신중을....
[ ]Backward compatible /proc/pci
-->오래된 풀그림을 이용해 PCI정보를 읽을때 필요합니다.
[ ] MCA support
-->"MICRO CHANNEL ARCHITECTURE" IBM PS/2 머신에서 필요합니다.
[ ] SGI Visual Workstaion Support
-->SGI 320,540 Workstation에서 필요합니다.
[ ] System V IPC
-->System V IPC를 지원하게 해주는 항목입니다.
리눅스에서는 도스용 프로그램을 에뮬레이터를 통해서 실행시킬수 있습니다. 프로세스 사이에서 동기화와 정보교환을 위한 라이브러리 함수와 시스템 콜 모음입니다. 이 항목을 선택하게 되면, 리눅스 박스는 System V IPC 로 작동을 하게 되며, 리눅스에서 도스용 프로그램을 사용할수 있게 해줍니다.
[ ] BSD Process Accounting
-->프로세스가 존재할 때에는 언제나 커널에 의해 프로세스 정보 (소유권,생성시간,메모리점유상태등..)가 파일에 추가.
[ ] Sysctl Support
-->Sysctl interface는 kernel compile 재질이나 시스템 재부팅 업이 실행중인 커널 매개변수를 동적으로 변경하는 방법을 제공합니다. 주 인터페이스는 시스템콜로 이루어져 있지만 /proc 파일시스템이 설치되어 있다면 편집 가능한 Sysctl 요소 트리는 /proc/sys 디렉토리 아래 생성될 것입니다.커널 크기가 8kb 늘어납니다.
< > Kernel support for a.out binaries
-->커널이 a.out 실행 파일 형식을 지원하게 해주는 항목입니다. a.out 이란? (Assembler.OUTput) 의 약자로 초창기 유닉스에서 쓰이던 실행 파일 형태입니다.
< > kernel support for ELF binaries
-->커널이 ELF 실행 파일 형식을 지원하게 해주는 항목입니다.
ELF 는 a.out 이후에 등장한 바이너리 형식이면서 리눅스 바이너리 포맷의 표준이므로 반드시 선택하도록 합니다..
< > Compile kernel as ELF - if your GCC is ELF-GCC
--> 커널 형태를 ELF 형식으로 만드는것을 지원하게 해주는 항목입니다. GCC 는 리눅스에서 중요한 컴파일이면서, 모든 유닉스에서 호환이 되는 컴파일러입니다. 이 항목을 지원하게 해주면, GCC 가 ELF 실행 파일 형태일때에, 커널 형식도 ELF 로 컴파일 할수 있게 해주는 항목입니다.
< > kernel support for JAVA binaries
--> 커널이 JAVA 실행 파일 형식을 지원하게 해주는 항목입니다. 이 항목을 선택하면, 커널 자체에서 JAVA 바이너리를 실행토록 지원해줍니다.
< > Parallel port Support
-->Parallel port를 이용해서 printer,zip drive등을 사용한다면 선택합니다.
< > PC-style hardware
-->PC-style Parallel port 없다면 "N"
< > Support foreign hardware
[ ] Advance Power Management BIOS Support
< > Ignore USER SUSPEND
-->APM 를 설정한 사용자라면 이 기능을 NO 로 선택합니다.
일반 사용자에게는 필요없는 항목입니다.
< > Enable PM at boot time
< > Make CPU idle calls when idle
-->듀얼 CPU 이상의 CPU 의 수를 가지고 있는 사용자가 아니 라면 그냥 통과.
< > Enable console blanking using APM
-->전원관리를 위해서 노트북의 백라이트 기능을 끄는 기능입니다.
< > Power off shutdown
--> 시스템을 종료할때 나오는 메세지"SYSTEM IS HALTED"가 나오는 동시에 전원을 차단하는 기능을 지원합니다.컴퓨터의 바이오스에 따라 기능이 적절히 활용되지 않을 때가 있다.
< > Ignore multiple Suspend
< > Ignort multiple Suspend/resume cycles
< > RTC stores time in GMT
< > Allow interrupts during APM BIOS calls
Ξ I20 device support
< > I20 support
< > I20 PCI support
< > I20 Block OSM
< > I20 LAN OSM
< > I20 SCSI OSM
< > I20 /proc support
-->아직이게 뭔지 모릅니다..혹 아시는분은 댓글을 달아서 다른분께 드리세요.(^___^);;
Ξ Plug and Play Support
[ ] Plug and Play Support
-->설정해야 좋은거 다 아시죠.
Ξ Block devices
< > Normal floppy disk support
-->리눅스에서 플로피 드라이버 장치를 지원하게 해주는 항목입니다.
[ ] Enhanced IDE/MFM/RLL disk/cdrom/tape support
--> IDE drive를 사용할수 있게 지원하게 해줍니다.
Personal Computer 에서는 하드디스크와 CD-ROM 드라이브가 IDE 에 속하는데, IDE 드라이브는 4개까지 사용할수 있고, 리눅스에서 IDE 장치를 사용하려면 선택합니다.
--Please see documentation/ide.txt for help/info on IDE drives
[ ] Use old disk-only driver on primary interface
-->예전에 출시된 하드디스크를 프라이머리로 사용할수 있게 해주는 기능입니다. 이 항목을 선택하면, 하나의 인터페이스에 오직 두개의 하드디스크만을 지원하게 해줍니다.
< > Include IDE/ATA-2 DISK support
[ ] use multi-mode by default
< > Include IDE/ATAPI CDROM support
-->ATAPI 방식의 CD-ROM 을 지원하게 해주는 항목입니다.
SCSI 용 CD-ROM 이나 2배속 이하의 CD-ROM 중 특별한 장치를 제외하고는 이것을 선택하면 리눅스에 CD-ROM 을 사용할수가 있습니다.
< > include CD-changer Reporting
< > Include IDE/ATAPI TAPE support
--> IDE 방식의 TAPE 드라이버를 지원하게 해주는 항목입니다.
TAPE 드라이브는 워크스테이션이나 기타 중,대형 서버급 이상의 기종에서백업용으로 하용하는 메체이므로 일반 PC 사용자들은 선택할 필요 없습니다.
< > Include IDE/ATAPI FLOPPY support(new)
--> SCSI 프로토콜을 사용하는 새로운 방식의 IDE cdrom/tape/floppy driver와 동등한 ATAPI 형식의 FLOPPY 를 지원하게 해주는 항목입니다. ATAPI ZIP 드라이브나 LS_120, 슈퍼 드라이브 같은 드라이버를 가지고 있는 사용자는 이 항목을 선택으로 설정하면 사용할수가 있습니다.
< > SCSI emulation support
-->IDE ATAPI 디바이스 장치를 SCSI 장치처럼 에뮬레이트 해주는 기능을 지원해줍니다. 예를 들자면, ATAPI PD-CD dirve 와 같은 장치를 SCSI 와 동등한 방식으로 사용하게 끔 해주는 방식입니다..
[ ] CMD640 chipset bugfix/support
-- MD640 칩셋의 버그를 고친 항목을 지원하게 해주는 항목합니다. CMD640 칩셋은 일반적으로 486이상 펜티엄 보드에 주로 쓰이는 칩셋인데, 주로 Netune 이나 SiS 와 같은 칩셋에 주로 같이 쓰입니다. 컴퓨터의 마더보드에서 CMD640 를 지원한다면, 이 기능을 선택하기 바랍니다.
[ ] CMD640 enhanced support
--> CMD640 칩셋을 지원하게 해주는 항목입니다.
컴퓨터의 마더보드에서 CMD640 를 지원한다면, 이 기능을 선택하기 바랍니다.
[ ] RZ1000 chipset bugfix/support
-->RZ1000 칩셋의 버그를 고친 항목을 지원하게 해주는 항목입니다. RZ1000 칩셋은 일반적으로 486이상 펜티엄 보드에 주로 쓰이는 칩셋입니다. 컴퓨터의 마더보드에서 RZ1000 을 지원한다면, 이 기능을 선택하기 바랍니다.
[ ] Generic PCI bus-master DMA Support
[ ] Boot off-board chipsets first Support
[ ] Other IDE chipset support
-->나온 칩셋 이외의 다른 칩셋을 지원하게 해주는 항목입니다.
다양한 종류의 칩셋을 선택할수 있게해줍니다.
자세히 모른다면 마더보드의 메뉴얼을 자세히 보거나, N 으로 설정하고 넘어가기 바랍니다.
-----Additional Block Devices
[ ] Loopback device Support
--> 하나의 파일을 하나의 파일시스템으로써 인식하게끔 지원해줍니다. 예를 들자면, 플로피 디스크의 이미지 파일이나 CD-ROM 을 굽기 위한 파일을 만들었을때, 그 이미지를 하나의 파일시스템으로써 인식함으로써 그 파일의 내용을 확인하게끔 해줍니다. 자신의 컴퓨터에 CD-R 이 있는 사람은 선택합니다.
[ ] Network block device Support
[ ] Multiple devices driver Support
-->다중 장치 지원을 지원하게끔 해주는 해줍니다.
여러개의 하드디스크에 있는 파티션을 묶어서 하나의 논리적인 드라이브를 사용할수 있게끔 해줍니다. 예를 들어서 용량이 작은 여러개의 하드디스크를 가지고 있는 사용자에게는 유용한 설정입니다.
< > Linear (append) mode
--> Multiple devices driver support 를 체크하면 활성화되는 설정으로써, 여러개의 하드디스크에 있는 파티션을 단순하게 나열하는 방식을 지원합니다.
< > RAID-0 (striping) mode
< > RAID-1 (mirroring) mode
< > RAID-4/RAID-5 mode
< > RAM disk support
--> 메모리의 일부를 하드 디스크 처럼 사용하게 지원해주는 항목으로, 램 디스크로 설정된 메모리는 하드 디스크와 마찬가지로 사용할 수가 있습니다.속도면에서 하드디스크와는 비교할수 없을 만큼 빠릅니다. 그러나 일반 사용자에게는 필요없는 항목이며, 메모리 양이 충분한 사용자는 한 번 선택해봅니다.
[ ] Initial RAM disk(initrd) support
--> 램 디스크를 Lilo 와 같은 부팅 관리자에 등록을 해서 부팅이 실행되기 전에 램 디스크에 있는 먼저 실행시킬수 있도록 해줍니다.
램 디스크를 설정한 사용자는 이 항목도 같이 설정하기 바랍니다.
< > XT haddisk support
--> XT 를 사용하던 8BIT 하드 디스크 컨트롤러를 지원하게끔 해줍니다.
[ ] Parallel port IDE device Support
Networking Options
< > Packet Socket
[ ] Kernel/User netlink Socket
[ ] Routing messages
< > Netlink device emulation
[ ] Network firewalls
--> 리눅스 시스템을 네트워크 파이어월로 작동하도록 해줍니다.
파이어월로 리눅스 시스템을 작동시키면 네크워크 상에서 보완을 유지시켜줍니다. 자신의 리눅스 박스가 방화벽의 기능을 하고자 한다면 선택하기 바랍니다. 이 항목을 설정하면, 네트워크 속도가 떨어지는 것을 감수해야 합니다. 그리고, 현재 리눅스 시스템의 네트워크가 TCP/IP 로 작동하고 있으면, IP firewalling 항목도 선택합니다.
[ ] Socket filtering
< > Unix domain Sockets
[ ] TCP/IP networking
--> 리눅스 시스템이 TCP/IP 네트워크가 되게 지원해주는 기능입니다. TCP/IP 는 지역 네트워크 및 인터넷 표준 프로토콜이며, 인터넷을 통하지 않는 Standalone 컴퓨터라 할지라도, TCP/IP 는 필요합니다. term과 XWindow 같은 프로그램은 TCP/IP 프로토콜을 사용하기 때문입니다.
[ ] IP: multicasting
--> 네트워크 상에서 리눅스 시스템을 멀티 캐스팅이 가능하게 해줍니다. 멀티 캐스팅이란, 네트워크 상에 연결된 컴퓨터에서 네트워크의 모든 호스트로 데이터를 보내는 것을 의미합니다. IP:forwarding/gatewaying 를 선택하였으면, 이것도 선택합니다.
[ ] IP: Advanced router
[ ] IP: ketnel Level autoconfiguration
[ ] IP: Optimize as router not host
< > IP: Tunneling
--> 하나의 프로토콜 형식의 자료를 캡슐에 저장해서 다른 프로토콜로 채널을 통해 보낼 때 인식하도록 지원해주는 기능입니다.
< > IP: GRE tunnels over IP
[*] IP: Aliasing support
--> 외부에서 단일 네트워크 인터페이스상에서 호스트명을 통해서 접속할수 있도록 해주는 기능입니다. 여러 개의 네트워크 카드가 장착된 컴퓨터에서는 매우 유용한 기능입니다. 일반 사용자에게는 필요없는 기능입니다.
[ ] IP: TCP Syncookes Support ( not enabled per deault )
--> 서비스 거부 공격을 받을때 대처해주는 패킷입니다.
---( it is safe to Leave these untouched )
< > IP: Riverse ARP
--> 사용자의 리눅스 시스템에서 네트워크상의 또 다른 네크워크 컴퓨터가 IP 주소를 물어왔을때, 대답을 해주는 기능입니다. 즉 , 네트워크상에 물려진 컴퓨터의 이더넷 카드의 주소는 알지만, 시작시 IP 주소를 모르게 되면, 역 주소 결과치를 가지고 프로토콜을 찾아주는 기능입니다.
[*] IP: Allow large windows ( not recommended if < 16Mb of memory )
--> 대용량의 자료를 전송할 수 있게 해주도록 지원해줍니다.
메모리 16메가 이상이면 이 항목을 설정해줍니다.
---
< >The IPX protocol
--> 네트워크 운영체제로 유명한 노벨 네트웨어의 기본 프로토콜인 IPX 프로토콜을 지원하게 해줍니다. 노벨 네트웨어 파일 시스템이나 프린터를 사용하려면 이 옵션을 선택합니다.
[ ] IPX: Full internal IPX network
-->내부 네트워크상에서 다른 가상 노드상에 소켓을 배분받게 하는 설정입니다. The IPX protocol 항목을 선택했다면 선택합니다.
[ ] Appletalk DDP
--> Appletalk 프로토콜의 지원여부를 결정하는 항목입니다.
Appletalk 는 애플 컴퓨터의 네트워크 프로토콜입니다.
Ξ SCSI support
< > SCSI support
-->시스템에 SCSI 장비가 있다면 이 항목을 선택합니다.
--SCSI Support type (disk,tape,CD-ROM)
< > SCSI disk support
-->시스템에 SCSI 하드디스크나 IOMEGA parallel ZIP 드라이브를 가지고 있다면 이 항목을 Y 선택합니다.
< > SCSI tape support
-->시스템에 SCSI tapedrive 를 가지고 있다면,선택합니다.
< > SCSI CD-ROM support
-->사용자의 리눅스 시스템에 SCSI CD-ROM 이나 CD-R 를 가지고 있다면, 이 항목을 선택합니다.
< > SCSI generic support
--> SCSI 용으로 나오는 제품중에는 하드디스크나 CD-ROM 말고도 수많은 제품들이 있습니다. SCSI 방식의 스캐너나 신디사이저, CD-writer 등을 가지고 있다면 이 항목을 YES 로 설정 하기 바랍니다.
--Some SCSI device (e.g. CD jukebox) Support multiple LUNS
[ ] Probe all LUNs on each SCSI device
--> SCSI 는 각 SCSI 장비에 논리적인 번호, 즉(LUN) 를 할당하는데, SCSI 어댑터 중 복수의 LUN 을 지원하는 제품들이 있습니다.이러한 복수의 LUN 을 지원하는 항목입니다.
[ ] Verbose SCSI error reporting (kernel size +=12K)
--> SCSI 하드웨어에서 일어나는 에러메시지를 이해하기 쉬어집니다. 가급적 SCSI 장비를 가지고 있는 사용자는 이 항목을 선택합니다.
SCSI low-level drivers -->
< > 7000FASST SCSI support
-->웨스턴 디지탈사의 7000 스카시 어댑터를 지원하는 항목입니다.
< > Adaptec AHA152X/2825 support
< > Adaptec AHA1542 support
< > Adaptec AHA1740 support
< > Adaptec AIC7xxx support
-->아답텍사의 스카시 어댑터를 지원하는 항목입니다. aic7xxx 를 지원하는 스카시 컨트롤러 항목은 274X EISA 카드, 284X VLB 카드, 294x PCI카드, 394X PCI 카드, 3985 PCI 카드를지원합니다.
< > AM53/79c974 PCI SCSI support
-->AM53/79c974 스카시 어댑터를 지원하는 항목입니다.
Tekram DC390(T) PCI-SCSI 호스트 어댑터를 가지고 있다면 기본적으로 DC390 드라이버를 가지고 있습니다. 이 항목은 DC390 및 AM53/79c974 스카시 어댑터를 지원합니다.
< > BusLogic SCSI support
-->BusLogic MultiMaster SCSI 어댑터를 지원하는 항목입니다.
< > DTC3180/3280 SCSI support
-->DTC 3180/3280 스카시 어댑터를 지원하는 항목입니다.
< > EATA-DMA(DPT,NEC,AT&T,SNI,AST,Olivetti,Alphatronix) support
-->SmartCache III/IV, SmartRAID, PM2011B/PM2012B 등의 스카시 어댑터가 사용하는 EATA-DMA 프로토콜을 지원하는 항목입니다.
< > EATA-PIO (old DPT PM2001, PM2012A) support
--> DPT PM2001, PM2012A 등의 스카시 어댑터가 사용하는 EATA-PIO 프로토콜 지원하는 항목입니다.이 드라이버는 단지 harddisks 및 lacks 의 많은 특징들을 지원해 주는 기능의 역할만을 합니다.
< > Future Domain 16xxSCSI support
-->Future Domain 16Bit 스카시 어댑터나 Future Domain 의 칩셋을 사용하는 스카시 어댑터를 지원하는 항목입니다.
< > GDT SCSI Disk Array Controller Support
< > Generic NCR5380/53c400 SCSI support
--> NCR의 스카시 어댑터를 지원하는 항목입니다.선택하게 되면 리눅스 커널에서 지원하는 많은 종류의 NCR스카시 어댑터를 사용할수 있게 됩니다.
< > Initio 9100U(W) Support
< > initio INI-A100U2W Support
< > NCR5380/53c400 mapping method (use Port for T130B)
--> NCR5380 과 NCR53c400 스카시 어댑터에서 T130B 방식으로 메모리를 매핑 해주는 기능을 지원하는 방식입니다.
< > Symbios 53c416 SCSI Support
< > NCR53c406a SCSI support
--> NCR53c406a 스카시 어댑터를 지원해주는 항목입니다.
< > NCR53c8xx SCSI support
< > SYM53c8xx SCSI support
--> NCR53C8XX 계열의 PCI 용 스카시 어댑터를 사용가능하도록 지원해주는 기능입니다. Parity check, FAST SCSI II 등을 지원하는등 다양한 기능을 사용할수 있습니다.
(4) Default tagged command Queue depth
(32) maximum number of queued commands
--> 어떠한 대기명령이 주어졌을때, 그에 따른 디바이스에 최소및 최대 명령수를 부여하는 기능을 지원해주는 기능입니다.기본적으로 4, 최소값으로는 2, 최대값으로는 12 의 명령수를 부여해줍니다.
(20) synchronous transfers frequency in MHz
[ ] enable profiling
[ ] use normal IO
-->X86 을 기반으로하는 시스템에서 메모리의 IO를 매핑해주는 기능을 지원합니다.
[ ] Include support for the NCR PQS/PDS SCSI card
< > PAS16 SCSI support
-->PAS 16 스카시 어댑터를 지원해주는 항목입니다.
< > PCi2000 support
< > PCi2220i support
< > PCi2240i support
< > Qlogic FAS SCSI support
-->Qlogic 의 FastSCSI 를 지원해주는 항목입니다.지원하는 항목은 PCI 방식이 아닌 ISA, VLB, PCMCIA 방식입니다.
< > Qlogic ISP SCSI support
-->PCI 방식의 스카시 어댑터를 지원해주는 항목입니다.
< > Qlogic ISP FC support
< > Seagate ST-02 and Future Domain TMC-8xx SCSI support
-->8BIT 용 스카시 어댑터를 지원해주는 항목합니다.
< > Tekram DC-390(T) SCSI support
-->Am53C974A 칩을 사용하는 Tekram DC390(T) PCI 스카시 어댑터를 지원해주는 항목입니다.
< > Trantor T128/T128F/T228 SCSI support
--> Trantor T128/T128F/T228 스카시 어댑터를 지원해주는 항목입니다.
< > UltraStor 14F/34F support
-->UltraStor 14F/34F 스카시 어댑터를 지원해주는 항목입니다.
< > UltraStor SCSI support
-->UltraStor 14F/34F 외에 24F 등의 스카시 어댑터를 지원합니다. UltraStor 14F/34F 지원항목과 겹치는 스카시 어댑터가 있는데, 둘중의 하나를 선택해야만 합니다.
Ξ Network Device support
[ ] Network device support
-->자신의 컴퓨터가 네트워크에 연결되어 있거나 SLIP이나 PPP를 사용하려면 선택합니다.
< > ARCnet Support
-->ARCnet 칩셋이 있는 네트워크 카드를 가지고 있다면 선택합니다.
< > Dummy net driver support
-->IP 어드레스를 구성하는데 있어서 필수적인 디바이스를 제공합니다. SLIP이나 PPP를 사용 한다면 Y로 설정하기 바랍니다.
< > EQL (serial line load balancing) support
-->한 컴퓨터에 두개의 모뎀과 전화선 두개를 이용하여 동시에 접속할수 있게 해줍니다. 다른 컴퓨터와 2개의 시리얼 연결이 되어 있으며, 그것을 통해 SLIP이나 PPP를사용한다면, 이 옵션으로 2개를 하나로 만들어주어 2배의 속도를 낼 수 있게 해줍니다.
[ ] Ethernet (10 or 100Mbit)
-->랜카드가 있을시에는 이 항목을 선택해 줍니다.
[ ] 3COM cards
< > 3c501 support
< > 3c503 support
< > 3c505 support
< > 3c507 support
< > 3c509/3c579 support
< > 3c515 ISA Fast EtherLink
< > 3c590/3c900 series (592/595/597/900/905) "Vortex/Boomerang" support
-->이 항목은 3COM 네트워크 카드를 지원해주는 기능입니다.
AMD LANCE and PCnet (AT1500 and NE2100) support
-->AT1500 또는 NE2000 호환인 AMD LANCE/PCnet 스카시 어댑터를 지원해주는 항목입니다.
[ ] Western Digital/SMC cards
-->Western Digital/SMC 네트워크 카드를 지원해주는 기능입니다.
[ ] Racal-interlan (Micom) NI cards
[ ] Other ISA cards
-->설치된 네크워크 카드가 위의 해당사항에 없거나. 네트워크 카드가 ISA 용일때에는 이 항목을 선택합니다.
[ ] EISA,VLB.PCI and on board controllers
-->보드에 내장된 네트워크 카드를 가진 사용자라면 이 항목을 선택합니다.
< > AMD PCInet32 (VLB and PCI) support
-->PCI 및 VLB 방식을 지원하는 AMD PCInet32 스카시 어댑터를 사용가능하도록 지원해주는 항목입니다.
< > Apricot Xen-II on board Ethernet
< > CS8x0 support
< > Generic DECchip & DIGITAL EtherWORKS PCI/EISA
< > DECchip Tulip (dc21x4x) PCI support
< > Digi Intl . RightSwitch SE-X support
< > EtherExpressPro/100 support
-->이더넷 네트워크 인터페이스 카드(NIC)가 설치되었다면 선택합니다.
< > PCI NE2000 support
-->PCI 방식의 NE2000 네트워크 카드를 지원해주는 항목입니다.
< > TI ThunderLAN support
< > IA Rhine support
[ ] Pocket and portable adaptors
[ ] FDDI driver support
< > Frame relay DLCI support
PPP (point-to-point) support
-->페러렐 포트와 크로스 케이블을 이용해 두 리눅스 박스를 연결할수 있습니다.TCP/IP를 이용하며 "FX"케이블을 통해서 4bits 씩 전송할 수 있는 mode0와 특별한 PILP케이블을 이용해 8bits씩 전송할 수 있는 mode1이 제공됩니다.
<*> SLIP (serial line) support
-->PPP 이전에 많이 사용했던 시리얼 라인을 지원하는 네트워크 프로토콜입니다.
[ ] Wireless LAN (non - hamradio)
-->RADIO와 무선 LAN을 지원합니다.
[ ] Token Ring driver support
-->IBM 사의 제폼에서 로컬 네트워크를 연결하는 토큰링 방식의 드라이버를 지원해주는 기능입니다.토큰 링 카드를 사용하려면 이것을 선택합니다.
< > Comtrol Hostess SV-11 support
< > COSA/SRP sysc serial boards support
< > Red Creek Hardware VPN (EXPERIMENTAL)
[ ] WAN drivers
Ξ Amateur Radio Support
[ ] Amateur Radio Support
--packet radio protocols
< > Amateur Radio AX.25 Level 2 protocols
--Misc hamradio Protocols
Ξ IrDA Subsystem Support
-->적외선을 이용한 근거리 무선통신이나 프린터,시리얼 장치 등의
표준 프로토콜을 지원합니다.
지금은 좀 낮설지만 조만간에 아주 익숙해질 유용한 기능입니다. 생각해보죠 계산기만한 컴퓨터를 가지고 다니다 무선으로 근처에 접근하는 것만으로 자료가 전송된다면..벌써 셀빅같은 PDA종류나 고급사양의 노트북에선 지원하고 있습니다. 필자는 이정도밖에 모르지만 앞으로 많이 이용될 기술이니 아래의 기술을 설명할수 있는 분이 있다면 댓글을 달아서 더 살을 붙여 좀더 많은 리눅서가 공유하게 되길 빕니다.
< > IrDA Subsystem Support
< > IrDA subsystem support
---IrDA protocols
< > IrLAN protocols
< > IrCOMM protocols
< > IrLPT protocols
< > IrLPT client support
< > IrLPT server support
< > IrDA protocol options
--- IrDA options
[ ] Cache last LSAP
[ ] Fast RRs
[ ] Debug infomation
[ ] IrLAP compression
Infrared-port device drivers -->
--- SIR device drivers
< > IrTTY (users linux serial driver )
IrPORT (IrDA serial driver)
--- FIR device drivers
< > NSC PC87108
< > Winbond W83977AF (IR)
< > Sharp UIRCC
< > Toshiba Type-0 IR Port
< > SMC IrCC
--- Dongle support
[ ] Serial dongle support
< > ESI JetEye PC dongle
< > ACTiSYS IR-220L and IR220L+ dongle
< > Tekram IrMate 210B dongle
< > Greenwich GirBIL dongle
< > Parallax LiteLink dongle
Ξ ISDN subsystem
-->얼마전만해도 생소했던 기술이지만 이제는 모뎀처럼 흔해졌습니다. 이제 곧 리눅스가 제 힘과 기술을 발휘할수 있는 고속 네크워크의 세계로 성큼 다가간 것 같아서 기분이 좋아지는군요..(^___^);; 여러분도 아시겠지만 리눅스는 네트워크와 연결될 때 무한의 기능과힘을 발휘합니다.
올해부터 부쩍 늘어난 각 통신사의 ISDN 광고또한 리눅스에서의ISDN지원에 힘을 주고 있습니다.모 텔런트가 ISDN-II 광고를 재미있게 하던군요.:-)
< > ISDN support
--> ISDN 카드를 이용해서 네트워크나 인터넷을 사용하려면 이 항목을 선택합니다.
[ ] Support synchronous PPP
-->ISDN 을 통해 동기화된 PPP 를 지원해주는 기능입니다.
동기화된 PPP 는 주로 SUN 이나 CISCO 에서 사용되어집니다.
[ ] Use VJ-compression with synchronous PPP
-->동기화된 PPP에서 VJ 압축(Van Jacobson header compression)을 지원하는 항목입니다.
[ ] Support audio via ISDN
-->ISDN 을 통해 음성기능을 지원해주는 기능입니다. 자신의 리눅스 박스가 ISDN 를 통해 음성 통화가 가능하게 하려면,이 기능을 선택합니다.
[ ] X.25 PLP on top of ISDN (Experimental)
< > ICN 2B and 4B support
-->ICN 이라 불리는 두 종류의 ISDN 카드를 모두 지원하는 항목입니다. ICN 2B 는 하나의 ISDN 라인에 2개의 B 채널을 가진 ISDN 표준방식입니다. ICN 4B 는 두개의 ISDN 라인을 지원합니다.
< > ISDNloop Support
-->테스트를 위한 가상 ISDN Card를 제공해 줍니다.
< > PCBIT-D support
-->이 항목은 포트투칼의 Octal 사가 만들어낸 PCBIT ISDN 카드를 지원하는 항목입니다.
< > HiSax SiemensChipSet driver support
-->Siemens Chipset 를 사용하는 AVM A1, Elsa ISDN cards, Teles S0-16.0, Teles S0-16.3, Teles S0-8, Teles/Creatix PnP,ITK micro ix1 등 ISDN 카드를 지원해주는 기능입니다.
< > AVM-B1 with CAPI2.0 support
-->CAPI2.0 인터페이스를 장착한 AVM B1 카드를 지원해주는 항목입니다.
Ξ OLD CD-ROM drivers(not for SCSI or IDE/ATAPI drives)
[ ] Support non-SCSI/IDE/ATAPI CDROM drives
-->리눅스 박스에 설치된 CD-ROM 를 지원토록 해주는 기능입니다.요즘 나오는 CD-ROM 은 IDE 나 ATAPI 방식으로 작동되는 CD-ROM 이므로 해당사항이 없고,IDE 나 ATAPI 가 나오기전의 구형모델의 CD-ROM 을 지원해 줍니다. SCSI CD-ROM 를 가지고 있는 사용자 또한 필요없는 기능입니다.
< > Aztech/Orchid/Okano/Wearnes/TXC/CyDROM CDROM support
-->Aztech 사의 CDA268-01A, Orchid 사의 CD-3110, Okano 와 Wearness의 CDD110, Conrad 사의 TXC 및 CyDROM 의 CD-ROM 을 지원해주는 기능입니다.
< > Goldstar R420 CDROM support
-->LG의 초창기 모델이었던 R420 CD-ROM 을 지원해주는 기능입니다.
< > Matsushita/Panasonic/Creative, Longshine, TEAC CDROM support
-->마쯔시다 CR-521, CR-522, CR-523, CR-562, CR-563 CD-ROM 및 크리에이티브랩의 CD200, Longshine 사의 LCS-7260,TEAC 사의 CD-55A CD-ROM 등을 지원해주는 기능입니다. 사운드 블라스터와 함께 있던 CD-ROM 들이 대부분이며, 이전에 사운드 블라스터와 함께 CD-ROM 을 구입한 사용자라면 대부분 이 항목에 들어갈 것입니다.
< > Mitsumi (standard) [no XA/Multisession] CDROM support
-->미쯔미사에서 제작된 LU-005, FX-001, FX-001D CD-ROM를 지원해주는 기능입니다. 미쯔미사의 FX-001DE CD-ROM 를 가지고 있는 사용자라면 선택해서는 안됩니다. FX-001DE CD-ROM 은 IDE/ATAPI 방식을 지원하기 때문입니다.
< > Mitsumi [XA/MultiSession] CDROM support
-->미쯔미사에서 제작된 LU-005, FX-001, FX-001D CD-ROM 를 지원합니다. 이항목은 XA 방식이나 Photo CD 를 지원하기도 합니다.
< > Optics Storage DOLPHIN 8000AT CDROM support
-->34핀 케이블로 작동되는 DOLPHIN 의 CD-ROM 를 지원합니다.
< > Philips/LMS CM206 CDROM support
-->CM260 이라는 어댑터카드를 이용하는 필립스사의 CM206 CD-ROM 를지원해주는 기능입니다.
< > Sanyo CDR-H94A CDROM support
-->이 항목은 산요사의 CDR-H94A CD-ROM 를 지원해주는 기능입니다.
< > ISP16/MAD16/Mozart soft configurable cdrom interface support
-->ISP16, MAD16, Mozart 등의 CD-ROM 인터페이스 카드를 지원해주는 기능입니다.
< > Sony CDU31A/CDU33A CDROM support
-->예전의 SONY 사의 CD-ROM 제품군은 돌핀 제품군과 마찬가지로 34핀 케이블을 사용하였습니다. 이 제품 또한 34핀 케이블을 사용하는 SONY 사의 CDU33A CD-ROM을 지원해 주는 기능입니다.
< > Sony CDU535 CDROM support
-->SONY사의34핀케이블을사용하는CDU535및CDU-531 CD-ROM 를 지원해주는 기능입니다.
Ξ Character devices
[ ] Vitual terminal
-->여러개의 가상 터미널을 실행할수 있는 것은 아마 리눅스에서만 느낄수 있는 강력한 기능이 아닌가 한다.물론 여러개의 X 터미널도 가능하게 해줍니다.
[ ] Support for console on Vitual terminal
< > Standard/generic (dumb) Serial Support
-->일반적인 시리얼 포트를 사용가능하도록 지원해주는 기능입니다,이더넷을 통해서 웹 서버를 구축하였거나,일반 시리얼 마우스를 사용하지 않고 버스 마우스를 사용하는 사용자는 선택하지 않도록 합니다. 여기서는 시리얼 포트를 사용하는 사용자만 선택하기 바랍니다.
[ ] Support for console on Serial port
-->시스템 콘솔은 모든 커널 메시지와 경고 메시지를 수취하고 , 단독 사용자 모드에서 로그인을 허용하는 장치입니다.선택시 "console=tty3"와 같은 명령을 사용하여 시스템 콘솔로 사용할 수 있습니다.
[ ] Extended dumb Serial driver options
[ ] Support more than 4 serial ports
[ ] Support for Sharing Serial ports (unsafe)
[ ] Autodetect IRQ on Standard ports
[ ] Support special multiport boards
[ ] Support the Bell Technologies HUB6 card
[ ] Non-Standard Serial port Support
[ ] Unix98 PTY Support
(256) Maximum number of Unix98 PTYS in use (0-2048)
< > Parallel printer Support
-->25핀 짜리 패러럴 포트를 사용하는 프린터를 사용가능하도록 지원해주는 기능입니다. 여기서 주의할 점은 두개의 패러럴 포트(printer 와 PLIP)를 함께 사용하는 사용자는 이 항목과 PLIP 항목을 같이 모듈(M) 로써 설정하기 바랍니다. 두개의 패러럴 포트를 각각 따로 사용하는 사용자라면 선택합니다.
[ ] Mouse Support (not serial mice)
-->시리얼 마우스나 마이크로 호환 마우스를 사용하지 않는 버스 마우스나 PS/2 마우스 사용자에게 해당되는 사항입니다.
Mice--->
[ ] Mouse Support (not serial mouse)
-->시리얼 마우스를 제외한 장치를 사용가능케 해줍니다.
< > ATIXL busmouse support
-->이 버스마우스는 ATI 그래픽 카드의 뒷면에 꼽는 요즘은 보기 힘든 마우스입니다.
< > Logitech busmouse support
-->9핀 짜리의 로지텍 버스 마우스를 사용가능하도록 지원해주는 기능입니다.
< > Microsoft busmouse support
-->대개 확장 보드에 삽입되는 9핀 짜리의 원형 포트에 꼽히는 마이크로소프트 버스 마우스를 사용가능하도록 지원합니다.
[ ] PS/2 mouse (aka "auxiliary device") support
-->PS/2 마우스를 지원하는 항목으로, ATX 보드를 장착한 리눅스박스 라면 일반적으로 PS/2 마우스 포트를 가지고 있습니다. 원형의 6핀짜리 포트를 가진 마우스라면 PS/2 마우스입니다.
[ ] C&T 82C710 mouse port support (as on TI Travelmate)
-->PS/2 마우스의 종류인 C&T 82c710 마우스 포트를 사용가능하도록 지원해주는 기능입니다.
< > PC110 digitizar pad Support
[ ] QIC-02 tape support
-->스카시 방식이 아닌 테이프 드라이버를 사용가능하도록 지원해주는 기능입니다.
[ ] Watchdog Timer Support
-->Watchdog라는 기능을 사용가능하도록 해주는 기능입니다. 이기능은 어떠한 파일을 열거나 어떤 파일에 쓰는 일을 1분이상 실패할 경우에 자동적으로 컴퓨터를 리부팅 시키는 기술을 제공합니다.네트워크의 빠른 반응을 얻기 위해서 유용하게 쓰이는 기능중의 하나입니다.
[ ] /dev/nvram Support
-->PC에서 CMOS(BIOS)Atari Non-Volatile RAM이라 부르는 비휘발성 메모리 가운데 50bytes를 읽거나 쓸 수 있도록 한다. 하드디스크에 두기는 위험한 데이터나 전원이 꺼져도 잃어버리면 안되는 매우 중요한 데이터를 저장하는데 쓰입니다.
[ ] Enhanced Real Time Clock Support
-->소프트웨어가 컴퓨터 실시간 시계를 사용할 수 있도록 하는 기능입니다.멀티 프로세서 머신을 가지고 있고 SMP 기능을 사용한다면 선택합니다.또한 주기적인 Data Sampling 등 이 기능을 유용하게 쓸 장치가 있다면 설정합니다.
Video for Linux -->
-->FM radio card나 audio/video capture나 Overlay board를 지원해 줍니다. 자신에게 맞는 것이 있나 유심히 살펴보세요..
< >video for linux
< > AIMslab RadioTrack ( aka Radio Reveal ) support
< > AIMslab RadioTrack FF support
< > A : tech/Packard Bell Radio
< > Miro PCM20 Radio
< > Gemtek Radio Card support
< > BT848 Video For Linux
< > Modiavision Pro Movie Studio Video For Linux
< > SAA5249 TeleText processor
< > SF16FMI Radio
< > Typhon Radio ( a.k.a EcoRadio )
< > Zoltrix Radio
Joystick Support -->
-->Joystick을 이용한 신나는 게임을 사용하고픈 사용자라면
유심히 본후 선택하자..역시 잘 성공하면 다른리눅서를 위해
성공담을 댓글 달아주시면 고맙겠습니다..(^___^);;
< > Joystick support
< > Classic PC analog joysticks gamepads
< > FPGaming and MadCatz A3D controllers
< > Gravis GrIP joysticks gamepads
< > Logitech Digital joysticks gamepads
< > Microsoft SideWinder, Genius Digital joysticks and gamepads
< > ThrustMaster DirectConnect joysticks and game pads
< > PDPI Lightning 4 gamecards
< > Double talk PC internal Speech card Support
Ftape,the floppy tape device driver--->
-->플로피 컨트롤러에 연결되어 있는 테이프 드라이브를 가지고 있는 사용자라면 이 항목을 설정하기 바랍니다. 일반 사용자에게는 필요없는 항목입니다.
Ξ USB drivers - not for the faint of heart
-->이기능 역시 미래의 표준으로 자리잡아 가고 있죠.^^;;
< > Support for USB ( Expermental )
< > UHCI ( intel PIIX4 and others ) support
< > OHCI ( compaq and some others ) support
< > OHCI-HCD ( other OHCI opt,virt,Root HUb ) support
< > USB hub support
< > USB mouse support
< > USB keyboard support
< > USB audio parsing support
< > USB abstract control Model support
< > USB printer support
< > USB SCSI support
Ξ File systems
[ ] Quota support
-->사용자에게 사용할수 있는 디스크 공간을 제한할수 있는 아주 유용한 기능입니다. 웹호스팅이나 학과서버를 운영하려 한다면 선택하는 좋습니다.
< > Kernel automounter support (experimental)
-->요청에 따라 원격 파일시스템을 자동으로 마운트할수 있게 해줍니다.BSD의 amd와 다르게 매우 적은 사용자 공간을 차지하는 데몬이다. 이 기능을 사용하려 한다면 "NFS Filesystem Support"항목도 선택합니다.
< > Amiga FFS filesystem support (EXPERIMENTAL)
< > Apple Macintosh filesystem Support
< > DOS FAT fs support
-->FAT 기반의 MSDOS fs Support,VFAT(Windows-95) fs support등 MS의 파일시스템을 자주 마운트하여 사용한다면 선택합니다.대신 아래 사항을 선택해 줘야 한다. 버트, umsdos항목은 항목은 절대 선택하지 않길 바랍니다.
< > MSDOS fs support
< > umsdos: Unix like fs on top of std MSDOS FAT fs
< > VFAT (Windows-95) fs support
< > ISO9660 cdrom filesystem support
-->ISO에서 제안한 시디롬을 위한 표준 파일시스템입니다.시디롬을 자주 마운트하여 쓴다면 필수요,아니더라도 꼭 선택하길 바랍니다.
[ ] Microsoft joliet CDROM extentions
-->Microsoft에서 개발한 유니코드 형식의 긴 파일이름을 지원하는 확장 ISO 9660CDROM 파이시스템입니다.
< > Minix fs support
-->토발즈처럼 이것으로 커널공부를 시작해 볼수 있습니다.
단 아시는분만 선택하세요.
< > NTFS filesystem Support (read only)
-->Microsoft NT filesystem을 읽을수 있게 해줍니다.
[ ] NTFS read-write Support (DANGEROUS)
-->위험합니다.선택하지 마세요.
[ ] OS/2 HPFS filesystem support (read only)
-->OS/2 filesystem 을 읽을수 있게 해줍니다.
[ ] /proc filesystem support
-->커널과 프로세스를 위한 가상의 파일시스템입니다.실제로 디스트공간을 차지하지는않지만 프로세스 정보 등을 볼수 있게 해줍니다.
[ ] /dev/pts filesystem Support (readonly)
< > QNX filesystem Support
-->QNX4 운영체제에서 사용하는 파일시스템입니다.
< > ROM filesystem Support
-->주로 인스톨 디스크의 램디스크를 초기화하려는 매우 작은 읽기전용 파일시스템입니다.
< > Second extended fs Support
-->현재 리눅스에서 사용하는 파일시스템입니다.반드시 선택합니다.
< > System V and Coherent filesystem support
-->Xenia와 Cherent와 같은 인텔 기종을 위한 상용 유닉스 시스템을 지원합니다.
< > UFS filesystem support (read only)
-->BSD와 Unix에서 파생된 버전(SunOS,FreeBSD,NetBSD,OpenBSD,NextStep)들은 UFS라는 파일시스템을 사용합니다.어떤 System V 유닉스는 디스크 파티션이나 플로피 디스크에 UFS 파일시스템을 사용하기도 합니다.NFS를 사용한다면 이 옵션을 선택하면 안됩니다.
Network filesystems-->
< > Coda filesystem support ( advanced networks fs )
-->NFS와 비슷한 진보된 네트워크 파일시스템입니다.비접속 운영,캐시,보안과 인증 등 NFS보다 좋은 점이 몇가지 있읍니다.이것을 선택하면 Coda 클라이언트로 동작하며 서버와 클라이언트 모두 지원해야 합니다.
< > NFS filesystem support
-->네트워크 파일시스템을 지원합니다.
< > SMB filesystem support (to mount WfW shares etc.)
-->리눅스에서 MS windows 95,98/NT 네트워크 자원을 공유할수 있게 해주는 기능입니다.NT와 windows 95,98 함께 네트워크를 사용한다면 유용하게 쓰입니다.
< > NCP filesystem support(to mount NetWare volumes)
-->NCP(Netware Core Prptocol)은 IPX 를 이용한 랜 프로토콜입니다.
[ ] Packet signatures
-->NCP에 보안을 강화시켜 주는 기능을 제공합니다.
[ ] Proprietary file Locking
-->리모트 볼륨상에 레코드를 locking합니다.
[ ] Clear remove/delete inhibit when neede
-->파일 플래그 조작을 허용합니다.
[ ] Use NFS namespace if available
[ ] Use long ( os/2 ) namespace if available
[ ] Allow mouthing of volume subdirectories
[ ] Use Native language Support
[ ] Enale symbolic links and Execute flags
Partition Types ->
[ ] BSD disklabel ( BSD partiton tables ) support
[ ] Macintosh partition map Support
[ ] SMD disklabel ( sun partition tables ) support
[ ] Solaris ( X86 ) partition table support
[ ] SGI disklabel support
Native Language Support -->
-->아쉽게도 아직한국어의 지원이 없습니다.한글 코드페이지를 949를 사용하려면 패치를 수행해야 합니다.
Ξ Consoledrivers
[ ] VGA text console
[ ] Video mode Selection Support
Ξ Sound
< > Sound card support
-->자신의 리눅스박스에 사운드 카드가 있다면 선택합니다.
< > C-media PCI (CMI8338/8378 )
< > Ensoniq AudioPCI
< > Creative Ensoniq AudioPCI 97 (ES1371)
< > S3 SonicVibes
< > Support for Turtle Beach MutiSound Classic, Tahiti , Monterey
< > Support for Turtle Beach MutiSound Pinnacle, Fiji
< > OSS sound modules
-->OSS(Ooen Sound System)사운드 카드 드라이버 모음입니다.
선택시 아래아 같이 다양한 항목이 나옵니다.
< > ProAudioSpectrum 16 support
-->ProAudioSpectrum 16, ProAudio Studio 16,Logitec SoundMan 16 사운드 카드를 리눅스에서 사용가능하도록 지원해주는 기능입니다. Media Vision 또는 Logitec 에서 나오는 다른 사운드 카드를 가지고 있는 사용 자라면 선택합니다.버트, PAS16 과 호환되지 않습니다.
< > 100% Sound Blaster compatibles (SB16/32/64,ESS,Jazz16) support
-->사운드 카드중에서 가장 일반적으로 사용되는 사운드 블라스터와 사운드 블라스터 호환 사운드 카드를 설정하는 항목입니다. 자신의 사운드 카드가 사운드 블라스터 이거나 사운드 블라스터호환이라고 생각되면 선택합니다.
< > Generic OPL2/OPL3 FM synthesizer support
-->사운드 카드가 야마하사에서 만든 FM 칩을 가지고 있는 사용자라면 선택한다. 대부분의 사운드 카드는 야마하의 FM 칩을 사용하며, 사운드 블라스터 계열의사운드 카드는 기본적으로 들어있는 칩입니다. 사운드 블라스터 나 사운드 블라스터 호환 사운드 카드를 가진 사용자라면 선택 합니다.
< > Gravis Ultrasound support
-->Gravis Ultrasound card를 사용가능하게 해줍니다.
< > MPU-401 support (NOT for SB16)
-->사운드 카드의 미디 인터페이스인 MPU-401 을 지원하는 기능인데, 거의 모든
사운드 카드가 이 인터페이스를 채택하고 있읍니다. 그렇다고 해서 무조건 선택해서는 안됩니다, 진짜로 MPU-401 미디 카드가 있는 사운드 카드를 가지고 있는 사용자만 선택합니다. 사운드 블라스터 계열 가지고 있다면 선택하면 안됩니다.
< > PSS (AD1848,ADSP-2115,ESC614) support
-->PSS 칩에 기반을 둔 Orchid SW32, Cardinal DSP16 사운드 카드를 사용가능하도록 지원해주는 기능입니다.
< > Microsoft Sound System support
-->사운드 블라스터 사용자라면 주의를 기울여야 하는 부분입니다. 사운드 블라스터 계열 중 마이크로 소프트 사운드 시스템을 지원하는 사운드 카드를 가지고 있는 사용자라면 이 항목을 선택하기 바랍니다.이유는 사운드 블라스터 항목을 선택하게 되면 사운드는 8Bit 로 작동하게 되고, 이항목을 선택하면 16Bit 로 작동하게 됩니다. 사운드 블라스터 항목과 이 항목을 같이 선택할수는 없읍니다. 사운드 블라스터 계열의 사운드 카드를 가지고 있는 사용자는 일단 매뉴얼을 유심히 보고 나서 자신이 마이크로 소프트 사운드 시스템을 지원한다고 확신이서면 이 항목을 선택하기 바랍니다.
< > Ensoniq SoundScape support
--> Ensoniq SoundScape 칩셋에 기반을 둔 사운드 카드를 지원합니다.
< > MediaTrix AudidTric Pro support
--> MediaTrix AudioTrix Pro 사운드 카드를 사용가능 하도록 지원해주는 기능입니다.
< > Support for OPTi MAD16 and/or Morzart based cards
-->Mozart(Oak OTi-601) 이나 MAD16(OPTi 82C928/82C929) 칩셋을 기반으로 하는 사운드 카드를 사용가능하도록 해줍니다.
< > Full support for Turtle Beach WaveFront (Tropez Plus, Tropez)
< > Support for Crystal CS4232 based (PnP) cards
-->Crystal CS4232 칩셋을 기반으로 하는 사운드 카드를 사용가능하도록 지원해주는 기능입니다.
< > Support for Aztech Sound Galaxy (non-PnP) cards
< > Limited support for Turtle Beach Wave Front (Maui,Tropez)
< > Support for Aztech Sound Galaxy (non-PnP) cards
< > Yamaha OPL3-SA1 audio controller
< > SoftOSS software wave table engine
< >FM synthesizer(YM3812/OPL-3 ) support
-->이 항목은 FM 신서시저를 사용가능하도록 지원해주는 기능입니다. 선택합니다.
< > Loopback MIDI device support
-->MIDI는 FM과 다르게 실제 소리를 음원으로 합니다./dev/sequencer 와 /dev/music 을 이용한 MIDI포트의 접속과 /dev/midixx를 사용하지 않을 거라면 선택하지 않는게좋습니다.
< > 6850 UART support
Additional low level sound drivers --->
< > Additional low level sound drivers
-->추가적인 기본등급 드라이버를 사용할 것 인가를 설정하는 기능입니다. AWE사운드 블라스터를 사용한다면 선택합니다.
< > ACI mixer (microPCM12)
-->이 항목은 ACI 믹서를 사용가능하도록 지원해주는 기능입니다. ACI 믹서를 지원하도록 설정하려면 선택합니다.
< > AWE32 synth
-->사운드 블라스터의 AWE32 신디 사운드를 사용할수 있게 지원해주는 기능입니다. 자신의 사운드 카드가 AWE 지원 사블을 가지고 있다면 선택합니다. 또한, Emu8k 도 지원합니다.
< > Gallant Audio Cards (SC-6000 and SC-6600 based )
Ξ Kernel hacking
[ ] Kernel profiling support
-->이 항목을 설정하면 커널에서 이루어지는 모든 절차들이
/proc 라는 디렉토리에 profile 이라는 파일로써 저장되어
파일을 읽어서 절차들을 확인할수 있게 해줍니다.
커널의 내부 구조를 알고 싶은 사용자라면 선택해봅니다.
---------------------------
1. JDK 설치
1.1 다운로드
--------------------------
http://java.sun.com
--------------------------
에서 java se 버전 다운로드
# ls
jdk-6u12-linux-i586.bin
1.2. JDK 설치 파일 실행
# sh jdk-6u12-linux-i586.bin
..
more
...
[yes] 입력
..
Done.
# mv jdk-6u12-linux-i586.bin /usr/local
# cd /usr/local
# ls
# ln -s /usr/local/jdk1.6.0_12/ java <링크생성>
1.3. /etc/profile 에 환경변수 등록
# vi /etc/profile < 환경 변수 등록>
..
# SET JAVA ENV
export JAVA_HOME=/usr/local/java
export PATH=$PATH:$JAVA_HOME/bin
export CLASSPATH=.$JAVA_HOME/jre/lib/ext:$JAVA_HOME/lib/tools.jar
..
# source /etc/profile < 현재 쉘에 바로 적용 >
# javac
Usage: javac <options> <source files>
where possible options include:
-g Generate all debugging info
-g:none Generate no debugging info
-g:{lines,vars,source} Generate only some debugging info
.. < 정상 등록되었음 >
# env
/usr/local/java/bin
JAVA_HOME=/usr/local/java
CLASSPATH=./usr/local/java/jre/lib/ext:/usr/local/java/lib/tools.jar
2. Tomcat 설치
2.1. Tomcat 다운로드 및 설치
---------------------------------
http://tomcat.apache.org
---------------------------------
< 현재 6.x 버전 까지 나와있으나 안정화 버전인 5.x 버전을 다운로드 >
< tomcat 서버는 압축 해제가 바로 서버 설치와 같다.>
# pwd
/usr/local
# wget http://mirror.khlug.org/apache/tomcat/tomcat-5/v5.5.27/bin/apache-tomcat-5.5.27.tar.gz
# ls
apache-tomcat-5.5.27.tar.gz
# tar -xvzf apache-tom*
# cd apache-to*
# ls
LICENSE RELEASE-NOTES bin conf server temp work
NOTICE RUNNING.txt common logs shared webapps
# ln -s /usr/local/apache-tomcat-5.5.27 /usr/local/tomcat
2.2 /etc/profile 에 환경변수 등록
# SET JAVA ENV
export JAVA_HOME=/usr/local/java
export CATALINA_HOME=/usr/local/tomcat
export PATH=$PATH:$JAVA_HOME/bin:$CATALINA_HOME/bin
export CLASSPATH=.$JAVA_HOME/jre/lib/ext:$JAVA_HOME/lib/tools.jar:$CATALINA_HOME
/common/lib/jsp-api.jar:$CATALINA_HOME/common/lib/servlet-api.jar
# source /etc/profile
# env
:/usr/local/tomcat/bin
:/usr/local/tomcat/common/lib/jsp-api.jar:/usr/local/tomcat/common/lib/servlet-api.jar
2.3. Tomcat 서버 시작
# /usr/local/tomcat/bin/startup.sh
Using CATALINA_BASE: /usr/local/tomcat
Using CATALINA_HOME: /usr/local/tomcat
Using CATALINA_TMPDIR: /usr/local/tomcat/temp
Using JRE_HOME: /usr/local/java
# ps -ef | grep tomcat
root 24200 1 2 06:54 pts/2 00:00:02 /usr/local/java/bin/java -Djava.util.logging.config.file=/usr/local/tomcat/conf/logging.properties -Djava.util.logging.manager=org.apache.juli.ClassLoaderLogManager -Djava.endorsed.dirs=/usr/local/tomcat/common/endorsed -classpath :/usr/local/tomcat/bin/bootstrap.jar:/usr/local/tomcat/bin/commons-logging-api.jar -Dcatalina.base=/usr/local/tomcat -Dcatalina.home=/usr/local/tomcat -Djava.io.tmpdir=/usr/local/tomcat/temp org.apache.catalina.startup.Bootstrap start
root 24255 3559 0 06:55 pts/2 00:00:00 grep tomcat
# /usr/local/tomcat/bin/shutdown.sh
Using CATALINA_BASE: /usr/local/tomcat
Using CATALINA_HOME: /usr/local/tomcat
Using CATALINA_TMPDIR: /usr/local/tomcat/temp
Using JRE_HOME: /usr/local/java
# /usr/local/tomcat/bin/startup.sh
Using CATALINA_BASE: /usr/local/tomcat
Using CATALINA_HOME: /usr/local/tomcat
Using CATALINA_TMPDIR: /usr/local/tomcat/temp
Using JRE_HOME: /usr/local/java
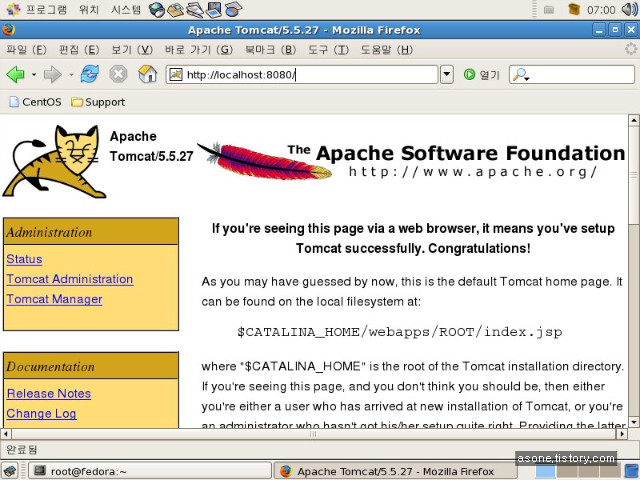
2.4. 웹브라우저 확인
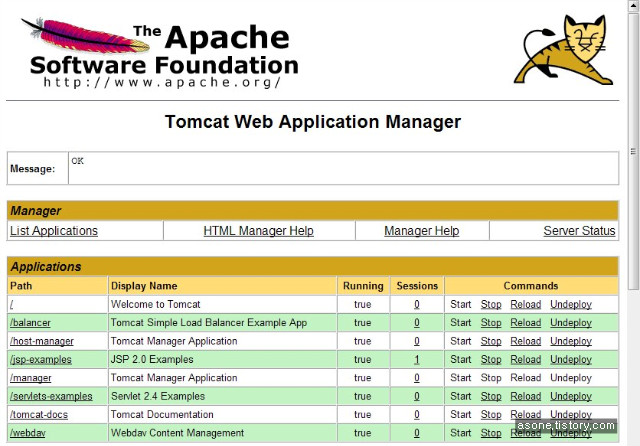
2.5. Tomcat manager 접속
2.5.1 환경설정
# vi /usr/local/tomcat/conf/tomcat-users.xml
<?xml version='1.0' encoding='utf-8'?>
<tomcat-users>
<role rolename="tomcat"/>
<role rolename="role1"/>
<role rolename="admin"/>
<role rolename="manager"/>
<user username="admin" password="passwd" roles="admin,manager"/>
<user username="tomcat" password="tomcat" roles="tomcat"/>
<user username="both" password="tomcat" roles="tomcat,role1"/>
<user username="role1" password="tomcat" roles="role1"/>
</tomcat-users>
2.5.2. 톰캣서버 재시작 (스톱 -> 시작) 스크립트 실행>
# /usr/local/tomcat/bin/shutdown.sh
Using CATALINA_BASE: /usr/local/tomcat
Using CATALINA_HOME: /usr/local/tomcat
Using CATALINA_TMPDIR: /usr/local/tomcat/temp
Using JRE_HOME: /usr/local/java
# /usr/local/tomcat/bin/startup.sh
Using CATALINA_BASE: /usr/local/tomcat
Using CATALINA_HOME: /usr/local/tomcat
Using CATALINA_TMPDIR: /usr/local/tomcat/temp
Using JRE_HOME: /usr/local/java
#
2.5.3 웹브라우저 확인
첫페이지의 Tomcat manager << 항목에서 확인할 수 있다.
tomcat 서버의 전반적인 상황을 파악할 수 있다. <server status>
2.6. JSP 간단 테스트
# pwd
/usr/local/apache-tomcat-5.5.27/webapps
# mkdir home
# cd home/
# pwd
/usr/local/apache-tomcat-5.5.27/webapps/home
# cp -R ../ROOT/WEB-INF ./
# vi time.jsp
<%@ page contentType="text/html; charset=utf-8" %>
<%@ page import="java.util.Date" %>
<%
Date nowTime = new Date();
%>
<html>
<head>
<title>JSP time test</title>
</head>
<body>
NOw Time is <%= nowTime %>
</body>
</html>
2.6.1. tomcat server 재시작
2.6.2. 웹브라우저 확인


MB “닌텐도 만들라” 지시에 네티즌 ‘명텐도 MB’ 초광속 출시… 온라인 ‘폭소’
다음 아고라 펌 : http://bbs1.agora.media.daum.net/gaia/do/debate/read?bbsId=D115&articleId=541186&pageIndex=1&searchKey=subjectNcontent&searchValue=명텐도&sortKey=depth&limitDate=0&agree=F
촛불 든 이명박, 누리꾼에게 딱 걸렸다
2008년 7월 4일(금) 오후 4:54 [오마이뉴스]
 | ||||
이명박 대통령이 촛불시위를 하는 장면의 <오마이뉴스> 사진이 다음 아고라 등 인터넷에서 화제가 되고 있다. 이 대통령 외에도 박근혜 전 대표를 비롯한 한나라당 의원들도 다수 참여했다. 공교롭게도 촛불시위를 벌인 곳도 서울시청 앞 광장이다.
3년 전인 2005년 12월 16일 한나라당은 개정 사학법 통과를 규탄하며 국회 등원을 거부하고 장외투쟁에 나섰다. 당시 1만5000여 명이 모였던 '사학법 원천무효 및 아이지키기운동 범국민대회'에는 서울시장이었던 이 대통령과 한나라당 지도부외에도 이혜훈·박진·이규택·전여옥·나경원 의원 등이 동참했다. 이들은 시민들과 가두행진에 나서기도 했다.
그 곳에는 지난달 30일 "불법 폭력시위는 공동체의 평화와 이익을 깎아내리는 해충"이라고 발언했던 강재섭 전 한나라당 대표도 있었고, 지난달 24일 국무회의에서 "국가정체성에 도전하는 시위나 불법 폭력 시위는 엄격히 구분해 대처해야 한다"고 했던 이 대통령도 있었다.
 | ||||
 | ||||
정권퇴진 촛불, 뉴라이트가 먼저 들었다
이날 집회에서 뉴라이트전국연합 상임의장이었던 김진홍 목사는 "우리 종교계는 이 법의 불복종 운동을 벌이고 있다"며 "정권퇴진 운동으로까지 갈 수 있다"고 경고하기도 했다.
서울시장이던 이명박 대통령도 연단에 올라 "사학법을 지금 이 시점에서 그렇게 처리할만큼 급한 것인지 모르겠다"며 "사학법 말고도 서민들의 어려움을 해결하기 위해서 해야 할 일이 많은데 무엇이 급해서 날치기 통과시켜야 했나 하는 의문이 생긴다"고 목소리를 높였다.
또한 그는 "사학에 관한 모든 것을 나라가 간섭한다면 자유민주주의가 아니다. 사학에 문제가 있다면 지금 법으로도 해결할 수 있는 데 재단 이사까지 이래라 저래라 하는 나라는 지구상에 없다"고 말했다. (☞ [관련기사] 박근혜 "현정권은 나라 무너뜨리는 파괴정권")
누리꾼 '하니'는 자신의 블로그에서 당시 이 대통령의 발언을 인용해 지금의 상황을 꼬집었다.
"쇠고기협상과 한미FTA 비준을 지금 이 시점에서 그렇게 처리할 만큼 급한 것인지 모르겠다. 한미FTA 말고도 서민들의 어려움을 해결하기 위해서 해야 할 일이 많은데 무엇이 급해서 졸속적으로 추진해야 했나하는 의문이 생긴다. 또 언론에 관한 모든 것을 대통령이 간섭한다면 자유민주주의가 아니다. 방송에 문제가 있다면 지금 법으로도 해결할 수 있는 데 방송사 사장까지 이래라 저래라 하는 민주국가는 지구상에 없다."
당시 한나라당의 장외투쟁은 성공했다. 열린우리당은 한나라당의 개정사학법 재개정에 합의하고 쟁점이 됐던 개방형 이사제와 관련해 한나라당과 사학들의 요구를 대폭 수용했다.
그러나 3년 후인 2008년 7월 한나라당의 모습은 어떠한가.
야간 시위는 불법? 대통령부터 '민사상 책임' 질 판
임태희 한나라당 정책위의장은 2일 당정회의 브리핑에서 "불법 폭력시위는 형사뿐만 아니라 민사상 책임을 반드시 묻겠다"고 했다. 천주교·기독교·불교 등 종교계가 촛불집회에 가세하면서 잠시 주춤했지만, 다시금 강경대응 방침을 밝힌 것이다.
임 의장은 "외견상 평화적 시위라고 해도 야간에 시위를 하거나 도로점거 행위는 불법"이라며 "불법임을 명확히 고지하고, 거기에 참가한 분에게도 명확한 법의 내용을 알려드리고 대처할 것"이라고 강력대응의 근거까지 제시했다.
3년 전 한나라당이 들었던 '촛불'과 지금 국민들이 들고 있는 '촛불'의 본질은 분명히 다르다. 그러나 겉으로 보이는 시위나 의사전달 방식 등은 크게 다르지 않다. 그들도 야간에 촛불집회를 했고, 정권퇴진을 경고하며 가두행진에 나섰다.
지난 3일 MBC <100분 토론>에서도 이같은 사실이 지적됐다. 시민패널로 참석한 김미영씨는 3년 전 한나라당의 개정사학법 통과 규탄 촛불집회를 지적하면서 "왜 촛불에게만 책임을 묻냐"고 질문하자, 장윤석 의원(한나라당)은 "그 때는 잘못된 사학법 추진을 국민들에게 알리기 위해서 장외투쟁 한 것"이라며 "당시 정부가 한나라당의 요구를 받아들이지 않았다고 해서 퇴진하라는 주장을 하지 않았다"고 변명했다.
누리꾼들도 한나라당과 정부에 대해 비판을 쏟아내고 있다.
당시 촛불집회에 참석했던 이 대통령과 한나라당 의원들의 모습이 담긴 <오마이뉴스> 사진이 다음 아고라 자유토론방에 게시돼 "저 때는 소화기나 물대포 사용하지 않나", "저들의 배후가 궁금하다" 등 누리꾼들의 비난 댓글이 계속 달리고 있다.
[☞ 오마이 블로그] [☞ 오마이뉴스E 바로가기] [☞ 촛불문화제 특별면]
- Copyrights ⓒ 오마이뉴스, 무단 전재 및 재배포 금지 -
펌짐 : 좀 봐주세요 ''ㅋ
■ NFS 패키지 준비
portmap-4.0-65.2.2.1
# rpm -qa nfs-utils
nfs-utils-1.0.9-24.el5
만약 없다면
# yum install portmap nfs-utils
■ NFS 서버의 공유목록 관리
# vi /etc/exports
/share 192.168.10.30(rw,sync)
#/share 폴더를 해당 아이피에만 read write할 수 있게 .
■ /etc/exports 파일 설정 형식
[형식]
공유디렉토리 접근 호스트(옵션)
[옵션]
rw : 읽기 쓰기
ro : 읽기만 가능
secure : 클라이언트 마운트 요청시 포트를 1024 이하
noaccess : 엑세스 거부
root_squach : 클라이언트의 root가 서버의 root권한을 획득하는 것을 막는다.
sync : 파일 시스템 변경시 즉시 동기화
■ NFS 사용
# /etc/init.d/portmap start
portmap (을)를 시작 중: [ OK ]
# /etc/init.d/nfs start
NFS 서비스를 시작 중: [ OK ]
NFS 쿼터를 시작 중: [ OK ]
NFS 데몬을 시작 중: [ OK ]
NFS mountd를 시작 중: [ OK ]
■ NFS 부팅시 자동시작
# chkconfig nfs on
# chkconfig --list | grep nfs
nfs 0:off 1:off 2:on 3:on 4:on 5:on 6:off
■ 공유목록 확인
# exportfs -v
/share 192.168.10.30(rw,wdelay,root_squash,no_subtree_check,anonuid=65534,anongid=65534)
nfs 서버 다시 시작않고 공유목록 수정
-a : /etc/exports 파일 load
-r : /etc/exports 파일 reload
-u IP:/디렉토리 : 입력한 디렉토리를 공유목록에서 제외
-v : 현재의 공유목록 확인
■ 클라이언트에서 확인
[nfs server]
# touch /share/hello.txt
[client]
# mkdir /mnt/nfs
# mount -t nfs 192.168.10.10:/share /mnt/nfs
# ls /mnt/nfs
hello.txt
■ 마운트 확인
# cat /etc/mtab
192.168.10.10:/share /mnt/nfs nfs rw,addr=192.168.10.10 0 0 < 정상 마운트 >
부팅시 자동마운트 하고 싶다면
#vi /etc/fstab에 추가 해주면 된다.
■ 아파치 서버 설정
■ 설치전 준비 사항
0. php
0. mysql
0. gcc 관련 패키지
0. libjpeg , libpng , freetype , gd
■ 소스 다운로드
// 아파치
www.apache.org --> http server --> from a mirror --> unix source
# cd /usr/src
# wget http://mirror.apache-kr.org/httpd/httpd-2.2.11.tar.gz
// php
www.php.net --> downloads --> php 5.x.x -
# wget http://kr2.php.net/get/php-5.2.8.tar.gz/from/this/mirror
// mysql
www.mysql.org or mysql.com --> downloads --> Compressed GNU TAR archive (tar.gz)
--> pick a mirror -- >
# wget http://dev.mysql.com/get/Downloads/MySQL-5.1/mysql-5.1.30.tar.gz/from/http://mysql.byungsoo.net/
# ls -l
-rw-r--r-- 1 root root 6806786 12월 13 23:35 httpd-2.2.11.tar.gz
-rw-r--r-- 1 root root 29050568 11월 20 08:19 mysql-5.1.30.tar.gz
-rw-r--r-- 1 root root 12427411 12월 8 04:43 php-5.2.8.tar.gz
■ 라이브러리, 컴파일러 확인
# rpm -qa gcc* cpp* compat-gcc* flex*
gcc-c++-4.1.2-42.el5
gcc-objc++-4.1.2-42.el5
gcc-objc-4.1.2-42.el5
compat-gcc-34-3.4.6-4
gcc-java-4.1.2-42.el5
flex-2.5.4a-41.fc6
cpp-4.1.2-42.el5
compat-gcc-34-g77-3.4.6-4
gcc-gfortran-4.1.2-42.el5
gcc-4.1.2-42.el5
gcc-gnat-4.1.2-42.el5
# yum -y install libjpeg-devel libpng-devl freetype-devel gd-devel
# rpm -qa libjpeg* libpng* freetype* gd-*
libpng-1.2.10-7.1.el5_0.1
libjpeg-6b-37
gd-devel-2.0.33-9.4.el5_1.1
libjpeg-devel-6b-37
freetype-devel-2.2.1-20.el5_2
freetype-2.2.1-20.el5_2
libpng-devel-1.2.10-7.1.el5_0.1
■ MySQL 설치
# useradd -M -s /bin/false mysql
# ./configure \
--prefix=/usr/local/mysql \
--with-charset=utf8 \
--with-extra-charsets=all
....
MySQL has a Web site at http://www.mysql.com/ which carries details on the
latest release, upcoming features, and other information to make your
work or play with MySQL more productive. There you can also find
information about mailing lists for MySQL discussion.
hints about installing MySQL on your platform. Also have a look at the
files in the Docs directory.
# make && make install
....
# echo $?
0
#
// 환경 설정파일 복사 , 소스 폴더내에 있다.
my-large.cnf 512M
my-medium.cnf 128M~ 256M
my-small.cnf 64M 이하
초기 샘플 파일에 대해서..
vmware상에서 구현중 메모리 512로 잡고 하지만 vmware상 문제인지 small외에 사용하면
아래 install db가 되지 않는다.
또한 mysqld 시작시 위 파일들 때문에 시작이 안된다.. 혹시 안되는 분들이 있다면
rm -f /etc/my.cnf 하고 작업을 진행 하길. 문제 해결을 위해 검색 중이나
마땅히 해결책이 보이질 않고 있음..(vmware상의 문제로 보여짐)
// 기본 DB생성
# cd bin
# ls
# ./mysql_install_db --user=mysql
Installing MySQL system tables...
OK
Filling help tables...
OK
To start mysqld at boot time you have to copy
support-files/mysql.server to the right place for your system
PLEASE REMEMBER TO SET A PASSWORD FOR THE MySQL root USER !
To do so, start the server, then issue the following commands:
/usr/local/bin/mysqladmin -u root password 'new-password'
/usr/local/bin/mysqladmin -u root -h fedora password 'new-password'
Alternatively you can run:
/usr/local/bin/mysql_secure_installation
which will also give you the option of removing the test
databases and anonymous user created by default. This is
strongly recommended for production servers.
See the manual for more instructions.
You can start the MySQL daemon with:
cd /usr/local ; /usr/local/bin/mysqld_safe &
You can test the MySQL daemon with mysql-test-run.pl
cd /usr/local/mysql-test ; perl mysql-test-run.pl
Please report any problems with the /usr/local/bin/mysqlbug script!
The latest information about MySQL is available at http://www.mysql.com/
Support MySQL by buying support/licenses from http://shop.mysql.com/
# echo $?
0
# chown -R mysql:mysql .
// 환경변수 등록
# vi ~/.bash_profile
PATH=$PATH:$HOME/bin:/usr/local/mysql/bin
# source ~/.bash_profile < 로긴 과정 없이 적용 >
//자동실행 설정
# cp share/mysql/mysql.server /etc/init.d/mysqld
# chkconfig --add mysqld
# chkconfig --list mysqld
// mysqld 시작
# /etc/init.d/mysqld start
Starting MySQL. [ OK ]
# mysql
Welcome to the MySQL monitor. Commands end with ; or \g.
Your MySQL connection id is 1
Server version: 5.1.30 Source distribution
Type 'help;' or '\h' for help. Type '\c' to clear the buffer.
mysql> exit
Bye
// 암호 설정
# mysqladmin -u root password ****
# # mysql -u root -p
Enter password:
Welcome to the MySQL monitor. Commands end with ; or \g.
Your MySQL connection id is 4
Server version: 5.1.30 Source distribution
Type 'help;' or '\h' for help. Type '\c' to clear the buffer.
mysql> exit
■ APACHE 설치
# ls
httpd-2.2.11.tar.gz
# tar xvfz httpd-2.2.11.tar.gz
# cd httpd-2.2.11
# ls
# ./configure --prefix=/usr/local/apache --enable-mods-shared=all --enable-so --enable-rewrite
// prefix ( 위치 ), enable-mods-shared=all (모든 모듈을 DSO로)
// enable-so (DSO 모드 활성)
// enable-rewrite ( URL 재작성 모듈 활성)
# echo $?
# make && make install
# echo $?
■ 자동실행 스크립트 정의
# chkconfig --add httpd
안됨
# vi /etc/init.d/httpd
#!/bin/sh
# chkconfig: 2345 90 90
# description: init file for Apache server daemon
# processname: /usr/local/apache/bin/apachectl
# config: /usr/local/apache/conf/httpd.conf
# pidfile: /usr/lcoal/apache/logs/httpd.pid
....
# chkconfig --add httpd
# chkconfig --list httpd
httpd 0:off 1:off 2:on 3:on 4:on 5:on 6:off
■ httpd.conf 환경 설정
#ServerName << 주석 해체
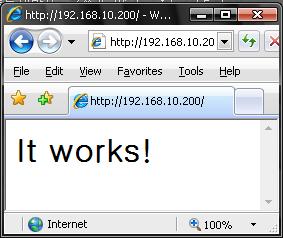
# /etc/init.d/httpd restart
웹브라우저에서 접속 테스트
■ PHP 설치
# ls
php-5.2.8.tar.gz
# tar xvzf php-5.2.8.tar.gz
# cd php-5.2.8
# ./configure --prefix=/usr/local/php --with-apxs2=/usr/local/apache/bin/apxs --with-mysql=/usr/local/mysql --with-config-file-path=/usr/local/apache/conf --disable-debug --enable-safe-mode --enable-track-vars --enable-sockets --enable-mod-charset --with-charset=utf8 --with-xml --with-language=korean --enable-mailparse --enable-calendar --enable-sysvsem=yes --enable-sysvshm=yes --enable-ftp --enable-magic-quotes --enable-gd-native-ttf --enable-url-includes --enable-trans-id --enable-inline-optimization --enable-bcmath --with-jpeg --with-png --with-zlib --with-jpeg-dir=/usr --with-png-dir=/usr/lib --with-freetype-dir=/usr --with-libxml-dir=/usr --enable-exif --with-gd --with-ttf --with-gettext --enable-sigchild --enable-mbstring
with-apxs2 (아파치의 apxs를 이용해 아파치에 모듈적재)
with-mysql (mysql과 연동)
with-config-file-path ( php 의 환경설정 파일인 php.ini가 생성될 위치)
이하 라이브러리 포함 위치
....
+--------------------------------------------------------------------+
| License: |
| This software is subject to the PHP License, available in this |
| distribution in the file LICENSE. By continuing this installation |
| process, you are bound by the terms of this license agreement. |
| If you do not agree with the terms of this license, you must abort |
| the installation process at this point. |
+--------------------------------------------------------------------+
--with-charset=utf8
--with-xml
--with-language=korean
--enable-mailparse
--enable-calender
--enable-url-includes
--enable-trans-id
--with-jpeg
--with-png << 없는 옵션일 경우 출력됨
# echo $?
0
# make && make install
<IfModule dir_module>
DirectoryIndex index.html index.html index.php
</IfModule>
<IfModule mime_module>
AddType application/x-httpd-php .php
AddType application/x-httpd-php-source .phps
</IfModule>
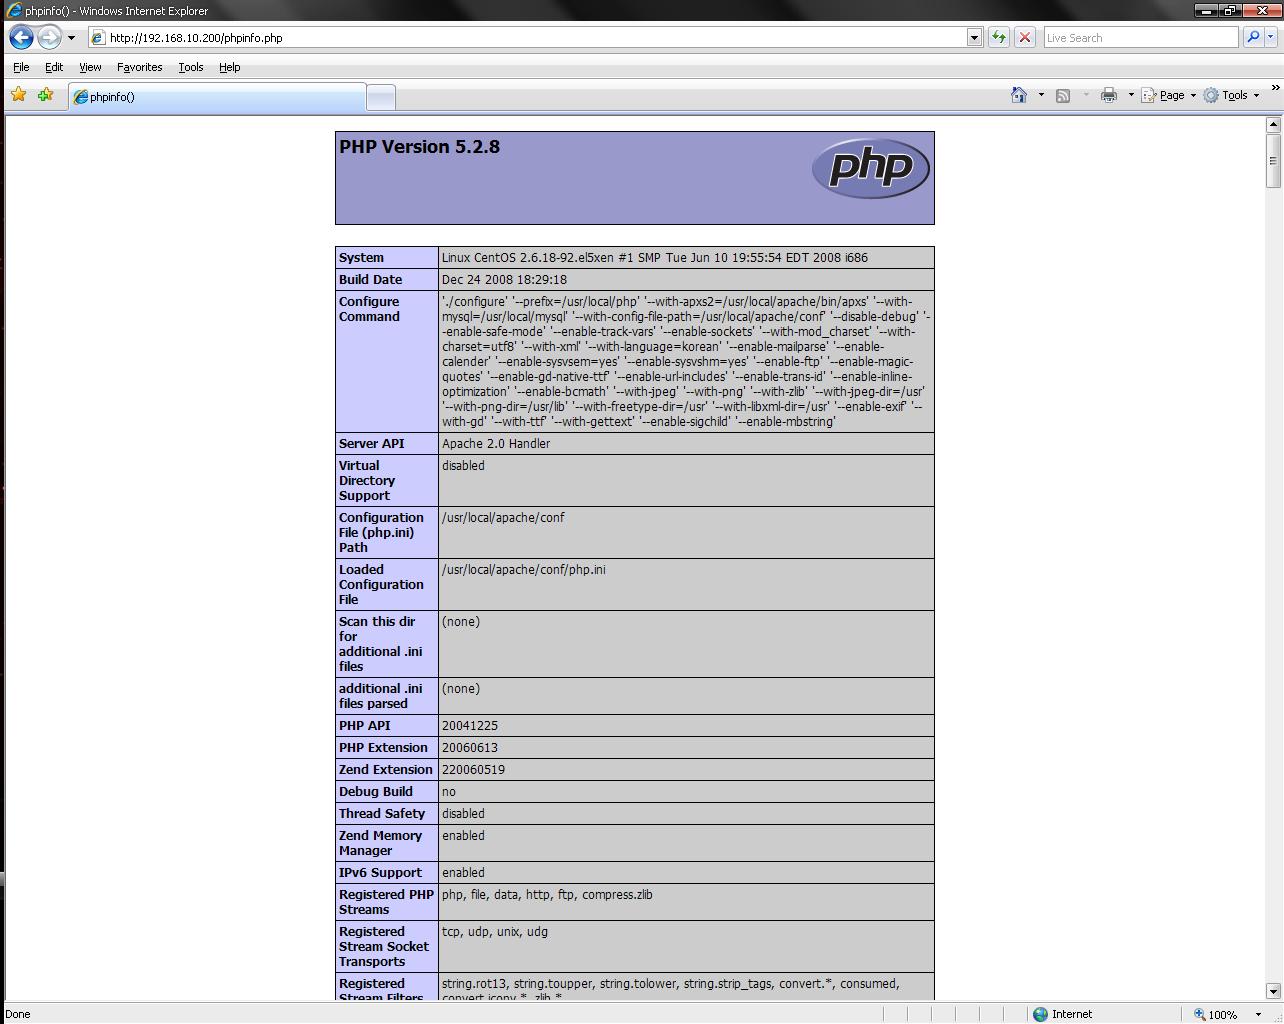
# vi /usr/local/apache/htdocs/phpinfo.php
<? phpinfo(); ?>
# /etc/init.d/httpd restart
웹브라우저에서 확인
■ apache 환경 설정 ( # vi /usr/local/bin/apache/conf/httpd.conf )
# 아파치 웹서버가 설치된 디렉토리
# 아파치가 사용할 포트번호
LoadModule authn_dbm_module modules/mod_authn_dbm.so
LoadModule authn_anon_module modules/mod_authn_anon.so
# 아파치에 등록된 모듈목록
<IfModule !mpm_winnt_module>
User daemon
Group daemon
</IfModule>
</IfModule>
# 아파치 데몬은 root권한 그 자식 프로세스는 위에서 지정된 이름으로 실행된다.
# 아파치서버의 웹문서가 있는 경로 설정
Options FollowSymLinks
AllowOverride None
Order deny,allow
Deny from all
</Directory>
# 해당 디렉토리 이하의 웹문서를 어떻게 제어할 것인가를 설정
<IfModule dir_module>
DirectoryIndex index.html index.html index.php
</IfModule>
# 클라이언트가 파일이름없이 접근시 나열된 파일을 순서대로 검색하여 보여준다.
<FilesMatch "^\.ht">
Order allow,deny
Deny from all
Satisfy All
</FilesMatch>
# 특정한 파일형식을 정규표현식으로 지정해서 해당 파일에 대한 접근 제어을 설정할때 사용
ErrorLog "logs/error_log"
# 에러로그파일 위치
LogLevel warn
# 에러로그레벨 지정
<IfModule log_config_module>
LogFormat "%h %l %u %t \"%r\" %>s %b \"%{Referer}i\" \"%{User-Agent}i\"" combined
LogFormat "%h %l %u %t \"%r\" %>s %b" common
LogFormat "%h %l %u %t \"%r\" %>s %b \"%{Referer}i\" \"%{User-Agent}i\" %I %O" combinedio
</IfModule>
CustomLog "logs/access_log" common
</IfModule>
# 웹서버 로그 포멧 지정
<IfModule alias_module>
ScriptAlias /cgi-bin/ "/usr/local/apache/cgi-bin/"
</IfModule>
# Redirect지시어는 앞에 지정한 주소로 접속하면 뒤에 지정한 URL로 이동한다.
# Alias 지시어는 경로를 짧게 줄이거나 DocumentRoot 외에 다른곳에 있는 디렉토리 접근
# ScriptAlias 는 서버 스크립트를 포함한다.
<IfModule cgid_module>
#Scriptsock logs/cgisock
</IfModule>
# CGI 데몬과 통신을 위해 사용할 소켓의 이름 지정
<Directory "/usr/local/apache/cgi-bin">
AllowOverride None
Options None
Order allow,deny
Allow from all
</Directory>
# cgi 스크립트가 있는 디렉토리의 설정내용
DefaultType text/plain
# 웹서버가 데이터를 전송하는 문서 형식 지정, mime.types파일에 정의되지않는 형식을 표시
<IfModule mime_module>
TypesConfig conf/mime.types
# 웹서버의 mime type을 지정한 파일을 지정
# Addtype 특정 확장자 지정
# AddEncoding 특정 확장자를 가진 파일을 특정 형식으로 인코딩
# AddHandler 특정 확장자를 가진 파일의 핸들러를 지정한다.
#AddType application/x-gzip .tgz
#AddEncoding x-compress .Z
#AddEncoding x-gzip .gz .tgz
AddType application/x-compress .Z
AddType application/x-gzip .gz .tgz
AddType application/x-httpd-php .php
AddType application/x-httpd-php-source .phps
#AddHandler cgi-script .cgi
# For type maps (negotiated resources):
#AddHandler type-map var
#AddType text/html .shtml
#AddOutputFilter INCLUDES .shtml
</IfModule>
#MIMEMagicFile conf/magic
# RFC 형식이 지정되어있지 않을때 파일의 내용을 통해 자동적으로 결정하게 되는데 해당 지시어를 # 통해서 conf/magic 파일을 힌트 삼아서 문서 형식을 결정
#ErrorDocument 500 "The server made a boo boo."
#ErrorDocument 404 /missing.html
#ErrorDocument 404 "/cgi-bin/missing_handler.pl"
#ErrorDocument 402 http://www.example.com/subscription_info.html
# 에러 발생시 응답 페이지
#EnableMMAP off
#EnableSendfile off
# 메모리 대응 or 메모리 매핑
#Include conf/extra/httpd-mpm.conf
# 다중 처리 모듈
#Include conf/extra/httpd-multilang-errordoc.conf
# 에러메시지 다중언어 지원
#Include conf/extra/httpd-autoindex.conf
# 클라에게 보여줄 디렉토리 목록 설정
# 다중 언어를 지원키 위한 설정 파일
#Include conf/extra/httpd-userdir.conf
# 사용자 홈 디렉토리 설정 파일
#Include conf/extra/httpd-info.conf
# 아파치 웹서버의 상태와 환경설정 제공 파일
#Include conf/extra/httpd-vhosts.conf
# 가상호스트 설정파일
#Include conf/extra/httpd-manual.conf
# 아파치 메뉴얼
#Include conf/extra/httpd-dav.conf
# 웹사이트 개발도구 WebDAV 지원 모듈
#Include conf/extra/httpd-default.conf
# 아파치 기본 설정 파일
#Include conf/extra/httpd-ssl.conf
# 보안 소켓 레이어
#
# Note: The following must must be present to support
# starting without SSL on platforms with no /dev/random equivalent
# but a statically compiled-in mod_ssl.
#
<IfModule ssl_module>
SSLRandomSeed startup builtin
SSLRandomSeed connect builtin
</IfModule>
# 보안 소켓 레이어 모듈이 Load되어질때, 인터넷을 통해 비공개문서를 전송키위해 사용
■ 설치전 준비
# rpm -qa | grep ftpd
lftp-3.5.1-2.fc6
vsftpd-2.0.5-12.el5
ftp-0.17-33.fc6
# rpm -e vsftpd
# rpm -qa | grep ftp
lftp-3.5.1-2.fc6
ftp-0.17-33.fc6
#
■ 소스 or 패키지 준비
- gcc
- make compiler tools
- proftpd 소스파일
# gcc --version
# make --version
■ 소스 다운로드 및 압축 해제
==================================================
다운로드
# wget ftp://ftp.proftpd.org/distrib/source/proftpd-1.3.1.tar.gz
압축 해제
# tar xvfz proftpd-1.3.1.tar.gz
# cd proftpd-1.3.1
■ 컴파일 및 설치
- 환경 탐색? 을 통해 컴파일 될 목록을 makefile로 만드는 과정이다
- prefix는 설치 위치를 나타내는데 default 위치가 있다.
- configure에서 나온 makefile의 룰에 따라 컴파일 하는 과정
- make에서 만들어진 실행파일을 해당 경로에 이동~!
TIP.
보통
/usr/local/bin or sbin 에 설치가 되며
( 이 위치는 PATH변수에 미리 등록이 되어있어 절대경로 없이 바로 쓸 수 있다.)
/usr/local/etc 에 conf 가 있다.
which 를 통해 path변수에 저장된 실행 파일 위치 찾을 수 있다.
■ 설치와 실행
0 <위 명령어의 실행결과를 보자 0이라면 위 명령이 정상 실행 되었다는 뜻이다.>
/usr/local/sbin/proftpd
< ftp데몬을 실행>
# proftpd
- no such group 'nogroup'
- Fatal: Group: Unknown group 'nogroup' on line 27 of '/usr/local/etc/proftpd.conf'
# /usr/local/sbin/proftpd
- no such group 'nogroup'
- Fatal: Group: Unknown group 'nogroup' on line 27 of '/usr/local/etc/proftpd.conf'
<기본 값으로 설정시 에러 메시지 나올수 있음>
< nogroup 이란 그룹이 없다는 메시지 >
nogroup추가
# groupadd nogroup < 추가 혹은 proftpd.conf 에서 nogroup을 -> nobody 로 수정 >
# /usr/local/sbin/proftpd <정상구동 되었다>
# echo $?
0
# netstat -atpn
Active Internet connections (servers and established)
Proto Recv-Q Send-Q Local Address Foreign Address State PID/Program name
tcp 0 0 0.0.0.0:21 0.0.0.0:* LISTEN 13499/proftpd: (acc
< proftpd 데몬이 구동중인것을 볼 수 있다>
<만약 구동에 실패 한다면 >
# vi /usr/local/etc/proftd.conf
에러를 보면서 conf file을 적당히 수정
■ 간단한 테스트
# useradd user01
# passwd user01
...
#
< windows -> cmd에서 간단히 테스트 정상작동하였다!>

TIP. 테스트 실패시
만약 호스트에 연결 할 수 없다는 메시지가 나온다면
c:\> ping < IP > 확인후
방화벽 설정을 확인해봐야 한다.
보통 기본적인 방화벽으로 < lokkit > , < iptables > 두가지가 있는데
테스트를 위해서 iptables를 수정 하거나 정지
lokkit 설정에서 ftp를 열어주어야 한다.
참고로 직접 iptables를 설정 해주지 않았다면 서비스가 시작 되어 있지 않을것이다!!
# lokkit


■ proftpd.conf 설정
# 현재 운영중인 FTP서비 이름을 설정하는곳
# 데몬 타입
# FTP서버의 primary IP or 가상 FTP 호스트 서비스 설정 블록에서 설정된 IP Address로 부터 연결 요청이 있을 때 기본으로 응답할 서버 설정하는것이며 오직 하나만 기본으로 설정될 수 있다.
# Port 21 is the standard FTP port.
# 기본 포트
# Umask 022 is a good standard umask to prevent new dirs and files
# from being group and world writable.
# 클라이언트 사용자가 ftp로 접속하여 파일 업로드시 생성되는 파일과 디렉토리의 퍼미션 조정값
# proftpd 데몬 실행 할때 최대 자식 프로세서 생성 개수 지정(standalone모드일경우)
Group nogroup
# proftpd 데몬 실행시 어떤 유저와 그룹의 권한으로 실행하겠다라는 설정
# 각 계정의 홈디렉토리를 최상위 ( / ) 로 표시
# 특정 그룹만 최상위 접속 권한 줄려면 DefaultRoot ~ ! anygroup 으로 설정
# Normally, we want files to be overwriteable.
# 이미 업로드된 파일의 덮어 쓰기를 허용 유무
DenyAll
</Limit>
# ftp 사용자가 업로드한 파일에 대해 퍼미션을 조정하지 못하도록 하는 옵션
# 허용은 AllowAll
# A basic anonymous configuration, no upload directories. If you do not
# want anonymous users, simply delete this entire <Anonymous> section.
# anonymous server 설정을 위한 탭 <Anonymous ~ftp> ~~</Anonymous>
Group ftp
# 익명 사용자들이 할당받을 이름 지정
# 익명 ftp 서버의 접속자 유저명을 항상 anonymous로
# Limit the maximum number of anonymous logins
# 익명서버 동시 접속자수
# in each newly chdired directory.
# 익명서버 접속시 보여줄 메시지
DisplayChdir .message
# /var/ftp 하위 디렉토리 접속시 메시지 지정
# Limit WRITE everywhere in the anonymous chroot
DenyAll
</Limit>
# 익명접속자에 대해 쓰기 제한
■ inetd mode 변경
# 서버 타임을 inetd로 변경
ServerType inetd
# vi /etc/xinetd.d/proftpd
{
disable = yes
flags = REUSE
protocol = tcp
socket_type =stream
port = 21
instances = 30
wait = no
user = root
server = /usr/local/sbin/in.proftpd
log_on_success=HOST PID
log_on_failure+=USERID
log_on_failure = HOST RECORD
server_arg= -l -a
}
# pkill -9 proftpd
# /etc/rc.d/init.d/xinetd restart < xinetd 가 없다면 yum으로 설치 >
■ proftpd 로그 파일 관리
# cd /usr/src/proftpd-1.3.1/contrib/dist/rpm
# ls
ftp.pamd proftpd.init.d proftpd.init.d.suse proftpd.logrotate xinetd
# cp proftpd.logrotate /etc/logrotate.d/proftpd
/etc/logrotate.d 디렉토리에 넣어놓면 알아서 작동한다 ㅡㅡ;
■ 부팅시 자동 실행
########### proftpd auto running test###########
/usr/local/sbin/proftpd &
시작스크립트 생성
소스 파일있는곳에서
# pwd
/usr/src/proftpd-1.3.1/contrib/dist/rpm
# vi proftpd.init.d
PATH="$PATH:/usr/local/sbin" < proftpd 위치로 변경 >
# ls
ftp.pamd proftpd.init.d proftpd.init.d.suse proftpd.logrotate xinetd
# cp proftpd.init.d /etc/init.d/proftpd
# /etc/init.d/proftpd stop
# /etc/init.d/proftpd start
# chkconfig --add proftpd
# chkconfig --list proftpd < 원하는 레벨로 변경 >
DefaultRoot ~aaa,bbb,ccc
-> aaa, bbb ,ccc 그룹 사용자 접속시
자신의 홈디렉토리가 / 로 표시된다.
DefaultRoot ~!aaa
-> aaa 그룹제외한 사용자들은
자신의 홈디렉토리가 루트 디렉토리가 된다.
CWD : 디렉토리 이동
MKD : 디렉토리 생성
RNFR, RNTO : 디렉토리 이름 바꾸기
DELE : 파일 삭제 권한
RMD : 디렉토리 삭제
RETR : 파일 전송 ( 서버 - 클라이언트)
STOR : 파일 전송( 클라이언트 -> 서버)
READ : 파일 리스트 확인 ( RETR, STAT)
파일 읽기와 관련된 모든 FTP명령
DIRS : 디렉토리 목록에 관련된 ""
-> LIST, NLST
LOGIN : 서버에 연결하거나 로그인을 제한하고자 할떄
WRITE : 생성에 관련된 모든 FTP명령
예)
<Limit LOGIN> # anonymous 허용
AllowAll
</Limit>
<Limit LOGIN>
Order Allow, Deny
Allow from 192.168.0.100 192.168.0.11
Allow from 203.241.205.,.rootman.co.kr
Deny from all
</Limit>
<Limit Write>
AllowAll
<Limit>
■ DHCP 서버 설정, 운영
0. 설치전 준비 사항
2장의 NIC
1. 패키지 준비
dhcpv6_client-0.10-33.el5
# yum install dhcp
....
# rpm -qa | grep dhcp
dhcp-3.0.5-13.el5
#
2. NIC 카드 준비
# cd /etc/sysconfig/network-scripts
# ls
ifcfg-eth0
ifcfg-eht1 <<.
# vi ifcfg-eth1
# Advanced Micro Devices [AMD] 79c970 [PCnet32 LANCE]
DEVICE=eth1
ONBOOT=yes
BOOTPROTO=dhcp
HWADDR=00:0c:29:25:e1:2d
NETMASK=255.255.255.0
IPADDR=192.168.10.50
gateway 설정 하지 말것
#
3. dhcpd.conf 설정
/etc/dhcpd.conf
# cat /etc/dhcpd.conf
/usr/share/doc/dhcp*/dhcpd.conf.sample 을 쓰라고 한다
# cp /usr/share/doc/dhcp*/dhcpd.conf.sample /etc/dhcpd.conf
# vi /etc/dhcpd.conf
ddns-update-style interim;
ignore client-updates;
# 내부 네트워크의 범위를 지정
option routers 192.168.0.1;
option subnet-mask 255.255.255.0;
option nis-domain "domain.org";
option domain-name "domain.org";
option domain-name-servers 192.168.1.1;
option time-offset -18000; # Eastern Standard Time
# option ntp-servers 192.168.1.1;
# option netbios-name-servers 192.168.1.1;
# --- Selects point-to-point node (default is hybrid). Don't change this unless
# -- you understand Netbios very well
# option netbios-node-type 2;
# 기본 게이트웨이의 ip에 대한 설정, 서브넷 , 네임서버 도메인, 네임서버 ip등을 설정할때 쓴다.
# dhcp ip할당 영역
max-lease-time 43200;
# 할당 받은 ip의 사용시간과 최대 보유시간을 지정
host ns {
next-server marvin.redhat.com;
hardware ethernet 12:34:56:78:AB:CD;
fixed-address 207.175.42.254;
}
# 특별히 고정된 ip를 할당할때
4. 구동 시작
dhcpd (을)를 시작 중: [ OK ]
NIC ip 설정을 dhcp로 설정후 재시작

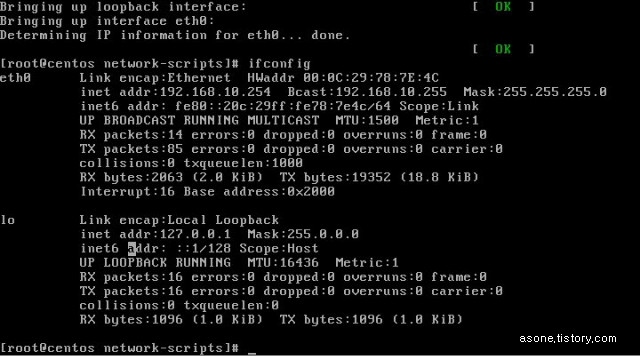
# arp -a
? (192.168.10.254) at 00:0C:29:78:7E:4C [ether] on eth0
254번 ip를 받아 간것을 확인 할 수 있다.
■ CentOS 에서 네임서버 설치 , 운영
Tip .
0. 소스로 설치 할 경우
http:/www.isc.org 에서 소스 다운 받아 설치 하면 된다.
0. bind 9.3 부터는 name.caching-nameserver.conf 사용
1. 필요 패키지
2. 패키지 준비
# rpm -qa | grep bind
bind-libs-9.3.3-10.el5
ypbind-1.19-8.el5
bind-utils-9.3.3-10.el5
# yum install bind
....
Dependencies Resolved
Package Arch Version Repository Size
=============================================================================
Installing:
bind i386 30:9.3.4-6.0.2.P1.el5_2 updates 9
58 k
Updating for dependencies:
bind-libs i386 30:9.3.4-6.0.2.P1.el5_2 updates 8
46 k
bind-utils i386 30:9.3.4-6.0.2.P1.el5_2 updates 1
67 k
=============================================================================
Install 1 Package(s)
Update 2 Package(s)
Remove 0 Package(s)
Is this ok [y/N]: y
....
Installed: bind.i386 30:9.3.4-6.0.2.P1.el5_2
Dependency Updated: bind-libs.i386 30:9.3.4-6.0.2.P1.el5_2 bind-utils.i386 30:9.3.4-6.0.2.P1.el5_2
Complete!
# rpm -qa | grep bind
bind-9.3.4-6.0.2.P1.el5_2
bind-utils-9.3.4-6.0.2.P1.el5_2
ypbind-1.19-8.el5
bind-libs-9.3.4-6.0.2.P1.el5_2
# yum install caching-nameserver
....
installed: caching-nameserver.i386 30:9.3.4-6.0.2.P1.el5_2
Complete!
# rpm -qa | grep caching
caching-nameserver-9.3.4-6.0.2.P1.el5_2
#
3. 운영을 위한 환경 설정 파일
# vi /etc/named.caching-nameserver.conf
// named.caching-nameserver.conf
...
options {
// listen-on port 53 { 127.0.0.1; };
// 기본적으로 port 53 으로 자신만이 접근 가능하게 되어있다.
listen-on port 53 { any; };
// ip v6 에 대한 것으로 차후 서비스를 위해 ~..주석처리.
// zone file에 대한 기본 디렉토리 설정
// 캐쉬 덤프 파일 생성 위치와 파일 이름
// 통계파일 생성 위치와 파일 이름
// 메모리 관련 통계파일 위치 이름
// randomization
// query-source port 53;
// 쿼리를 받아 들일 소스포트
allow-query { any; };
// 쿼리 허용할 ip 대역
channel default_debug {
file "data/named.run";
severity dynamic;
};
};
// 실행에 있어 디버깅시 참고 할 수 있는 로그파일 생성 위치
// match-clients { localhost; };
// match-destinations { localhost; };
match-destinations { any; };
// 로컬 리졸버 허용 클라이언트 지정
recursion yes;
include "/etc/named.rfc1912.zones";
};
4. 구동 시작
named를 시작 중: [ OK ]
[root@fedora ~]# tail /var/named/data/named.run
zone 0.in-addr.arpa/IN/localhost_resolver: loaded serial 42
zone 0.0.127.in-addr.arpa/IN/localhost_resolver: loaded serial 1997022700
zone 255.in-addr.arpa/IN/localhost_resolver: loaded serial 42
zone 0.0.0.0.0.0.0.0.0.0.0.0.0.0.0.0.0.0.0.0.0.0.0.0.0.0.0.0.0.0.0.ip6.arpa/IN/localhost_resolver: loaded serial 1997022700
zone localdomain/IN/localhost_resolver: loaded serial 42
zone localhost/IN/localhost_resolver: loaded serial 42
running
//정상 구동되었다.
#
5. zone 파일 구성
# vi /etc/named.rfc1912.zones
// named.rfc1912.zones:
//
// Provided by Red Hat caching-nameserver package
//
// ISC BIND named zone configuration for zones recommended by
// RFC 1912 section 4.1 : localhost TLDs and address zones
//
// See /usr/share/doc/bind*/sample/ for example named configuration files.
//
zone "." IN {
type hint;
file "named.ca";
};
...
zone "linux.com" IN {
type master;
file "linux.com.zone";
allow-update { none; };
};
//추가
# cd /var/named
# ls
// 기본 포멧 파일을 이용
# cp localdoamin.zone linux.com.zone
# vi linux.com.zone
@ IN SOA ns.linux.com. root.linux.com (
2008121601 ; serial (d. adams)
3H ; refresh
15M ; retry
1W ; expiry
1D ) ; minimum
IN NS ns.linux.com.
IN MX 10 mail.linux.com.
IN A 192.168.10.200
ns IN A 192.168.10.200
www IN A 192.168.10.200
mail IN CNAME www
ftp IN CNAME @
* IN CNAME @
// 생성 후 저장
//zone 파일과 conf 파일 체크
# named-checkconf /etc/named.rfc1912.zones
# named-checkconf /etc/named.caching-nameserver.conf
# named-checkzone linux.com /var/named/linux.com.zone
zone linux.com/IN: loaded serial 2008121601
OK
#
// 모든게 정상으로 나왔다. 서버 재구동
/etc/rc.d/init.d/named restart
named를 정지 중: [ OK ]
named를 시작 중: [ OK ]
# vi /etc/resolv.conf
search localdomain
nameserver 192.168.10.10
nameserver 168.126.63.1
// 기존에 있던 nameserver외에 추가로 자신의 ip로 된 nameserver ip를 추가
// 192.~ 대의 dns를 먼저 검색 하며 검색된 정보가 없을경우 다음 dns에게 물어 본다.
# nslookup
> linux.com
Server: [192.168.10.10]
Address: 192.168.10.10
Address: 192.168.10.100
...
> ftp.linux.com
>q
// 잘나오는것을 확인 할 수 있다.
6. zone file 설명
time to live의 약자 다른 네임서버에서 읽어간 정보가 살아있는 시간이다. 초단위
ORIGIN 의 의미 public domain을 의미 즉 @ = linux.com.
IN 다음 의 설정을 이용
SOA start of authority 해당 도메인의 정보를 가지고 있고 root@linux.com 이 관리자를 나타낸다.
해당 정보의 시리얼 보통 날짜정보 + 카운터로 표시된다.
리프레쉬 타임 주기
M-> S로의 장애 발생시 재 접속 시간
존파일 유효기간, 만약 Expiry 시간안에 M에서 응답을 못받을 경우 S는 데이터에 대한 유효성을 더이상 인정 하지 않겠다는뜻
TTL과 같은 의미 다른 서버에서 zone 데이터를 가져갔을때 그 데이터에 대한 유효기간
// 네임서버 이름 지칭
IN MX 10 mail.linux.com.
// mailserver 이름 지칭
IN A 192.168.10.200
// ip 할당
ns IN A 192.168.10.200
// nameserver의 ip는 ""
www IN A 192.168.10.200
// www.linux.com ip할당
mail IN CNAME www
// mail server의 ip는 www의 설정을 가져온다.
ftp IN CNAME @
// ORIGIN 변수의 값을 그대로 사용
* IN CNAME
www IN A 192.168.10.201
www IN A 192.168.10.202
// A 레코드 여러개 적어 부하 분산!
■ samba 서버 설치 및 설정
설치 전 준비
-------------------------------
# rpm -qa | grep samba
samba-3.2.0-1.pre3.9.fc9.i386
없을 경우 설치 한다
# yum -y install samba
# /etc/init.d/smb start 서비스 시작
# vi /etc/samba/smb.conf
log file = /var/log/samba/log.%m >> %m (접속한 ip)
security = user
server -> smb server인증
share
domain -> NT 계열 인증
share public 공유디렉토리를 접속하려 할때
valid 암호만 물어 본다.
user public 계정 암호 둘다 물어본다.
valid
user 접근시 공유폴더 처음 접근시 계정 비번 물어보며
user와 같은 계정을 가진 디렉토리만 접근 가능
퍼블릭은 제외
smb유저 추가
---------------------
smbuseradd x 로 안되므로
명령어로 포팅
# cat /etc/passwd | mksmbpasswd.sh >
/etc/samba/smbpasswd
# smbpasswd @ID
윈도우 공유폴더 확인
--------------------------
# smbclient -L 192.168.77.1
passwd :
$는 admin은 권한으로만 가지고 있다.
# smbclient //ip
# mkdir /SMBClient
# mount -t smbfs //192.168.77.1/aaa /SMBClient
# cd /SMBClient
프린터 활용
해결책
첫번째.


두번째.
시작 - 내컴퓨터 - 도구 - 폴더 옵션 - 모든 사용자에게 동일한 폴더 공유 권한 지정(권장) 을 체크 해제
접근 불가 폴더에서 - 오른쪽 마우스 - 속성 - 보안탭 이동 - 고급 - 소유자 - 기타 로컬 사용자 및 그룹 - 현재 계정 추가 - 확인 or 적용 후 삭제 시도~
세번째.
유틸 이용
UNlocker를 설치후 이용~
NIC Configuration (Solaris 10 x86 on VMWare)
작성자: 백승찬
작성일: 2008.05.07(수)
참 고: http://cafe.daum.net/bscsolaris
(작업상태)
(1). 운영체제는 새로 설치된것으로 가정한다.
(2). NIC는 1개를 설정하고 Bridge로 선택한것으로 가정한다.
(3). 네트워크 구성은 다음 그림을 참고한다.
[ MS Windows ]
+------------+
| |
----------- NIC1 VMnet0 -----------+-
| | |
| VMnet1 |
| | |
| VMnet8 ----------| ----+-
| | | |
| | + +
+------------+ +----NIC2--NIC3--+
| pcn0 pcn1 |
| |
| |
+----------------+
solarisXXX
[그림] VMWare Bridge + NAT Network Configuration
-------------- VMnet8 --------------------+--------
(NAT Device) 192.168.10.XXX
192.168.10.1 192.168.10.2 solarisXXX
(예) 강사용 컴퓨터
NIC1 : 121.160.70.121
NIC2 : 172.16.8.254
NIC3 : 192.168.10.250
■ (작업1) NIC2(pcn0) 정상 동작 유무 확인
■ (작업2) NAT 네트워크 대역 조정(192.168.10.0)
■ (작업3) NIC3(pcn1) 설정
(작업1) NIC2 정상 동작 유무 확인
# ping -s 172.16.8.254
(작업 2) NAT 네트워크 대역 조정(192.168.10.0)
# sync
# poweroff
VMWare "Power Off" 아이콘 클릭
VMWare > Edit > Virtual Network Setting
> Host Virtual Network Mapping
> VMWare Network Adapter VMnet8
> Subnet
IP Address : 192.168.10.0
Subnet Mask : 255.255.255.0
> NAT Setting
기본라우터: 192.168.10.2 (정보 확인)
-> 자동으로 설정 되어 있다.
(작업 3) NIC3(pcn1) 설정
■ NIC3(pcn1) 추가
■ Device Reconfiguration
■ NIC3 IP 설정
IP : 192.168.10.XXX / 255.255.255.0
/etc/hosts, /etc/hostname.pcn1, /etc/netmasks
(1). NIC 추가 작업
VMWare > VM > Setting > Add > Ethernet Adapter > NAT 선택 > Finish
VMWare PowerON
(2). 디바이스 재인식(Device Reconfiguration)
# cat /etc/path_to_inst | grep pcn
# devfsadm -v
# cat /etc/path_to_inst | grep pcn
(3). IP 설정 작업
■ /etc/hosts
■ /etc/hostname.pcn1
■ /etc/netmasks
■ /etc/defaulrouter
■ /etc/nsswitch.conf
■ /etc/resolv.conf
# vi /etc/hosts
......
[수정전]
127.0.0.1 localhost
172.16.8.XXX solarisXXX loghost
[수정후]
127.0.0.1 localhost
172.16.8.XXX solarisXXX solarisXXX.example.com loghost <----- 정보 수정
192.168.10.XXX nic2 <----- 라인 추가
# cat > /etc/hostname.pcn1 (# echo "nic2" > /etc/hostname.pcn1)
nic2
<Ctrl + D>
# cat /etc/hostname.pcn1
# vi /etc/netmasks
.....
[수정전]
172.16.0.0 255.255.0.0
[수정후]
172.16.0.0 255.255.0.0
192.168.10.0 255.255.255.0 <----- 라인 추가
# ifconfig pcn1 plumb up
# ifconfig pcn1 192.168.10.XXX netmask 255.255.255.0 broadcast +
# ifconfig -a
(4). Defaultrouter 설정 작업
# cat /etc/defaultrouter
172.16.0.1
# cat > /etc/defaultrouter
192.168.10.2
<Ctrl + D>
# route flush
# route add default 192.168.10.2
# netstat -nr
(5). DNS Client 설정 작업
# cp /etc/nsswitch.dns /etc/nsswitch.conf
# cat > /etc/resolv.conf
nameserver 168.126.63.1
<Ctrl + D >
(6). 확인 작업
# reboot
(부팅 이후에 정보 확인)
# nslookup www.daum.net
(작업 4) Port Forwarding 설정
VMWare > Edit > Virtual Network Setting > NAT Tab
Client --------> Window(VMWare) -------> Solaris
# telnet S 23 ---> 192.168.253.254 23
(작업 5) 환경작업
- korn shell 변경
- ENV_main.sh
(1). korn shell 변경
# passwd -e
Old shell: /sbin/sh
New shell: /bin/ksh <----- '/bin/ksh' 입력
(2). ENV_main.sh 실행
# dfshares 172.16.8.254
# mkdir /mnt/server
# mount 172.16.8.254:/root/shell /mnt/server
# cd /mnt/server
# ls
# ./ENV_main.sh
# cat /.profile
# cat /.kshrc
# cat /.exrc
# cat /.rhosts
# cat /etc/default/login
# cat /etc/ssh/sshd_config
# cat /etc/ftpd/ftpusers
# ksh
# . /.profile (csh # source /.cshrc)
# . /.kshrc
|
Solaris Admin I 과정
목차
0. Basic Network Setting 1. Solaris Directory Hierarchy 2. Managing Local Disk Devices 4. Patch Administration 5. BootSequence 6. User Administration 7. Basic System Security 8. Printer Administration 9. Job Scheduling 10.Backup & Recovery |
NTP(Network Time Protocol)
0. Why NTP !!!!
__________________
많은 네트워크 프로그램들은 시간 동기화가 필요하게 된다. 네트워크 상에서 서로 연동하
는 시스템들 간에 시간이 일치 하지 않게 된다면 다수의 시스템 장애처리, 성능카운트,
분석, 로깅등 수많은 문제점을 갖게된다.
■ NFS Server
■ DB Server
■ Logging Server
■ NMS Program(Network Management Solution)
■ Encyption
■ 기타
===== WebServerA ===== ===== NFS Server ====
Date: 12:00 12:10
/p/file1(12:10) /source/file1(12:10)
====================== =====================
A
===== WebServerB ===== |
Date: 12:40 +---- file1 생성
/p/file1(12:10)
======================
[그림] 서버간의 시간 동기화 이유
[참고] 실무에서 많이 사용하고 있는 방법 예
# rdate gps.bora.net
or
# ntpdate time.kriss.re.kr
# crontab -e
0 * * * * rdate gps.bora.net (gps.bora.net: 210.120.246.46)
......
0 * * * * ntpdate time.kriss.re.kr
[EX] rdate 명령어 실습
# date
Fri Mar 7 10:45:34 KST 2008 (10시 45분 34초)
# date 03070845 (03월 07일 08시 45분)
# date
Fri Mar 7 08:45:00 KST 2008 (03월 07일 08시 45분 00초)
# rsh 172.16.8.254 date
# rdate 172.16.8.254
# date
(서버의 시간과 같은지 확인한다.)
1. NTP Server Overview
_________________________
NTP (network time protocol, 네트웍 시간 프로토콜)
NTP는 네트웍으로 연결되어 있는 컴퓨터들끼리 클록 시각을 동기화시키는데 사용되는 프
로토콜이다. NTP는 미국 델라웨어 대학의 데이빗 밀스에 의해 처음 개발되었으나, 이제는
인터넷 표준이 되었다. NTP는 컴퓨터 클록 시간을 1/1000 초 이하까지 동기화시키기 위
해 협정 세계시각(UTC)을 사용한다.
컴퓨터 네트웍 전반에 걸쳐 정확한 시각을 유지하는 것은 여러 가지 이유로 중요한데, 그
이유는 심지어 수십 분의 1초 정도의 차이만으로도 큰 문제가 발생될 수 있기 때문이다.
예를 들어 협정 세계시에 기반을 두면, 지역적으로 분산된 업무처리 환경에서도 작업 순
서가 정확히 유지될 수 있다. 보안 메커니즘 역시 네트웍 전체에 걸쳐 협정 세계시에 기
반을 두고 있다. 여러 대의 컴퓨터가 하나의 파일 시스템을 수정하는 것 역시 정확히 동
기화된 클록 시각에 의존해야 한다. 항공기의 운항 궤적을 그림으로 표시해 주는 항공관
제 시스템에도 매우 정확한 시간측정이 요구되는 것은 당연하다.
협정세계 시각은 무선이나 위성 시스템 등, 여러 가지 방법으로 얻어진다. GPS나 정부기
관 등과 같은 특수한 수신자들은 보다 높은 수준의 서비스를 이용하는 것이 가능하지만,
모든 컴퓨터에 수신기를 장착하는 것은 비경제적이며, 현실성이 없다. 그 대신에, 시각
서버로 지정된 컴퓨터들에만 수신기를 장착하고, 이 서버들과 네트웍으로 연결되어 있는
컴퓨터들의 클록 시각은 NTP와 같은 프로토콜을 사용하여 동기화하는 것이다.
협정세계시로부터 떨어져 있는 수준을 표시하기 위해 흔히 계층번호를 쓰는데, 0번 계층
은 전용 송신기 또는 위성 위치추적 시스템으로부터 수신된 실제 시각인 무선 클록을,
1번 계층은 이 무선 클록과 직접 연결되어 있는 컴퓨터의 클록을, 2번 계층은 1번 계층으
로부터 시각을 받은 컴퓨터 등으로 원천 협정 세계시로부터 멀수록 계층 번호가 커져 간다.
NTP라는 용어는, 프로토콜과 컴퓨터상에서 실행되는 클라이언트/서버 프로그램, 둘 모두
에 대해 사용된다. 프로그램은 사용자에 의해 NTP 클라이언트, NTP 서버, 또는 둘 모두로
해석될 수 있다. NTP 클라이언트는 시각 서버에 정확한 현재 시각을 교환할 것을 요구한다.
이 교환의 결과를 통해, 클라이언트는 서버의 시각과의 차이를 이용하여 링크 지연시간을
계산할 수 있으며, 자신의 클록을 서버에 있는 클록과 일치하도록 조정할 수 있다. 하나의
규칙으로서, 처음 클록을 맞추기 위해서는 5~10분 동안 모두 6번의 시각 교환이 요구된다.
일단 시각 동기화가 끝나면, 클라이언트는 매 10분마다 메시지 교환을 통해 클록을 수정
한다. 클록 동기화의 신뢰도 및 정확도를 높이기 위해, 여러 대의 서로 다른 서버와 다양
한 네트웍 경로가 사용된다. 클라이언트/서버 동기화에 아울러, NTP는 브로드캐스트를 통
한 컴퓨터 클록 동기화도 지원한다. NTP는 매우 높은 수준의 내고장성과 확장 가능성을
염두에 두고 설계되었다.
NTP 서버에서 사용되는 용어에 대해 알아보자.
(1). 기본적인 용어
■ Reference Clock - GMT, UTC과 같이 표준시간 또는 참고 시간 (기준 시간)
■ Strata - NTP 서버의 계층적 구조
■ Stratum-1 Server - NTP 1계층 서버
Stratum-2 Server - NTP 2계층 서버
... -15 .... - NTP 15계층 서버(15까지 존재)
■ Drift File - PPM(Parts-Per-Million)단위로 오프셋에 일치하는 단일 부동 소수
점이 들어가 있다. (예: /var/ntp/ntp.drift)
■ xntpd - NTP 서버/클라이언트 데몬
■ ntp.conf - NTP 서버/클라이언트 주 설정 파일
(2). 추가적인 용어
■ Resolution - 시간 제공 장치에서 사용하는 시간의 최소 단위.
예) 손목시계의 Resolution : 1초
■ Precision - 컴퓨터 프로그램에서 사용하는 시간의 최소 단위.
■ Accuracy - 시간의 정확성. 기준시간(UTC)과 얼마나 근접한가를 나타냄.
■ Jitter - 시간을 측정했을 때 생기는 오차 중 작은 값.
■ Wander - 시간을 측정했을 때 생기는 오차 중 큰 값.
[참고] UTC & GMT
■ UTC(Universal Time Coordinate) 협정 세계시, 그리니치 표준시 대신 방송에 사용되
는 표준시. 협정 세계시는 국제 사회가 사용하는 과학적 시간의 표준입니다.
1972년 1월 1일부터 시행된 협정세계시에서는 67년 국제도량형총회가 정한 세슘원자의
진동수에 의거한 초의 길이가 그 기준(원자초)으로 쓰인다. 그 때까지 시간의 기준으로
는 지구의 자전에 의한 평균태양시와 지구의 공전에 의한 태양년에서 산출한 초의 길이
가 쓰였다. 그리니치표준시(GMT)는 원래 평균태양시를 기준으로 한 것이었다. 따라서
원자시계를 표준으로 하면서부터 GMT라는 명칭이 실체(實體)를 바르게 나타내지 못하는
불합리한 점이 생겼다. 이러한 문제를 없애기 위해서 1978년 국제무선통신자문위원회
(CCIS) 총회는 통신분야에서는 금후 그리니치평균시를 협정세계시(UTC)로 바꾸어 쓰자
는 권고안을 채택하였다.
■ GMT(Greenwich Mean Time) 그리니치 표준시.
그리니치천문대를 지나는 본초자오선(그리니치자오선)을 기준으로 하는 시. 약호 GMT.
약칭하여 그리니치시라고도 한다. 1925년 이전의 그리니치시는 정오(正午)를 0시로 하여
시간을 재기 시작하는 방식의 천문학용 평균태양시의 명칭이었다. 이에 반해 일상생활에
서는 자정을 0시로 하여 시간을 재는 방식이 사용되었으며, 이것을 그리니치상용시(GCT)
라고 하였다. 1925년 1월 1일 국제천문연합에서는 그리니치시를 12시간 앞당겨 그리니치
상용시와 일치시켰으며, 이를 세계시(世界時)라고 하여 전세계 공통의 표준시로 사용하
였다. 그러나 지구의 자전을 근거로 한 이 세계시는 수정시계나 원자시계와 비교한 결과
지구 자전의 불규칙성에 의한 오차가 있으므로 1972년 이후에는 새로이 협정세계시가 세
계표준시로 사용되었다. 협정세계시란 세계시와는 달리 원자 방사(放射)의 진동수를 기
준으로 하고, 원자시의 초(秒)를 세분하여 세계시와의 차이가 0.9초 이내가 되도록 만든
것이다.
[참고] 참고 URL(시, 시간의 인식, 시의 척도, 시법, 하루의 시작, 보시등)
http://kr.dic.yahoo.com/search/enc/result.html?p=UTC&pk=15348300&subtype=&type=enc&field=id
[참고] Stratum 1 / Stratum 2
http://www.ntp.org
Stratum 1 Server : http://support.ntp.org/bin/view/Servers/StratumOneTimeServers
Stratum 2 Server : http://support.ntp.org/bin/view/Servers/StratumTwoTimeServers
2. NTP Server Concept
________________________
(1). Startup Script
부팅시에 실행되는 스크립트로는 런레벨2에서 동작하는 S74xntpd 스크립트에 의해 xntpd
데몬이 동작하게 된다. xntpd 데몬은 기본값으로 123번 포트를 사용한다.
- /etc/init.d/xntpd stop/start
- /etc/rc2.d/S74xntpd
(2). NTP Network Transfer Time Check
NTP Client NTP Server
| |
T1 | ------------------> | T2
| |
| |
T4 | <------------------ | T3
| |
| |
네트워크에서 보낸시간 = [(T2-T1)+(T4-T3)] / 2
(a). NTP Client는 NTP 서버에 현재 시간을 요구하는 요청을 보낼 때, 패킷에 클
라이언트의 현재 시간(T1)을 포함하여 보낸다.
(b). 클라이언트의 요청을 받은 NTP 서버는 요청을 받았을 때의 서버 시간(T2)을
패킷에 포함한다.
(c). NTP 서버는 현재 UTC 시간을 패킷에 포함하고, 클라리언트로 보내는 순가의
서버 시간(T3)도 패킷에 포함하여 클라이언트의 요청에 응답한다.
(d). 클라이언트는 서버의 응답을 받는 순간의 시간(T4)과 나머지 시간들을 이용
하여 네트워크에서 얼만큼의 시간을 보냈는지 판단하여 UTC 시간에 더한 후
시스템의 시간으로 설정한다.
3. NTP Server Configuration
_____________________________
# cd /etc/inet
# ls ntp.*
(ntp.server, ntp.client) => ntp.conf
ntp.server : NTP Server Templete Configuration File
ntp.client : NTP Client Templete Configuration File
(1). Undiscipline Local Clock
# cd /etc/inet
# cp ntp.server ntp.conf
# vi ntp.conf
......
server 127.127.1.0 prefer <----- 라인 수정(XType -> 1)
#fudge 127.127.XType.0 stratum 0 <----- 주석 처리
......
driftfile /var/ntp/ntp.drift <----- 정보 확인
......
# touch /var/ntp/ntp.drift
# /etc/init.d/xntpd stop
# /etc/init.d/xntpd start
(2). Discipline Clock
# cp ntp.server ntp.conf
# vi ntp.conf
......
server time.kriss.re.kr prefer <----- 라인 추가
server gps.bora.net <----- 라인 추가
server <NTP 서버 IP> <----- 라인 추가
......
#fudge 127.127.XType.0 stratum 0 <----- 주석처리
......
# touch /var/ntp/ntp.drift
# /etc/init.d/xntpd stop
# /etc/init.d/xntpd start
[참고] server Directive
server 지시자 다음에 쓸수있는 대표적인 기관(IP)은 한국표준연구원입니다. 시스템(서버)
의 시간을 세계표준시(초단위까지)로 설정하고 싶다면 rdate 명령어를 사용하여 다음과
같이 사용합니다.
# rdate time.kriss.re.kr
or
# ntpdate time.kriss.re.kr
(time.kriss.re.kr : 210.98.16.100)
한국표준연구원 : http://www.kriss.re.kr
시간, 길이, 질량등 모든 표준을 관리합니다.
[참고] ntp.server 파일 해석
/etc/inet/ntp.server (/etc/inet/ntpd.conf) 파일의 해석에 대해 알아 보자.
ntp.conf 파일의 해석에 대한 글은 KIPA 사이트의 글을 인용하여 만들었습니다.
# vi /etc/inet/ntp.server
------------------- ntp.server 파일 해석 시작 -----------------------------
(a) 주석 부분 해석
/etc/inet/ntp.conf로 복사하여 수정할 수 있는 예제 파일입니다. 이
파일은 외부 하드웨어 클럭을 수신하여 로컬 클럭을 동기화시키고 NTP
멀티캐스트 넷에 자신을 발표하는 서버를 위한 환경 설정 템플릿으로
사용할 수 있습니다.
다음 클럭 장치들에 대해서는 RFC 1305를 참조하십시오.
이것은 외부 클럭 장치입니다. 다음 장치들은 xntpd 3.4y에 의해 인식됩니다.
XType 장치 이름 해설
# XType Device RefID Description
# -------------------------------------------------------
# 1 local LCL Undisciplined Local Clock
# 2 trak GPS TRAK 8820 GPS Receiver
# 3 pst WWV PSTI/Traconex WWV/WWVH Receiver
# 4 wwvb WWVB Spectracom WWVB Receiver
# 5 true TRUE TrueTime GPS/GOES Receivers
# 6 irig IRIG IRIG Audio Decoder
# 7 chu CHU Scratchbuilt CHU Receiver
# 8 parse ---- Generic Reference Clock Driver
# 9 mx4200 GPS Magnavox MX4200 GPS Receiver
# 10 as2201 GPS Austron 2201A GPS Receiver
# 11 arbiter GPS Arbiter 1088A/B GPS Receiver
# 12 tpro IRIG KSI/Odetics TPRO/S IRIG Interface
# 13 leitch ATOM Leitch CSD 5300 Master Clock Controller
# 15 * * TrueTime GPS/TM-TMD Receiver
# 17 datum DATM Datum Precision Time System
# 18 acts ACTS NIST Automated Computer Time Service
# 19 heath WWV Heath WWV/WWVH Receiver
# 20 nmea GPS Generic NMEA GPS Receiver
# 22 atom PPS PPS Clock Discipline
# 23 ptb TPTB PTB Automated Computer Time Service
# 24 usno USNO USNO Modem Time Service
# 25 * * TrueTime generic receivers
# 26 hpgps GPS Hewlett Packard 58503A GPS Receiver
# 27 arc MSFa Arcron MSF Receiver
일부 장치들은 "fudge" 인자를 사용하여 도움을 얻을 수 있습니다.
xntpd 문서를 참조하십시오.
피어나 서버 중의 하나입니다. "XType"을 위의 표의 값으로 바꾸십시오.
로컬 하드웨어 클럭 장치를 추가하는 경우,
드라이버는 여기서 server 127.127.XX.0과 같은 지시문으로
지정됩니다. 여기서 127.127은 NTP에게 이것이 원격 네트워크 피어가
아니라 로컬 네트워크 피어임을 알려 주는 것이고, XX는 NTP 배포판에 설명된
클럭 유형입니다. 이 환경 설정 파일의 제한 지시문은 이 호스트가
지정된 두 IP 주소와만 대화를 하도록 지정합니다. 호스트는 그 외의
다른 주소는 신뢰하지 않으며, 다른 주소에 시간을 할애하지 않을 것입니다.
배포판에는 많은 제한 옵션에 대한 문서 자료가 포함되어 있습니다.
예를 들어 다음 코드 라인을 사용하면 이 호스트를 시간 서버로 설정할 수 있습니다.
restrict default notrust nomodify
이 코드 라인은 요청을 받으면 시간 패킷을 보내지만 다른 피어에
동기화시키지는 않는다는 의미입니다.
NTP의 통계 자료 및 파일 생성 기능을 이용하면 NTP 성능을 기록 처리할 수
있습니다. 예를 들어, /usr/adm/peerstats의 레코드의 형식은 다음과 같습니다.
MJD Second Peer IP Stat Offset Delay Dispersion
49815 60424.676 192.5.41.40 9614 -0.000040 0.00169 0.00793
UT 일이 시작된 이후 60424.676 초가 경과한 때인 Modified Julian Date 49815에
행해진 이 항목은 주소가 192.5.41.40인 시간 서버와 비교하여 클럭을
-0.000040 초 만큼 보정했음을 알려줍니다. 두 시스템 사이의 네트워크
시간 지연은 (실제로는 바로 옆 방에 있는 시스템인데도) 0.00169초로
계산되었고, 시간 지연 추정값 샘플의 분산은 0.00793 초였습니다.
Stat 필드에는 RFC-1305 문서에서 자세히 설명하는 것처럼 ntp 상태 플랙이
지정됩니다. 공개 NTP 릴리스의 scripts/stats 디렉터리에는 이러한 로그
파일을 요약하는 유틸리티들이 있습니다.
(b). server & fudge 설정
그곳에는 기본 설정에 따라 다음 두 코드 라인이 있습니다. 사용자의 설정 내용에 따라 그
내용을 수정하십시오.
# server 127.127.XType.0 prefer //server용
# fudge 127.127.XType.0 stratum 0 // next stratum servern
세 가지 종류의 시간 서버
(ㄱ). peer host_address [ key # ] [ version # ] [ prefer ]
로컬 서버가 host_address로 지정된 원격 서버와 함께 대칭형 액티브 모드로 작동하게 지
정하는 것입니다. 즉, 로컬 서버를 원격 서버에 동기화시킬 수 있습니다.
(ㄴ). server host_address [ key # ] [ version # ] [ prefer ] [ mode # ] server
로컬 서버가 명령에 따라 이름이 지정된 원격 서버에 대해 "클라이언트" 모드로 작동하게
지정하는 것입니다. 이 모드에서는 로컬 서버를 원격 서버에 동기화시킬 수 있지만, 원격
서버는 절대로 로컬 서버에 동기화시킬 수 없습니다.
(ㄷ). broadcast host_address [ key # ] [ version # ] [ ttl # ]
로컬 서버가 "broadcast" 모드로 작동하게 지정하는 것입니다. "broadcast" 모드에서 로
컬 서버는 명령으로 이름이 지정된 브로드캐스트/멀티캐스트 주소의 클라이언트에게 주기
적으로 브로드캐스트 메시지를 보내게 됩니다.
key 이 주소로 보내진 모든 패킷에 지정된 키 번호를 사용하여 암호화된 인증 필드가 포
함되어 있음을 가리킵니다. 이 숫자의 범위는 부호가 붙지 않은 32 비트 정수의 범위입니
다. 달리 지정하지 않으면, 암호화 필드가 포함되지 않습니다. version 밖으로 보내는
NTP 패킷에 대해 사용할 버전 번호를 지정합니다. version 1, version 2, version3 중에
서 선택합니다. 기본 설정값은 version 3입니다. prefer 호스트를 우선 호스트로 표시합니
다. 이 호스트는 비교할 수 있는 다른 호스트를 통하여 동기화시킬 때 우선 처리됩니다.
전체 목록은 xntpd에 관한 매뉴얼 페이지를 참조하십시오.
필자는 로컬 클럭을 서버 클럭으로 사용하므로, Xtype=1입니다.
fudge 명령은 다음과 같이 특별한 방식으로 클럭을 참조하기 위해 사용할 수 있습니다.
fudge 127.127.t.u [ time1 secs ] [ time2 secs ]
[ stratum int ] [ refid int ] [ flag1 0|1 ]
[ flag2 0|1 ] [ flag3 0|1 ] [ flag4 0|1 ]
stratum: 0에서 15까지의 범위에 속하는 숫자이며 클럭에 비표준 작동 방식을 할당하는
데 사용됩니다. 달리 지정하지 않으면, 이 값은 0입니다. 프라이머리 서버는 대체로
stratum을 0보다 큰 값으로 표시합니다.
자세한 내용은 xntpd에 관한 매뉴얼을 참조하십시오.
server 127.127.1.0 prefer
fudge 127.127.1.0 stratum 0
(c). 다양한 옵션 설정 / 해제
enable auth|bclient|pll|monitor|stats [ ... ]
disable auth|bclient|pll|monitor|stats [ ... ]
신뢰할 수 있는 키와 식별 부호를 사용하여 환경 설정이 되지 않은 피어를 정확하게 인증
한 경우에만 서버가 그 피어와 동기화됩니다. 또한 모니터 기능도 사용하도록 설정합니다.
enable auth monitor
(d). Drift File의 위치 지정
drift 파일의 위치를 지정합니다 이 파일에는 ppm(parts-per-million) 단위로 오프셋에 일
치하는 단일 부동 소수점 값이 들어 있습니다.
driftfile /var/ntp/ntp.drift
(e). ntpstat 디렉토리 지정
ntpstats 디렉토리를 지정합니다.
statdir /var/ntp/ntpstats
# cd /var/ntp/ntpstats
# ls
.....
loopstats.20070826 peerstats.20070709 peerstats.20071101
loopstats.20070828 peerstats.20070710 peerstats.20071102
loopstats.20070829 peerstats.20070711
loopstats.20070905 peerstats.20070714
......
# cat peerstats.20071102
......
54406 16854.142 0.000000 -28.4410 6
54406 16918.141 0.000000 -28.4410 6
54406 16982.138 0.000000 -28.4410 6
54406 17046.137 0.000000 -28.4410 6
(f). peerstats, loopstats, clockstats 설정
peerstats, loopstats, clockstats 등의 파일을 생성하고 그 파일을 사용할 수 있도록 설
정 합니다.
filegen name [ file filename ] [ type typename ] [ flag flagval ] [ link|nolink ]
[ enable|disable ]
하루 동안 피어, 루프, 클럭 등의 stat 파일을 생성하고 그 파일을 사용할 수 있도록 설
정합니다.
유형과 관련된 다른 옵션들은 다음과 같습니다.
week,month,year,age ,none
filegen peerstats file peerstats type day enable
filegen loopstats file loopstats type day enable
filegen clockstats file clockstats type day enable
(g). 인증 기법 지정
인증 기법을 사용하는 경우 이곳에서 지정하십시오
keys filename
인증 모드로 작동할 때 xntpd가 사용하는 암호화 키와 키 식별 부호가 들어 있는 파일의
이름을 지정합니다.
keys /etc/inet/ntp.keys
trustedkey 0
requestkey 0
controlkey 0
trustedkey # [ # ... ]
동기화에 적합한 인증 피어의 목적에 맞게 신뢰할 수 있는 암호화 키 식별자를 지정합니
다. 인증 절차를 사용하려면 로컬 서버와 원격 서버가 모두 이러한 목적으로 사용하도록
정의된 키와 키 식별자를 동일하게 공유해야 합니다. 하지만, 서버마다 다른 키를 사용할
수도 있습니다. 인수는 부호가 붙지 않은 32 비트 정수입니다. 하지만, key 0는 고정되어
있고 글로벌 영역에 알려져 있다는 점에 유의하십시오. 의미있는 인증을 실행해야 한다면,
0 키를 신뢰해서는 안됩니다.
controlkey #
ntpq(1M) 프로그램에서 사용할 키 식별자를 지정합니다. 이 프로그램은 xntpd 동작에 영
향을 주는 문제들을 진단하고 수리하는 데 도움이 됩니다. ntpq 프로그램과 xntpd의 동
작은 RFC 1305 규정의 내용과 일치합니다. 로컬 서버의 상태에 영향을 주는 원격 ntpq 프
로그램에서 보내는 요청은 인증되어야 합니다. 이렇게 하려면 원격 프로그램과 로컬 서버
가 모두 공통 키와 키 식별자를 공유해야 합니다. 이 명령의 인수는 부호가 붙지 않은 32
비트 정수입니다. 환경 설정 파일에 controlkey 명령이 포함되어 있지 않거나 키가 일치
하지 않은 경우, 이러한 요청은 무시됩니다.
authdelay seconds
로컬 컴퓨터의 NTP 인증 필드를 암호화하는 데 걸리는 시간을 알려줍니다. 이 값은 밖으
로 나가는 패킷에 대해 인증을 할 때 전송 타임스탬프를 교정하는 데 사용됩니다. 이 값
은 호스트 컴퓨터의 CPU 속도에 따라 다르지만 일반적으로 0.0001 초에서 0.003 초의 범
위에 있습니다.
액세스 제어 명령:
액세스를 제한하는 데 restrict를 사용하는 것 이외에는 지금은 사용하지 않습니다.
구문:
restrict address [ mask numeric_mask ] [ flag ] [ ... ]
이 환경 설정 파일의 제한 지시문은 이 호스트가 지정된 두 IP 주소와만 대화를 하도록
지정합니다. 호스트는 그 외의 다른 주소는 신뢰하지 않으며, 다른 주소에 시간을 할애
하지 않을 것입니다. 배포판에는 많은 제한 옵션에 대한 문서 자료가 포함되어 있습니다.
예를 들어, 다음 코드 라인을 사용하면 이 호스트를 시간 서버로 설정할 수 있습니다.
restrict default notrust nomodify
이 코드 라인은 요청을 받으면 시간 패킷을 보내지만 다른 피어에 동기화시키지는 않는다
는 의미입니다.
xntpd는 범용 주소-마스크 기준 제한 목록을 실행합니다.
자세한 내용은 xntpd에 관한 매뉴얼 페이지를 참조하십시오.
------------------- ntp.server 파일 해석 끝 -----------------------------
4. NTP Client Configuration
____________________________
# cd /etc/inet
# cp ntp.client ntp.conf
# /etc/init.d/xntpd stop
# /etc/init.d/xntpd start
5. NTP Practice
___________________
NTP Server : 172.16.8.254
NTP Client : 172.16.8.202
(NTP Server)
# cd /etc/inet
# cp ntp.server ntp.conf
# vi ntp.conf
.....
server 210.98.16.100 prefer (210.98.16.100 -> time.kriss.re.kr)
.....
# touch /var/ntp/ntp.drift
# /etc/init.d/xntpd stop
# /etc/init.d/xntpd start
TERM1)
# tail -f /var/adm/messages
TERM2)
# snoop -d hme0 | grep -i ntp
(NTP Client)
# cd /etc/inet
# cp ntp.client ntp.conf
# /etc/init.d/xntpd stop
# /etc/init.d/xntpd start
TERM1)
# tail -f /var/adm/messages
TERM2)
# snoop -d hme0 | grep -i ntp
(NTP Client) Time Changes
Manually set your NTP client system’s time 30 seconds back. Do not
set your system’s clock more than an one minute out because the
xntpd process requests manual intervention for large time changes.
# date (current time : 21:20 15)
# date 11022120 (current time : 21:20 00)
....(1~2분후에)....
# date
# rsh 172.16.8.XXX date (NTP Server IP)
6. Reference
_____________________
[NTP Server Configuration File]
server 127.127.1.0 prefer The IP address of the preferred NTP server. In this
case, the loopback address is used, indicating the
use of a local undisciplined clock. The server
keyword indicates an IP address of an NTP server
from which time will be received. If the system
happens to be a stratum-1, then you use X in the
127.127.X.0 syntax to identify a reference clock
source. If the server is a stratum-2 (or higher), this
entry would be an IP address of another NTP
server to contact for time information. The prefer
keyword means that if multiple systems of the
same strata are used to getting clock information,
a preferred server is the one that will always be
used when performing calculations.
fudge 127.127.1.0 stratum 0 The fudge entry is available to change (fudge) the
stratum that the server advertises.
broadcast 224.0.1.1 ttl 4 The address the server uses to advertise to the
network along with the time-to-live (TTL) value to
use in the IP datagrams.
enable auth monitor The configuration entry that enables
authentication and the monitoring facility.
driftfile /var/ntp/ntp.drift The location of the drift file.
statsdir /var/ntp/ntpstats/ The location of NTP statistics.
keys /etc/inet/ntp.keys The conventional name of the key file used for
authentication.
trustedkey 0 The encryption identifier. (Refer to RFC 1305 for
more information.)
controlkey 0 The key identifier. (Refer to RFC 1305 for more
information.)
6. 참고 사이트
[1] http://www.ntp.org
[2] http://www.kipt.co.kr/index.php?doc=bbs/gnuboard.php&bo_table=pds&page=1&wr_id=24
DHCP(Dynamic Host Configuration Protocol) Server
- Private Addr, DHCP
- IPv6
IP 부족 현상에 대한 보상책
ㅁ 사설 IP(Private Addr.)
ㅁ DHCP
ㅁ IPv6
DHCP
ㅁ IP 부족 현상으로 효율적인 IP 할당을 위해서 사용되었지만 현재는 IP의 효율적 관리를 위해서 주로 쓰인다.
1. DHCP Overview
___________________
DHCP enables you to provide network-related information to client systems through
a centrally located server system.
DHCP evolved from the bootstrap protocol(BOOTP). DHCP provides the following
enhanced functionality:
(1). Network Configuration for client //information for client
- IP Address
- Boot Server IP Adress
- DNS Server, router, NTP Server's IP Address
(2). Lease Periods // 사용 기간
(3). Routers can be configured to act as a BOOTP relay agent.
(4). Support is available for clients that need to boot over a network, effectively
replacing the need for using the Reverse Address Resolution Protocol (RARP)
and the bootparams file.
[참고] DHCP (Dynamic Host Configuration Protocol)
DHCP[디에이치씨피]는 네트웍 관리자들이 조직 내의 네트웍 상에서 IP 주소를 중앙에서
관리하고 할당해줄 수 있도록 해주는 프로토콜이다. 인터넷의 TCP/IP 프로토콜에서는, 각
컴퓨터들이 고유한 IP 주소를 가져야만 인터넷에 접속할 수 있다. 조직에서 컴퓨터 사용
자들이 인터넷에 접속할 때, IP 주소는 각 컴퓨터에 반드시 할당되어야만 한다. DHCP를
사용하지 않는 경우에는, 각 컴퓨터마다 IP 주소가 수작업으로 입력되어야만 하며, 만약
컴퓨터가 네트웍의 다른 부분에 속한 장소로 이동되면 IP 주소를 새로이 입력해야 한다.
DHCP는 네트웍 관리자가 중앙에서 IP 주소를 관리하고 할당하며, 컴퓨터가 네트웍의 다른
장소에 접속되었을 때 자동으로 새로운 IP 주소를 보내줄 수 있게 해준다.
DHCP는 주어진 IP 주소가 일정한 시간동안만 그 컴퓨터에 유효하도록 하는 "임대" 개념을
사용한다. 임대시간은 사용자가 특정한 장소에서 얼마나 오랫동안 인터넷 접속이 필요할
것인지에 따라 달라질 수 있다. DHCP는 사용자들이 자주 바뀌는 학교와 같은 환경에서
특히 유용하다. DHCP는 사용 가능한 IP 주소의 개수보다 더 많은 컴퓨터가 있는 경우에도
IP 주소의 임대시간을 짧게 함으로써 네트웍을 동적으로 재구성할 수 있다.
DHCP는 영구적인 IP 주소를 필요로 하는 웹서버에 대해서는 정적인 주소를 제공한다.
DHCP는 네트웍 IP 관리 프로토콜인 BOOTP의 대안으로 사용된다. DHCP가 더욱 진보된 프로
토콜이지만, 두 개의 프로토콜 모두 일반적으로 사용된다. 어떤 조직에서는 두 개의 프로
토콜 모두를 사용하지만, 동일한 조직에서 그것을 언제, 어떻게 사용할지를 이해하는 것이
무엇보다 중요하다. 윈도우NT와 같은 몇몇 운영체계에는 DHCP 서버가 딸려 나온다. DHCP
또는 BOOTP 클라이언트는 네트웍이 구성될 수 있도록 각 컴퓨터에 위치하는 프로그램이다.
[참고] BOOTP (Bootstrap Protocol, 초기 적재 통신 규약)
BOOTP는 네트웍 사용자가 자동으로 구성되고(IP 주소를 받게), 사용자의 간여 없이도 부
트되는 운영체계를 가지고 있게 해주는 프로토콜이다. X 터미널 등과 같이 하드디스크를
갖지 않은 장치의 설정 정보를 자동적으로 할당, 관리하기 위해서 개발되었다. 네트웍 관
리자에 의해 관리되는 BOOTP 서버는, 일정 시간동안 IP 주소를 자동으로 할당한다.
BOOTP는 좀더 진보된 네트웍 관리 프로토콜인 DHCP의 기반이 된다. BOOTP는 공식적으로는
RFC 951에 설명되어 있다.
2. DHCP Process Principle
______________________________
(1). DHCP Server & DHCP Client Process
---------------------------------------------
| |
DHCP Server DHCP Client
<DHCP Server> <DHCP Client>
in.dhcpd(67) dhcpagent(68)
| DHCPDISCOVER |
| <----------------------- |
| |
| <-ARP request-> |
| |
| DHCPOFFER |
| -----------------------> |
| DHCPREQUEST |
| <----------------------- |
| DHCPACK |
| -----------------------> |
| |
[참고] VMWare DHCP Server 동작시 IP 할당
DHCP 클라이언트가 부팅할때 DHCP 서버와 연동하는 동작과정을 살펴보면 다음과 같다.
(a). DHCP 클라이언트는 부팅하면서 현재 네트워크 안에 DHCP 서버가 있는지를 찾기 위해
DHCPDISCOVER 메시지를 같은 서브넷에 있는 모든 시스템으로 브로드캐스트한다.
(b). DHCP 클라이언트로 부터 메시지를 받은 서버에서는 ARP 브로드캐스팅을 통해서 클라
이언트에 제공할 IP주소를 선택한 후 네트워크 서비스 정보를 담은 DHCPOFFER 메시지
를 전송한다.
(c). 서버로 부터 DHCPOFFER 메시지를 받은 클라이언트는 메시지에 포함되어 있는 IP 주소
와 서비스 정보를 이용하여 네트워크 설정을 한 후, DHCP 서버에 사용 의사를 알리는
DHCPREQUEST 메시지를 보내게 된다.
(d). DHCPREQUEST 메시지를 수신한 서버는 DHCPACK 메시지를 통해 사용 허가를 해주게 되
고, 클라이언트는 ping 명령어를 이용하여 현재 할당받은 IP 주소를 이미 사용하고
있는 다른 시스템이 있는지 확인한 후에 네트워크 설정을 마무리하게 된다.
(2). DHCP Server & BOOTP Relay & DHCP Client
DHCP Server ------------ Router--------------------
| |
BOOTP Relay DHCP Client
Server
<DHCP Server> <BOOTP Relay> <DHCP Client>
| | DHCPDISCOVER |
| | <------------------- |
| DHCPDISCOVER | |
| <------------------- | |
| DHCPOFFER | |
| -------------------> | -------------------> |
| | DHCPREQUEST |
| <------------------- | <------------------- |
| DHCPACK | |
| -------------------> | -------------------> |
| | |
[참고] 일반 가정에서의 DHCP 서버가 존재하지 않은 이유
DHCP 서버에 BOOT Relay 서버가 존재하는 경우에 동작 방식도 없는 경우와 흡사하게 동작
한다. 중간에 BOOT Relay 서버가 DHCP 서버의 역할을 중계하게 된다.
3. DHCP Server/Client Function
__________________________________
(1). DHCP Client Function
- Sufficient information to properly configure the network interface
- IP Address
- Netmask
- Parameters needed by system-level and application-level software
- Boot Server Information
- Router Address
- Configuration Server
(2). dhcpagent process
- Constructs and sends packets
- Listens for responses from servers
- Caches the configuration information received
- Releases or renews leases
- Configures the interfaces with sufficient information to enable
communications with the network through the interface
(3). DHCP Server Function
- Corresponding Information Sending
- "2. DHCP Process Principle Reference"
4. DHCP Startup Script
___________________________
부팅시에 /etc/rd3.d/S34dhcp 시작스크립트에 의해서 in.dhcpd 데몬이 뜨게 된다. 이 경우
/etc/inet/dhcpsvc.conf 설정파일이 있어야만 in.dhcpd 데몬이 뜨게 된다.
- /etc/init.d/dhcp stop/start (in.dhcpd)
- /etc/init.d/dhcpagent stop/start (dhcpagent)
5. DHCP Client Configuration
________________________________
# man ifconfig
.....
dhcp This option is an alias for option auto-dhcp
auto-dhcp
Use DHCP to automatically acquire an address for this
interface. This option has a completely equivalent
alias called dhcp.
primary
Defines the interface as the primary. The inter-
face is defined as the preferred one for the
delivery of client-wide configuration data. Only
one interface can be the primary at any given
time. If another interface is subsequently
selected as the primary, it replaces the previ-
ous one. Nominating an interface as the primary
one will not have much significance once the
client work station has booted, as many applica-
tions will already have started and been config-
ured with data read from the previous primary
interface.
drop Remove the specified interface from DHCP con-
trol. Additionally, set the IP address to zero
and mark the interface as "down".
extend
Attempt to extend the lease on the interface's
IPv4 address. This is not required, as the agent
will automatically extend the lease well before
it expires
inform
Obtain network configuration parameters from
DHCP without obtaining a lease on an IP address.
This is useful in situations where an IP address
is obtained through mechanisms other than DHCP.
ping Check whether the interface given is under DHCP
control, which means that the interface is
managed by the DHCP agent and is working prop-
erly. An exit status of 0 means success. This
subcommand has no meaning when the named inter-
face represents more than one interface.
release
Relinquish the IPv4 address on the interface,
and mark the interface as "down."
start Start DHCP on the interface.
status
Display the DHCP configuration status of the
interface.
DHCP 클라이언트를 설정하는 방법은 (a)ifconfig 명령어를 사용하여 현재 수행하는 방법
과 (b)/etc/dhcp.XXn 파일을 사용하여 부팅시에 적정되도록 할 수 있다. /etc/dhcp.XXn
파일의 내용은 필요가 없다. 파일의 이름만 존재하면 된다.
(1). DHCP 클라이언트 현재 설정
Current Setting
# ifconfig hme0 dhcp
(2). DHCP 클라이언트 부팅시에 적용 설정
Configuration at Boot
# touch /etc/dhcp.hme0 (/etc/hostname.hme0)
# reboot
[참고] ifconfig hme0 dhcp CMD
# ifconfig hme0 dhcp start
# ifconfig hme0 dhcp inform
# ifconfig hme0 dhcp extend
# ifconfig hme0 dhcp release (> ipconfig /renew, # ifconfig hme0 dhcp)
# ifconfig hme0 dhcp drop (/etc/dhcp/hme0.dhc)
# ifconfig hme0 dhcp status
(ifconfig hme0 dhcp start)
# ifconfig pcn0 dhcp
# ifconfig pcn0 dhcp start
(ifconfig hme0 dhcp inform)
Obtain network configuration parameters from
DHCP without obtaining a lease on an IP address.
This is useful in situations where an IP address
is obtained through mechanisms other than DHCP.
(ifconfig hme0 dhcp extend)
Attempt to extend the lease on the interface's
IPv4 address. This is not required, as the agent
will automatically extend the lease well before
it expires
<DHCP Server> <DHCP Client>
in.dhcpd(67) dhcpagent(68)
| |
| IP(Lease Time:5일) |
| -----------------------> | ---
| | A
| | |
| Extend | | 5일
| <----------------------- | | ---
| | V A
| | --- |
| | | 5일
| | |
| | V
| | ---
| |
(ifconfig hme0 dhcp release)
c:\> ipconfig /renew
# ifconfig pcn0 dhcp release
# ifconfig pcn0 dhcp start
(ifconfig hme0 dhcp drop)
# ifconfig pcn0 dhcp drop
(현재 IP 설정) ------> /etc/dhcp/hme0.dhc (현재 IP 설정)
DHCP Client 부팅 -----> DHCP Server IP 정보 받지 않음
/etc/dhcp/hme0.dhc 파일의 설정을 통해 설정
(ifconfig hme0 dhcp status)
# ifconfig pcn0 dhcp status
6. DHCP Server
____________________
DHCP 서버가 제공해 주는 정보는 크게 2가지로 구분할 수 있다. (a)IP에 관련한 정보나
(b)시스템 레벨이나 프로그램 레벨에서 필요한 부가적인 인자 값들이다.
- IP에 관련한 설정 정보 (/var/dhcp/dhcp_network)
- 부가적인 설정 정보 (/var/dhcp/dhcptab)
(1). DHCP Server Database File
- dhcp_network(Network Number, IP) // ip와 대역
- dhcptab(Macro, Symbol) //부가정보
(2). DHCP Configuration Tools
- dhcpconfig (CLI)
Solaris 8 버전의 툴, Solaris 9 버전의 툴 - 설정 방법 다름
- dhcpmgr (GUI)
- pntadm, dhtadm(CLI)
[참고] pntadm / dhtadm
pntadm (p:dhcp, nt:network)-> /var/dhcp/dhcp_network
dhtadm (dht:dhcptab )-> /var/dhcp/dhcptab
[참고] DHCP Server Unconfiguration
# /etc/init.d/dhcp stop
# dhcpconfig -U -x -h (매뉴얼 페이지 참조, dhcpconfig(1))
[참고] 현재 설정 확인
# ls -ld /var/dhcp
[ ] /var/dhcp 디렉토리가 존재하는가?
[ ] dhcp_network, dhcptab 파일이 존재하는가?
(3). DHCP Server Setting
# dhcpmgr &
or
# /usr/sadm/admin/bin/dhcpmgr &
- Network Address Admin(pcn0: 172.16.8.1XX)
- Network Address Admin(pcn1: 192.168.10.1XX)
- Network Virtual Interface Add
/etc/hosts
/etc/hostname.hme0:1
/etc/netmasks
(아이피 할당 표)
IP 대역 : 172.16.8.XXX ~ 172.16.8.YYY
---------
XXX YYY
---------
100 ~ 104
105 ~ 109
110 ~ 114
115 ~ 119
120 ~ 124
125 ~ 129
130 ~ 134
135 ~ 139
140 ~ 144
145 ~ 149
150 ~ 154
155 ~ 159
160 ~ 164
165 ~ 169
170 ~ 174
175 ~ 179
180 ~ 184
185 ~ 189
190 ~ 195
---------
DHCP 서버 설정
# dhcpmgr &
--------------------------------------------------------------------------------
서버 설정 [x] Conigure as DHCP server
DHCP Configuration Wizard
Select data storage format [x] Text files
Configure Data store Path: /var/dhcp(기본값)
Select hosts nameservice /etc/hosts
Specify lease policy Length of Lease [1] days(기본값)
Specify DNS domain and servers DNS Domain: [example.com]
Specify network address and Network Address: [172.16.0.0] (기본값)
subnetmask Subnet Mask: [255.255.0.0] (기본값)
Specify network type and router Network Type: Local-Area (기본값)
Routing: Use router: 172.16.0.1
Specify NIS domain and servers <Next>
Specify NIS+ domain and servers <Next>
Address Wizard
Specify the number of IP addresses Number of IP Addresses: [5]
Commnet: [DHCP Test]
Specify the server and starting Managed by Server: [solarisXXX]
IP address Starting IP Address: [172.16.8.1XX]
[x] Generate Client Names
Root Name: solarisXXX
Confirm the IP address list <Next>
Enter client configuration <Next>
information
Select the lease type Lease Type: [x] Dynamic (기본값)
Review <Finish>
--------------------------------------------------------------------------------
(4). DHCP Configuration Files
Compare to dhcpmgr DB & /var/dhcp/DB
7. DHCP Server & Client Practice
___________________________________
[EX1] DHCP Server / Client Packet Capturing
(1). DHCP Server Configuration
(2). DHCP Client Configuration
(DHCP Server)
# /usr/sadm/admin/bin/dhcpmgr &
# snoop -d hme0 -o /test/dhcp.pkt
(DHCP Client)
# ifconfig hme0 dhcp
# ifconfig -a
(DHCP Server)
# snoop -i /tmp/dhcp.pkt | more
# snoop -i /tmp/dhcp.pkt -v > /tmp/dhcp.txt (패킷을 선택한다.)
# vi /tmp/dhcp.txt
DHCP Server / Client Packet Analyze
------------------------------------------------------------------
ETHER: ----- Ether Header -----
ETHER:
ETHER: Packet 133 arrived at 15:56:10.37
ETHER: Packet size = 342 bytes
ETHER: Destination = ff:ff:ff:ff:ff:ff, (broadcast)
ETHER: Source = 0:c:29:4e:dd:b7,
ETHER: Ethertype = 0800 (IP)
ETHER:
IP: ----- IP Header -----
IP:
IP: Version = 4
IP: Header length = 20 bytes
IP: Type of service = 0x00
IP: xxx. .... = 0 (precedence)
IP: ...0 .... = normal delay
IP: .... 0... = normal throughput
IP: .... .0.. = normal reliability
IP: .... ..0. = not ECN capable transport
IP: .... ...0 = no ECN congestion experienced
IP: Total length = 328 bytes
IP: Identification = 6
IP: Flags = 0x4
IP: .1.. .... = do not fragment
IP: ..0. .... = last fragment
IP: Fragment offset = 0 bytes
IP: Time to live = 255 seconds/hops
IP: Protocol = 17 (UDP)
IP: Header checksum = 7a9f
IP: Source address = 0.0.0.0, OLD-BROADCAST
IP: Destination address = 255.255.255.255, BROADCAST
IP: No options
IP:
UDP: ----- UDP Header -----
UDP:
UDP: Source port = 68
UDP: Destination port = 67 (BOOTPS)
UDP: Length = 308
UDP: Checksum = 4EE4
UDP:
DHCP: ----- Dynamic Host Configuration Protocol -----
DHCP:
DHCP: Hardware address type (htype) = 1 (Ethernet (10Mb))
DHCP: Hardware address length (hlen) = 6 octets
DHCP: Relay agent hops = 0
DHCP: Transaction ID = 0x3953c664
DHCP: Time since boot = 0 seconds
DHCP: Flags = 0x0000
DHCP: Client address (ciaddr) = 0.0.0.0
DHCP: Your client address (yiaddr) = 0.0.0.0
DHCP: Next server address (siaddr) = 0.0.0.0
DHCP: Relay agent address (giaddr) = 0.0.0.0
DHCP: Client hardware address (chaddr) = 00:0C:29:4E:DD:B7
DHCP:
DHCP: ----- (Options) field options -----
DHCP:
DHCP: Message type = DHCPDISCOVER
DHCP: Maximum DHCP Message Size = 1472 bytes
DHCP: IP Address Lease Time = -1 seconds
DHCP: Client Class Identifier = "SUNW.i86pc"
DHCP: Requested Options:
DHCP: 1 (Subnet Mask)
DHCP: 3 (Router)
DHCP: 12 (Client Hostname)
DHCP: 43 (Vendor Specific Options)
ETHER: ----- Ether Header -----
ETHER:
ETHER: Packet 148 arrived at 15:56:11.39
ETHER: Packet size = 371 bytes
ETHER: Destination = 0:c:29:4e:dd:b7,
ETHER: Source = 0:c:29:4a:b2:cd,
ETHER: Ethertype = 0800 (IP)
ETHER:
IP: ----- IP Header -----
IP:
IP: Version = 4
IP: Header length = 20 bytes
IP: Type of service = 0x00
IP: xxx. .... = 0 (precedence)
IP: ...0 .... = normal delay
IP: .... 0... = normal throughput
IP: .... .0.. = normal reliability
IP: .... ..0. = not ECN capable transport
IP: .... ...0 = no ECN congestion experienced
IP: Total length = 357 bytes
IP: Identification = 18293
IP: Flags = 0x4
IP: .1.. .... = do not fragment
IP: ..0. .... = last fragment
IP: Fragment offset = 0 bytes
IP: Time to live = 255 seconds/hops
IP: Protocol = 17 (UDP)
IP: Header checksum = 9c5a
IP: Source address = 192.168.10.250, nic2
IP: Destination address = 192.168.10.109, solaris254-109
IP: No options
IP:
UDP: ----- UDP Header -----
UDP:
UDP: Source port = 67
UDP: Destination port = 68 (BOOTPC)
UDP: Length = 337
UDP: Checksum = 5EE8
UDP:
DHCP: ----- Dynamic Host Configuration Protocol -----
DHCP:
DHCP: Hardware address type (htype) = 1 (Ethernet (10Mb))
DHCP: Hardware address length (hlen) = 6 octets
DHCP: Relay agent hops = 0
DHCP: Transaction ID = 0x3953c664
DHCP: Time since boot = 0 seconds
DHCP: Flags = 0x0000
DHCP: Client address (ciaddr) = 0.0.0.0
DHCP: Your client address (yiaddr) = 192.168.10.109
DHCP: Next server address (siaddr) = 0.0.0.0
DHCP: Relay agent address (giaddr) = 0.0.0.0
DHCP: Client hardware address (chaddr) = 00:0C:29:4E:DD:B7
DHCP:
DHCP: ----- (Options) field options -----
DHCP:
DHCP: Message type = DHCPOFFER
DHCP: DHCP Server Identifier = 192.168.10.250
DHCP: UTC Time Offset = 32400 seconds
DHCP: RFC868 Time Servers at = 172.16.8.254
DHCP: IP Address Lease Time = 86400 seconds
DHCP: DNS Domain Name = example.com
DHCP: DNS Servers at = 172.16.8.254
DHCP: DNS Servers at = 172.16.8.252
DHCP: DNS Servers at = 168.126.63.1
DHCP: Broadcast Address = 192.168.10.255
DHCP: Router at = 192.168.10.2
DHCP: Subnet Mask = 255.255.255.0
DHCP: Client Hostname = solaris254-109
ETHER: ----- Ether Header -----
ETHER:
ETHER: Packet 163 arrived at 15:56:13.37
ETHER: Packet size = 342 bytes
ETHER: Destination = ff:ff:ff:ff:ff:ff, (broadcast)
ETHER: Source = 0:c:29:4e:dd:b7,
ETHER: Ethertype = 0800 (IP)
ETHER:
IP: ----- IP Header -----
IP:
IP: Version = 4
IP: Header length = 20 bytes
IP: Type of service = 0x00
IP: xxx. .... = 0 (precedence)
IP: ...0 .... = normal delay
IP: .... 0... = normal throughput
IP: .... .0.. = normal reliability
IP: .... ..0. = not ECN capable transport
IP: .... ...0 = no ECN congestion experienced
IP: Total length = 328 bytes
IP: Identification = 7
IP: Flags = 0x4
IP: .1.. .... = do not fragment
IP: ..0. .... = last fragment
IP: Fragment offset = 0 bytes
IP: Time to live = 255 seconds/hops
IP: Protocol = 17 (UDP)
IP: Header checksum = 7a9e
IP: Source address = 0.0.0.0, OLD-BROADCAST
IP: Destination address = 255.255.255.255, BROADCAST
IP: No options
IP:
UDP: ----- UDP Header -----
UDP:
UDP: Source port = 68
UDP: Destination port = 67 (BOOTPS)
UDP: Length = 308
UDP: Checksum = 20EF
UDP:
DHCP: ----- Dynamic Host Configuration Protocol -----
DHCP:
DHCP: Hardware address type (htype) = 1 (Ethernet (10Mb))
DHCP: Hardware address length (hlen) = 6 octets
DHCP: Relay agent hops = 0
DHCP: Transaction ID = 0x9aa14ebb
DHCP: Time since boot = 0 seconds
DHCP: Flags = 0x0000
DHCP: Client address (ciaddr) = 0.0.0.0
DHCP: Your client address (yiaddr) = 0.0.0.0
DHCP: Next server address (siaddr) = 0.0.0.0
DHCP: Relay agent address (giaddr) = 0.0.0.0
DHCP: Client hardware address (chaddr) = 00:0C:29:4E:DD:B7
DHCP:
DHCP: ----- (Options) field options -----
DHCP:
DHCP: Message type = DHCPREQUEST
DHCP: IP Address Lease Time = 86400 seconds
DHCP: Maximum DHCP Message Size = 1472 bytes
DHCP: Requested IP Address = 192.168.10.109
DHCP: DHCP Server Identifier = 192.168.10.250
DHCP: Client Class Identifier = "SUNW.i86pc"
DHCP: Requested Options:
DHCP: 1 (Subnet Mask)
DHCP: 3 (Router)
DHCP: 12 (Client Hostname)
DHCP: 43 (Vendor Specific Options)
ETHER: ----- Ether Header -----
ETHER:
ETHER: Packet 165 arrived at 15:56:13.38
ETHER: Packet size = 371 bytes
ETHER: Destination = 0:c:29:4e:dd:b7,
ETHER: Source = 0:c:29:4a:b2:cd,
ETHER: Ethertype = 0800 (IP)
ETHER:
IP: ----- IP Header -----
IP:
IP: Version = 4
IP: Header length = 20 bytes
IP: Type of service = 0x00
IP: xxx. .... = 0 (precedence)
IP: ...0 .... = normal delay
IP: .... 0... = normal throughput
IP: .... .0.. = normal reliability
IP: .... ..0. = not ECN capable transport
IP: .... ...0 = no ECN congestion experienced
IP: Total length = 357 bytes
IP: Identification = 20283
IP: Flags = 0x4
IP: .1.. .... = do not fragment
IP: ..0. .... = last fragment
IP: Fragment offset = 0 bytes
IP: Time to live = 255 seconds/hops
IP: Protocol = 17 (UDP)
IP: Header checksum = 9494
IP: Source address = 192.168.10.250, nic2
IP: Destination address = 192.168.10.109, solaris254-109
IP: No options
IP:
UDP: ----- UDP Header -----
UDP:
UDP: Source port = 67
UDP: Destination port = 68 (BOOTPC)
UDP: Length = 337
UDP: Checksum = 7243
UDP:
DHCP: ----- Dynamic Host Configuration Protocol -----
DHCP:
DHCP: Hardware address type (htype) = 1 (Ethernet (10Mb))
DHCP: Hardware address length (hlen) = 6 octets
DHCP: Relay agent hops = 0
DHCP: Transaction ID = 0x9aa14ebb
DHCP: Time since boot = 0 seconds
DHCP: Flags = 0x0000
DHCP: Client address (ciaddr) = 0.0.0.0
DHCP: Your client address (yiaddr) = 192.168.10.109
DHCP: Next server address (siaddr) = 0.0.0.0
DHCP: Relay agent address (giaddr) = 0.0.0.0
DHCP: Client hardware address (chaddr) = 00:0C:29:4E:DD:B7
DHCP:
DHCP: ----- (Options) field options -----
DHCP:
DHCP: Message type = DHCPACK
DHCP: DHCP Server Identifier = 192.168.10.250
DHCP: UTC Time Offset = 32400 seconds
DHCP: RFC868 Time Servers at = 172.16.8.254
DHCP: IP Address Lease Time = 86400 seconds
DHCP: DNS Domain Name = example.com
DHCP: DNS Servers at = 172.16.8.254
DHCP: DNS Servers at = 172.16.8.252
DHCP: DNS Servers at = 168.126.63.1
DHCP: Broadcast Address = 192.168.10.255
DHCP: Router at = 192.168.10.2
DHCP: Subnet Mask = 255.255.255.0
DHCP: Client Hostname = solaris254-109
----------------------------------------------------------------
[EX2] NIC 추가
새로운 NIC를 추가하지 않고 가상 NIC를 구성하여 192.168.8.XXX으로 추가하여 작업 하는
것으로 가정한다.(부팅시의 작업에 대해서는 정의하지 않고 현재 작업으로만 설정한다.)
(1). Virtual NIC 추가
# ifconfig -a
lo0: flags=1000849<UP,LOOPBACK,RUNNING,MULTICAST,IPv4> mtu 8232 index 1
inet 127.0.0.1 netmask ff000000
pcn0: flags=1000843<UP,BROADCAST,RUNNING,MULTICAST,IPv4> mtu 1500 index 2
inet 172.16.8.254 netmask ffff0000 broadcast 172.16.255.255
ether 0:c:29:18:75:5e
# ifconfig pcn0:1 plumb up
# ifconfig pcn0:1 192.168.8.254 netmask 255.255.255.0 broadcast +
(2). DHCP Manager 설정
# /usr/sadm/admin/bin/dhcpmgr &
(a). EDIT
(b). Network Wizard
- Network Address : 192.168.8.0
- Netmask : 255.255.255.0
- Network Type : LAN
- Routing : Use router (192.168.8.XXX)
- NIC Domain : Next(Skip)
- NIC+ Domain : Next(Skip)
- Verification : Finish
(c). Address Wizard
- Number of IP Addresses : 10
- Starting IP Address : 192.168.8.100
- Generate Client Hostnames : Check
- Next > Next > Next > Finish
8. pntadm, dhtadm 명령어를 사용한 DHCP 서버 관리
_________________________________________________
pntadm (p:dhcp, nt:network)-> /var/dhcp/dhcp_network
dhtadm (dht:dhcptab )-> /var/dhcp/dhcptab
서버의 설정이 있다면 삭제하고 다시 설정 해야 한다.
# dhcpconfig -U -x -h
#include<iostream>
using std::endl;
using std::ostream;
using std::cout;
using std::istream;
using std::cin;
class My
{
friend ostream& operator<<(ostream &os, My &my);
friend istream& operator>>(istream &os, My &my);
public:
My(double _a, double _b):a(_a),b(_b){ }
My()
{
}
private:
double a,b;
};
int main()
{
My m1(1.1,2.2);
My m2(3.3,4.4);
//cout 은 ostream의 객체
//cin 은 istream의 객체
//객체 출력
//cout.operator<<(m1) //멤버함수에 의한 오버로딩 해결 불가능
//operator<<(cout,m1); //전역함수에 의한 오버로딩으로 해결
cout<<m1<<endl;
cout<<m2<<endl;
My m3;
cout<<"실수 두개 입력 : ";
cin>>m3;//operator>>(cin,m3)
cout<<"m3 "<<m3<<endl;
return 0;
}
//////////////////////////////////////////////////
//전역함수
ostream& operator<<(ostream &os, My &my)
{
os<<my.a<<" "<<my.b;
return os;
}
istream& operator>>(istream &is, My &my)
{
is>>my.a>>my.b;
return is;
}
///////////////////////////////////////////////
int *p;
p=new int;
delete p;
////////////////////////////////////////////////
int *p;
p=new int[100];
delete []p;
///////////////////////////////////////////////
int *p[3];
p[0]=new int;
delte p[0];
//////////////////////////////////////////////
int *p[3]
p[0] = new int[100];
delete [] p[0];
//////////////////////////////////////////////
#include<iostream>
using std::cout;
using std::cin;
using std::endl;
using std::ostream;
using std::istream;
class MyString
{
friend ostream& operator<<(ostream &os,MyString &ms);
friend istream& operator>>(istream &is, MyString &ms);
public:
MyString();
MyString(char *pC);
~MyString();
private:
char *ptr;
};
MyString::MyString()
{
//#define NULL 0, 포인터가 가리키는 값이 없음
ptr=NULL;
cout<<"인수를 받지 않는 생성자 호출\n";
}
MyString::MyString(char *pC)
{
ptr = new char[strlen(pC)+1];//동적할당
strcpy(ptr,pC);//문자열 복사
}
MyString::~MyString()
{
if(ptr!=NULL)
{
delete []ptr;//동적 할당 해제
cout<<"동적 메모리 할당 해체\n";
}
}
ostream& operator<<(ostream &os,MyString &ms)
{
if(ms.ptr!=NULL)
{
os<<ms.ptr<<endl;
}
return os;
}
istream& operator>>(istream &is, MyString &ms)
{
char temp[1024];
is>>temp;
ms.ptr= new char[strlen(temp)+1];
strcpy(ms.ptr,temp);
return is;
}
int main()
{
MyString s1 = "hello world";
MyString s2 = "time and tied wait for no man";
MyString s3;
cout<<"s1="<<s1<<endl;
cout<<"s2="<<s2<<endl;
cout<<"문자열입력 : ";
cin>>s3; // operator>>(cin,s3);
cout<<"s3="<<s3<<endl;
return 0;
}
#include<iostream>
using std::cout;
using std::cin;
using std::endl;
//////////////////////////////////////////////////////////////////////
class My
{
// 프렌드 함수 - 클래스와 전역 함수가 밀접한 관계를 갖는 경우 선언
// 전역함수는 클래스의 모든 멤버를 자유롭게 접근
friend My operator+(int n, My &my); //프렌드 함수
public:
My(double _a=0, double _b=0);
My operator+(int c);
void Out();
private:
double a,b;
};
My::My(double _a, double _b):a(_a),b(_b)
{ }
My My::operator+(int c)
{
My temp ;
temp.a=a+c;
temp.b=b+c;
return temp;
}
void My::Out()
{
cout<<"a="<<a<<" "<<"b="<<b<<endl;
}
//////////////////////////////////////////
My operator+(int n, My &my)
{
My temp;
temp.a = n + my.a;
temp.b = n + my.b;
return temp;
}
int main()
{
My m1(1.1,2.2);
My m2;
m2 = m1+10; // m1.operator+(10);
m1.Out();
m2.Out();
My m3;
//좌측 피연산자가 기본자료형이 되는 경우 클래스의 멤버 함수 호출 불가
m3 = 10+m1; // m1.operator+(10);
m3.Out();
return 0;
}
A1 + A2
1. 멤버 함수 : 좌측 호출 객체 + 우측 인수 -> A1.operator+(A2)
2. 전역 함수 : 좌측 인수 + 우측 (인수)객체 -> operator+(a1+a2);
++A
1. 멤버 함수 : 호출 객체
a.operator++();
2. 전역 함수 : 인수
operator++(a);
#include<iostream>
using std::cout;
using std::cin;
using std::endl;
/////////////////////////////////////////클래스 선언
class Point
{
//프렌드 함수 선언
friend Point& operator--(Point &pbar);
public:
Point(int _a, int _b);
Point& operator++();
void Show();
private:
int a, b;
};
///////////////////////////////////////외부 정의
Point::Point(int _a, int _b):a(_a),b(_b)
{
}
//Point& 레퍼런스로 리턴 시 복사본은 생성되지 않는다.( 참고 :Point* 주소로 받겠다.)
Point& Point::operator++()
{
++a;
++b;
return *this; // this (주소) --> *this (주소가 가리키는 값)
}
/// this 호출한 객체의 주소저장되어있다!!!!!!!!!!!
void Point::Show()
{
cout<<"a = "<<a<<" " <<" b = "<<b<<endl;
}
/////////////////////////////////////////전역 함수
Point& operator--(Point &pbar)
{
--pbar.a;
--pbar.b;
return pbar;
}
int main()
{
Point p(5,6);
++++p;
p.Show(); //p.operator++();
------p;
p.Show(); //operator--(p);
return 0;
}
DNS Server Management
[참고] 실무에서 많이 사용되고 있는 서비스
-> DNS, FTP, MAIL, WEB(WAS), DB Server
1. DNS 서버 설정 파일들
■ /etc/named.conf DNS Configuration File
■ /var/named/exampleXXX.zone DNS Forward Lookup Zone File
■ /var/named/exampleXXX.rev DNS Reverse Loookup Zone File
■ /var/named/localhost.rev DNS Localhost Reverse Lookup Zone File
■ /var/named/named.root DNS Root Domain Lookup File
■ /etc/nsswitch.conf Name Service Switching Configuration File
■ /etc/resolv.conf DNS Client Resolver File
(1). /etc/named.conf 파일 해석
/etc/named.conf 파일을 in.named 데몬이 읽어 들이는 DNS 서버의 주 설정 파일이다.
BIND 8.X 이후 버전에서는 이전의 버전에 비해 새로운 설정 파일을 사용한다.
■ 이전 설정 파일 : /etc/named.boot (BIND 4.x)
■ 새로운 설정 파일: /etc/named.conf (BIND 8.x, BIND 9.x)
BIND 4.9.x 버전의 /etc/named.boot 파일을 /etc/named.conf 파일로 변환하기 위해서는
/usr/sbin/named-bootconf 스크립트를 사용하면 된다.
/etc/named.conf 파일에서 사용되는 것은 다음과 같다.
- Root Server가 등록되어진 파일 위치 지정
- Primary / Secondary / Caching-Only Server 지정 및 DB 파일 지정
- DNS 서버의 zones of Authority 지정
- 서버용 파일들의 위치 지정
- 도메인에 대한 보안 설정
- 로그 기록 정의 지정
- zone 옵션 지정
# cat /etc/named.conf
-----------------------------------------------------------------------
options {
directory "/var/named";
allow-transfer { 172.16.8.154; 172.16.7.154; };//마스터와 슬레이브와의 관계
allow-query { 172.16.8.0/16; };//나에게 쿼리를 날릴 수 있는 대역 지정
};
acl "nets" {
{ 172.16.0.0/16; 172.15.0.0/16; };
};
zone "." IN {
type hint;
file "named.root";
};
zone "localhost" IN {
type master;
file "localhost.zone";
};
zone "0.0.127.in-addr.arpa" IN {
type master;
file "localhost.rev";
};
zone "example.com" IN {
type master;
file "example.zone";
allow-transfer { 172.16.8.154; };
allow-query { "nets"; };
};
zone "8.16.172.in-addr.arpa" IN {
type master;
file "example.rev";
};
zone "daum.net" IN {
type master;
file "db1/daum.zone";
};
zone "7.16.172.in-addr.arpa" IN {
type master;
file "db/daum.rev";
};
zone "daum.net" IN {
type slave;
masters { 172.16.8.254;};
file "db1/daum.zone";
};
-----------------------------------------------------------------------
zone block 에 정의된 것을 순서대로 나열하면 다음과 같다.
- Hint Server(캐쉬 네임서버 지정)
- Reverse Localhost(로컬네트워크 리버스 도메인 지정)
- Forward Primary Name Server(네임서버가 위치하는 곳의 포워드 도메인 지정)
- Reverse Primary Name Server(네임서버가 위치하는 곳의 리버스 도메인 지정)
(1-1). 각 도메인 설정 파일들의 위치 지정
-----------------------------------------------------------------------
options {
directory "/var/named";
};
-----------------------------------------------------------------------
각 도메인의 설정파일들이 위치할 디렉토리를 정의한다. 보통 /var/named 디렉토리를 많이
지정한다. 하지만 보안상의 이유로 기본 위치를 지정하지 않고 /named와 같이 다른 디렉토
리를 지정하는 경우도 많다. 이 경우의 대부분은 chroot 환경을 구성하는 경우이다.
이 파일의 전반적인 부분에서 "file" 다음에 나오는 모든 파일은 /var/named 디렉토리 하
위에 존재하게 된다. 경우에 따라서 다음과 같이 지정하는 경우도 존재한다.
zone "example254.com" IN {
type master;
file "zone1/example254.zone";
};
위와 같은 경우 포워드 존 파일의 위치는 /var/named/zone1/example254.zone 파일이 된다.
여러개의 도메인을 관리하는 도메인 위임 서버(웹 호스팅 업체)에서는 위와 같은 경우의
선언이 흔하게 된다.
[참고] options statemnet, directory element
options
Controls global server configuration options and sets
defaults for other statements.
directory
The working directory of the server. Any non-absolute
pathnames in the configuration file will be taken as
relative to this directory. The default location for
most server output files, for example, named.run, is
this directory. If a directory is not specified, the
working directory defaults to ".", the directory from
which the server was started. The directory specified
should be an absolute path.
(1-2). ACL 설정
-----------------------------------------------------------------------
acl "nets" {
{ 172.16.0.0/16; 172.15.0.0/16; };
};
-----------------------------------------------------------------------
allow-transfer, allow-query 같은 지시자를 사용해서 설정할때 사용하기 위한 ACL(Access
Control List)를 설정할 때 사용한다.
[참고] acl statement 와 allow-transfer element
acl Defines a named IP address matching list, for access
control and other uses.
allow-transfer
Specifies which hosts are allowed to receive
zone transfers from the server. allow-transfer
may also be specified in the zone statement, in
which case it overrides the options allow-
transfer statement. If not specified, the
default is to allow transfers from all hosts.
(1-3). 캐쉬 네임서버와 로컬네트워크 설정
-----------------------------------------------------------------------
zone "." IN {
type hint;
file "named.root";
};
zone "0.0.127.in-addr.arpa" IN {
type master;
file "localhost.rev";
};
-----------------------------------------------------------------------
캐쉬 네임 서버와 로컬 네트워크 설정은 반드시 있어야 하는 부분이다. 캐쉬 네임서버는
자신의 DB 정보(Forward Zone File, Reverse Zone File)이 없는 경우에 참고할 Root Name
Server의 위치를 지정하거나 로컬호스트에 대한 지정을 하는 부분이다.
[참고] zone statement, hint / master elements
zone Defines a zone.
hint The initial set of root name servers is specified
using a hint zone. When the server starts up, it uses
the root hints to find a root name server and get the
most recent list of root name servers.
master The server has a master copy of the data for the zone
and will be able to provide authoritative answers for
it.
(1-4). 포워드 도메인 / 리버스 도메인 파일 설정
Forward / Reverse Lookup Zone Files 설정을 한다. 아래 예제는 example.com 도메인에 대
해서 Master DNS 서버로 동작하고 Forward Lookup Zone 파일은 /var/named/example.zone
파일임을 나타낸다. 또한 "nets" 네트워크에 대해서만 Zone 파일들이 전송할수 있도록 한
정이 되어 있다.(Master Server에서 Slave Server로)
-----------------------------------------------------------------------
zone "example.com" IN {
type master;
file "example.zone";
allow-transfer { "nets"; };
allow-query { "nets"; };
};
zone "8.168.192.in-addr.arpa" IN {
type master;
file "example.rev";
};
-----------------------------------------------------------------------
(2). /var/named/named.root 파일 해석
named.root 파일은 ftp.internic.net 이나 rs.internic.net 사이트에서 FTP로 접속하여 받
을 수 있다. 접속하여 파일을 받을수 있는 디렉토리는 /domain 디렉토리에 존재한다.
다음은 ftp.internic.net 사이트에서 받은 named.root 파일의 내용이다.
# cat /var/named/named.root
-----------------------------------------------------------------------
. 3600000 IN NS A.ROOT-SERVERS.NET.
A.ROOT-SERVERS.NET. 3600000 A 198.41.0.4
. 3600000 NS B.ROOT-SERVERS.NET.
B.ROOT-SERVERS.NET. 3600000 A 192.228.79.201
. 3600000 NS C.ROOT-SERVERS.NET.
C.ROOT-SERVERS.NET. 3600000 A 192.33.4.12
. 3600000 NS D.ROOT-SERVERS.NET.
D.ROOT-SERVERS.NET. 3600000 A 128.8.10.90
. 3600000 NS E.ROOT-SERVERS.NET.
E.ROOT-SERVERS.NET. 3600000 A 192.203.230.10
. 3600000 NS F.ROOT-SERVERS.NET.
F.ROOT-SERVERS.NET. 3600000 A 192.5.5.241
. 3600000 NS G.ROOT-SERVERS.NET.
G.ROOT-SERVERS.NET. 3600000 A 192.112.36.4
. 3600000 NS H.ROOT-SERVERS.NET.
H.ROOT-SERVERS.NET. 3600000 A 128.63.2.53
. 3600000 NS I.ROOT-SERVERS.NET.
I.ROOT-SERVERS.NET. 3600000 A 192.36.148.17
. 3600000 NS J.ROOT-SERVERS.NET.
J.ROOT-SERVERS.NET. 3600000 A 192.58.128.30
. 3600000 NS K.ROOT-SERVERS.NET.
K.ROOT-SERVERS.NET. 3600000 A 193.0.14.129
. 3600000 NS L.ROOT-SERVERS.NET.
L.ROOT-SERVERS.NET. 3600000 A 198.32.64.12
. 3600000 NS M.ROOT-SERVERS.NET.
M.ROOT-SERVERS.NET. 3600000 A 202.12.27.33
-----------------------------------------------------------------------
하지만 수업을 위해서 변경이 된 파일을 사용할 것이다. 다음은 변경된 파일이다.
# cat /var/named/named.root
. 86400 IN NS ns.example.com.
ns.example.com. 86400 IN A 172.16.8.254
(3). /var/named/exampleXXX.zone 파일 해석
Forward-Domain 파일안에는 호스트 이름을 IP에 맵핑시키는 정보가 주로 설정된다. 이 정
보를 설정하기 위해서는 A Record를 사용한다. 이 외에도 SOA, NS, MX, CNAME 등의 Record
를 지정할 수 있다.
다음은 /var/named/exampleXXX.zone 파일을 예제이다.
# cat /var/named/exampleXXX.zone
-----------------------------------------------------------------------
$TTL 4
$ORIGIN example.com. //선언이안되어있다면 /etc/named.conf “example.com” 이 오리지날
@ IN SOA ns.example.com. root.example.com. (
2007051801 ; serial number
3M ; refresh time
1M ; retry time
1W ; expiry day
1D ; time to live
)
example.com. IN NS ns.example.com.
ns.example.com. IN A 172.16.8.254
example.com. IN NS ns2.example.com.
ns2.example.com. IN A 172.16.8.154
;================================================
; Basic Network
;================================================
www IN A 172.16.8.254
www IN A 172.16.8.253
www IN A 172.16.8.252
example.com. IN MX 10 mail.example.com.
mail IN A 172.16.8.254
example.com. IN MX 20 mailhost.example.com.
mailhost IN A 172.16.8.254
ftp IN A 172.16.8.254
cname1 IN A 172.16.8.253
cname2 IN CNAME cname1
-----------------------------------------------------------------------
파일을 해석할 때 필요한 정보들에 대해 자세히 알아 보자.
(3-1). DNS Zone Files Entry Format
(형식)
[Domain] [TTL] CLASS RecordType Data
* [Domain] 부분이 생략되면 오리지널 도메인이 된다. 오리지널 도메인을 찾는 순서는 다
음과 같다.
- zone 파일내의 $ORIGIN 값에 지정된 것
- /etc/named.conf 파일의 포워드 존의 도메인
* [TTL] 부분이 생략된면 $TTL 에 의해 지정된 값이 된다. TTL(Time To Live)가 지정되는
순서는 다음과 같다.
- 각 엔트리의 TTL 값에 지정된 것
- $TTL로 지정된 값
- SOA 지시자의 TTL 필드의 값
* CLASS는 현재 다른 것이 없고 IN(Internet)만 존재한다.
* RecoredType에 따라서 첫번째 필드와 마지막 필드가 결정된다.
[EX] 다양한 RecordType의 예
example.com. IN SOA ns.example.com. root.example.com (Number .....)
SOA – domain
example.com. IN NS ns.example.com.
NS - nameserver
ns.example.com. IN A 172.16.8.254
A - address
www.example.com. IN A 172.16.8.254
example.com. IN MX 10 mail.example.com.
172.16.8.254 IN PTR ns.example.com.
[EX] RecordType TEST
# nslookup -q=NS example.com
# nslookup -q=A ns.example.com
# nslookup -q=MX example.com
# nslookup -q=PTR 172.16.8.254
(3-2). 주석처리(Comment)
- ; (Window 주석처리)
- # (Unix 주석처리)
- /* */ (C 주석처리)
- // (C++ 주석처리)
(3-3). SOA(Start Of Authority) Record
(예) SOA Record Type
@ IN SOA ns.example.com. root.example.com. (
2007051801 ; serial number
3H ; refresh time
1H ; retry time
1W ; expiry day
1D ; time to live
)
====== Master ======== ======= Slave ==========
in.named(53) in.named(53)
/etc/named.conf /etc/named.conf
/var/named/DB /var/named/copy DB
====================== =======================
(a). Serial Number
exampleXXX.zone ----> exampleXXX.zone
Serial : 1 Serial : 1
Modify
Serial : 2 > Serial : ?
(권장) Serial : 2006122000
(b). Refresh Time // 동기화타임
Mater Server -----> Slave Server
3 hours
(권장) 12시간, 24시간
(c). Retry Time // 재시도 타임
Master Server --X--> Slave Server
3 hours Fail
----->
1 hours
(권장) 1시간, 3시간
(d). Expire Date // 마스터가 죽었을 때 대체 복구 시간
Master Server Slave Server
------>
Fail ---X-->
Data(7 Days)
(권장) 7일
(e). TTL(Time To Live)
Server ------> Client
(권장) 1일
(3-4). 여러가지 레코드 종류(Record Types)
(a). NS Record (Name Server)
example.com. IN NS ns.example.com.
domain full domain (nameserver)
ns.example.com. IN A 172.16.8.254
nameserver ip
(b). A Record (Address)
www.example.com. IN A 172.16.8.254
(c). MX Record (Mail Exchange)
example.com. IN MX 10 mail1.example.com.
domain full domain
mail1 IN A 172.16.8.254
name ip
example.com. IN MX 20 mail2.example.com.
mail2 IN A 172.16.10.254
[참고] SPAM 메일서버, 일반 메일 서버 등록 방식
(d). CNAME Record (Canonical Name)
www1 IN A 172.16.8.254
www2 IN A 172.16.8.254
or
www1 IN A 172.16.8.254
www2 IN CNAME www1
(e). PTR Record (Pointer)
254 IN PTR www.example.com.
(4) /var/named/exampleXXX.rev 파일 해석
Reverse Domain 파일은 주로 IP 주소에 Domain Name의 맵핑된 정보가 주로 설정된다. 이 설
정을 하기 위해서는 PTR Record를 사용한다. Reverse Domain 파일안에 반드시 등록 되어 있
어야 하는 정의는 자신의 도메인안에 존재하는 DNS 서버에 대한 Reverse Domain이다.
# cat /var/named/exampleXXX.rev
-----------------------------------------------------------------------
$TTL 4
$ORIGIN 8.16.172.IN-ADDR.ARPA.
@ 1D IN SOA ns.example.com. root.example.com. (
2007051800 ; serial number
3M ; refresh time
1M ; retry time
1W ; expiry day
1D ; minimum time
)
8.16.172.IN-ADDR.ARPA. IN NS ns.example.com.
254 IN PTR ns.example.com.
-----------------------------------------------------------------------
[참고] 리버스 존 파일안에 반드시 정의 되어야 하는 설정
DNS Client DNS Server
--------------->
<---------------
--------------->
<---------------
# nslookup www.itbank.co.kr
.....
59.5.100.166 -> 168.126.63.1 DNS C 1.63.126.168.in-addr.arpa. Internet PTR ?
168.126.63.1 -> 59.5.100.166 DNS R 1.63.126.168.in-addr.arpa. Internet PTR kns.kornet.net.
59.5.100.166 -> 168.126.63.1 DNS C www.itbank.co.kr. Internet Addr ?
168.126.63.1 -> 59.5.100.166 DNS R www.itbank.co.kr. Internet Addr 58.185.71.171
.....
(4-1). PTR Record
PTR Record Type(Pointer)
254 IN PTR www.example.com.
[EX] Recored Type 필드 예
8.16.172.IN-ADDR.ARPA. IN NS ns.example.com.
254 IN PTR ns.example.com.
200 IN PTR solaris200.example.com.
201 IN PTR solaris201.example.com.
202 IN PTR solaris202.example.com.
[EX] PTR / A Record Type 실습
ftp.example.com -> 172.16.8.200
# vi /var/named/example254.zone
.....
ftp IN A 172.16.8.200
.....
# vi /var/named/example254.rev
.....
200 IN PTR ftp.example.com.
.....
(5) /var/named/localhost.rev 해석
Reverse Loopback Domain 파일은 Reverse Loopback Domain 주소에 대해 Domain Name으로
변환하는 역할을 갖는다. 모든 도메인 서버는 자신의 주소를 master DNS Server로 설정이
되어야 한다.
형식은 위의 파일과 같다. 해석하는 방법은 같다.
# cat /var/named/localhost.rev
-----------------------------------------------------------------------
$TTL 4
@ 1D IN SOA ns.example.com. root.example.com. (
2007051800 ; serial number
3M ; refresh time
1M ; retry time
1W ; expiry day
1D ; minimum time
)
0.0.127.IN-ADDR.ARPA. IN NS ns.example.com.
1 IN PTR ns.example.com.
-----------------------------------------------------------------------
(6). /etc/nsswitch.conf 파일 해석
/etc/nsswitch.conf 파일은 이름서비스를 제공하는 서버들의 정보를 얻어 올수 있는 순서
를 정하는 중요한 파일이다.
# cat /etc/nsswitch.conf
......
# You must also set up the /etc/resolv.conf file for DNS name
# server lookup. See resolv.conf(4).
hosts: files dns
......
(7) /etc/resolv.conf 파일 해석
# cat /etc/resolv.conf
domain example.com
search example.com
nameserver 172.16.8.XXX
nameserver 172.16.8.254
/etc/resolve.conf 파일안에 정의 될수있는 statements
* domain - 자신의 lcoal domain을 적어 주면된다. domain이 설정되지 않아도 운영
하는데 아무런 지장이 없다.
(예) domain example.com
* search - search에 의해 지정된 되메인 부분은 생략할 수 있도록 하는 것이다. 만
약 "search example.com"로 지정되어 있다면 example.com의 서브 도메인
들은 그냥 호스트이름만으로도 찾을 수 있게 된다.
예를 들어 www.example.com를 찾을려고 한다면 www 만으로도 사용이 가능
하다.
(예) search example.com
(사용예) # ping www
# nslookup www
* nameserver - DNS 서버를 지칭한다. 일반적으로 3개까지 지정할수 있으면 그 이상 정의
된것은 인식이 되지 않는다. 회사내에서는 1차 DNS 서버와 2차 DNS 서버
를 정의하면 된다.
(예) nameserver 168.126.63.1
nameserver 168.126.63.2
nameserver 168.126.63.3
[EX] /etc/resolv.conf 해석 순서 확인
# cat /etc/resolv.conf
nameserver 172.16.8.XXX
http://www.daum.net -> /etc/hosts -> DNS(172.16.8.XXX) -> .(Nameless Root)
# nslookup www.daum.net
Server: ns.solarisXXX.example.com
Address: 172.16.8.XXX
*** ns.solarisXXX.example.com can't find www.daum.net: Server failed <----- 에러 메세지 확인
# vi /etc/resolv.conf
nameserver 168.126.63.1 <----- 정보 라인 추가
nameserver 172.16.8.XXX
# nslookup www.daum.net
Server: kns.kornet.net
Address: 168.126.63.1
Non-authoritative answer:
Name: daumtop.daum.akadns.net
Addresses: 211.115.77.213, 211.115.77.212, 211.115.115.212, 211.32.117.30
211.115.115.211, 222.231.51.78, 211.115.77.214, 222.231.51.40
Aliases: www.daum.net
# vi /etc/resolv.conf
nameserver 172.16.8.XXX <----+---- 정의 순서 교체
nameserver 168.126.63.1 <----+
# pkill -9 in.named
# pgrep -lf in.named
(in.named 데몬 종료 여부 확인)
# nslookup www.daum.net
(약 15초정도의 Time Interval이 걸린다.)
*** Can't find server name for address 172.16.8.20X: No response from server
Server: kns.kornet.net
Address: 168.126.63.1
Non-authoritative answer:
Name: daumtop.daum.akadns.net
Addresses: 211.115.115.212, 211.32.117.30, 222.231.51.77, 211.115.77.213
211.115.77.214, 211.115.77.211, 222.231.51.78, 222.231.51.40
Aliases: www.daum.net
# in.named
# nslookup www.daum.net
-> 정보 요청이 되지 않는다.
DNS Server Administrator Role
DNS Server Admin. Role List
■ 도메인 등록 (Domain Insert)
■ 서브 도메인 위임(Sub Domain Configuration = Domain Delegation)
■ 마스터 / 슬레이브 DNS 서버 (Master Server, Slave Server)
■ 캐싱 / 포워딩 DNS 서버 (Caching Olny Server, Forwarding Server)
■ DNS 부하 분산 (DNS Load Balancing = Web Load Balancing )
■ 동적 업데이트 설정(Dynamic Updates)
■ 보안 설정 (Security / ACL(Access Control List))
(1). 도메인 등록(Domain Insert)
DNS 서버 관리자에게 다음과 같은 도메인에 대한 IP 설정 요청이 들어 왔다고 해보자.
도메인에 IP 주소 등록 요청 예
- 172.16.8.254 ===> www.solaris254.example.com
- 172.16.8.254 ===> mail.solaris254.example.com
- 172.16.8.254 ===> ftp.solaris254.example.com
■ Forward Domain 파일에 등록
Forward Zone File (example254.zone)
# vi /var/named/example254.zone
.....
www IN A 172.16.8.254
IN MX 10 mail
mail IN A 172.16.8.254
ftp IN A 172.16.8.254
.....
# vi /var/named/example254.rev
254 IN PTR www.solaris254.example.com.
254 IN PTR ftp.solaris254.example.com. (X)
254 IN PTR mail.solaris254.example.com. (X)
//중복 정보 x
(EX1) 도메인 등록
■ 도메인에 IP 주소 등록 요청 예
- 172.16.8.XXX ===> cafe.solarisXXX.example.com
# cd /var/named
# vi exampleXXX.zone
......
;================================
; Domain Configuration for Test
;================================
[수정전]
test IN A 172.16.8.XXX
[수정후]
test IN A 172.16.8.XXX
cafe IN A 172.16.8.XXX <----- 라인 추가
......
# pkill -1 in.named
# nslookup cafe.solarisXXX.example.com
(출력 정보 확인)
Client -------> DNS(192.168.10.XXX)
(Windows XP) /var/named/exampleXXX.zone
www IN A 192.168.10.XXX
-----------------------------------------> Apache(192.168.10.XXX)
httpd(80, httpd.conf)
http://www.solarisXXX.example.com
■ Apache 설정
(주 설정 파일 설정)
# cd /etc/apache
# cp httpd.conf-example httpd.conf
(index.html 파일 생성)
# cd /var/apache/htdocs
# cp /etc/passwd index.html
(Apache 서버 기동)
# /etc/init.d/apache restart
# pgrep -lf httpd
-> 떠 있는 httpd 데몬들 확인
(DNS 설정 변경)
# cd /var/named
# vi exampleXXX.zone
[수정전]
;www IN A 172.16.8.XXX
www IN A 192.168.10.1
www IN A 192.168.10.2
www IN A 192.168.10.3
[수정후]
www IN A 192.168.10.XXX <----- 라인 추가
;www IN A 172.16.8.XXX
;www IN A 192.168.10.1 <----- 주석 처리
;www IN A 192.168.10.2 <----- 주석 처리
;www IN A 192.168.10.3 <----- 주석 처리
# pkill -1 in.named
# nslookup www.solarisXXX.example.com
(Window Server에서 확인)
네트워크 환경 > 로컬영역 연결 > 속성 > TCP/IP > DNS 서버 정보(192.168.10.XXX)
웹브라우저 에서 확인
http://www.solarisXXX.example.com
=> DNS 서버 정보 복원(Windows 서버)
(EX2) 부하분산(Load Balancing)
웹 부하 분산을 시킬때 DNS 서버를 사용할 수도 있다. 하지만 이것은 정확한 부하 분산이
라고 말할수는 없다. 이런경우 L4 스위치를 사용하는 경우와는 조금의 차이점이 존재한다.
예: www.daum.net
+----- www(IP1) +---- NAS
| |
[L4]----+----- www(IP2) -----+---- DB
|
+----- www(IP3)
[그림] L4 스위치를 사용한 웹 부하 분산의 예
+----- www(IP1) +---- NAS
| |
[DNS]---+----- www(IP2) -----+---- DB
|
+----- www(IP3)
[그림] DNS 서버를 이용한 웹 부하 분산의 예
[참고] NAS?
/root/docs/Reference/DAS_NAS_SAN.txt
[EX] Windows 서버에서의 테스트
C:\> nslookup www.daum.net
Server: kns.kornet.net
Address: 168.126.63.1
Non-authoritative answer:
Name: daumtop.daum.akadns.net
Addresses: 211.115.77.213, 211.115.77.211, 211.32.117.30, 211.115.115.212
211.115.77.214, 222.231.51.78, 222.231.51.77, 211.115.115.211
Aliases: www.daum.net
C:\> nslookup www.daum.net
Server: kns.kornet.net
Address: 168.126.63.1
Non-authoritative answer:
Name: daumtop.daum.akadns.net
Addresses: 211.115.77.211, 211.115.115.212, 222.231.51.77, 211.115.115.211
211.32.117.30, 211.115.77.213, 211.115.77.212, 222.231.51.40
Aliases: www.daum.net
C:\> nslookup www.daum.net
Server: kns.kornet.net
Address: 168.126.63.1
Non-authoritative answer:
Name: daumtop.daum.akadns.net
Addresses: 211.115.77.213, 211.115.77.211, 211.32.117.30, 211.115.115.212
211.115.77.214, 222.231.51.78, 222.231.51.77, 211.115.115.211
Aliases: www.daum.net
C:\> nslookup www.daum.net
Server: kns.kornet.net
Address: 168.126.63.1
Non-authoritative answer:
Name: daumtop.daum.akadns.net
Addresses: 211.115.77.212, 222.231.51.40, 211.115.77.211, 222.231.51.78
211.115.77.214, 211.32.117.30, 211.115.77.213, 211.115.115.212
Aliases: www.daum.net
Forward Zone File (exampleXXX.zone)
# vi /var/named/exampleXXX.zone
.....
[수정전]
www IN A 192.168.10.XXX
;www IN A 172.16.8.XXX
;www IN A 192.168.10.1
;www IN A 192.168.10.2
;www IN A 192.168.10.3
[수정후]
;www IN A 192.168.10.XXX <----- 주석 처리
;www IN A 172.16.8.XXX
www IN A 192.168.10.1 <----- 주석 제거
www IN A 192.168.10.2 <----- 주석 제거
www IN A 192.168.10.3 <----- 주석 제거
.....
# pkill -1 in.named
# nslookup www.solarisXXX.example.com
(정보 확인 및 1초후에 다시 시도)
# nslookup www.solarisXXX.example.com
(정보 확인 및 1초후에 다시 시도)
# nslookup www.solarisXXX.example.com
(정보 확인 및 1초후에 다시 시도)
# nslookup www.solarisXXX.example.com
(정보 확인 및 1초후에 다시 시도)
(2). 도메인 위임(Domain Delegation)
도메인 위임은 일반적으로 웹호스팅 업체(예:가비아)에서 일반적으로 많이 사용하고 있다.
[참고] domain 할당 받는 방법(예: 가비아)
+---------------------- example.com ------------------------+
|* DNS(ns.example.com) |
| |
| +----- solarisXXX.example.com ------+ |
| | * DNS(ns.solarisXXX.example.com) | |
| | | |
| | | |
| +-----------------------------------+ |
| |
+-----------------------------------------------------------+
DNS(ns.example.com)
# vi /var/named/example254.zone
.....
solaris200.example.com. IN NS ns.solaris200.example.com.
ns.solaris200.example.com. IN A 172.16.8.200
.....
or
solaris200 IN NS ns.solaris200
ns.solaris200 IN A 172.16.8.200
.....
# vi /var/named/example254.rev
.....
200 IN PTR ns.solaris200.example.com.
[EX] Hint Domain Administration
+----------------- . (Nameless Root Domain)-----------------+
|* DNS(A.ROOT-SERVERS.NET) |
| |
| +----------- .com ------------------+ |
| | * DNS(ns.com) | |
| | | |
| | | |
| +-----------------------------------+ |
| |
+-----------------------------------------------------------+
# vi /var/named/example254.zone
....
com. IN NS ns.com.
ns.com. IN A 172.16.8.200
....
(3). 마스터 / 슬레이브 DNS 서버 구성
Master Server / Slave Server
====== Master Server ======= ======== Slave Server ========
in.named(53) in.named(53)
/etc/named.conf /etc/named.conf
- Forward Zone File(M) - Forward Zone File(S)
- Reverse Zone File(M) - Reverse Zone File(S)
- Localhost Zone File(M) - Localhost Zone File(M)
- Zone File for Hint - Zone File for Hint
/var/named/Zone File /var/named/Copy Zone File
- Forward Zone File - Copy Forward Zone File
- Reverse Zone File - Copy Reverse Zone File
- Localhost Zone File - Localhost Zone File
- Zone File for Hint - Zone File for Hint
============================ ==============================
[그림] Master/Slave DNS Server
(전제 조건)
- Master DNS 서버의 도메인을 따른다.
solaris201(Master DNS Server) - solaris201.example.com => solaris201.example.com
solaris202(Slave DNS Server) - solaris202.example.com => solaris201.example.com
- 자리 배치에 따른 서버 결정
왼: Master, 오: Slave, 앞: Master, 뒤: Slave
(자리 배치도)
--------------------------------------------------------
solarisXXX(172.16.8.XXX)
--------------------------------------------------------
200 201 202 203 204 205
206 207 208 209 210 211
212 213 214 215 216 217
218 219 220 221 222 223
224 225 226 227 228 229
--------------------------------------------------------
(3-1). Master DNS Server 서버쪽 설정
# vi /var/named/example254.zone
......
example.com. IN NS ns1.example.com.
example.com. IN NS ns2.example.com.
ns1 IN A 172.16.8.254
ns2 IN A 172.16.8.253
......
# vi /var/named/example254.rev
......
IN NS ns1.example.com.
IN NS ns2.example.com.
254 IN PTR ns1.example.com.
253 IN PTR ns2.example.com.
......
(3-2). Slave DNS Server 서버쪽 설정
# vi /etc/named.conf
......
zone "example.com" in {
type slave;
file "example254.zone";
masters { 172.16.8.254; }; <----- 172.16.8.254: Master DNS IP
};
zone "8.16.172.in-addr.arpa" in {
type slave;
file "example254.rev";
masters { 172.16.8.254; }; <----- 172.16.8.254: Master DNS IP
};
......
# cd /var/named
# ls
localhost.rev named.root
[실습] DNS Master / Slave Server Configuration
(실습시나리오)
Domain : solaris201.example.com(Master DNS Server의 도메인)
DNS1 : ns.solaris201.example.com (solaris201)
^^^^^^^^^^^^^^^^^^^^^^
DNS2 : ns2.solaris201.example.com (solaris202)
^^^^^^^^^^^^^^^^^^^^^^
+---------------------- example.com ------------------------+
|* DNS(ns.example.com) |
| |
| +----- solarisXXX.example.com ------+ |
| | * DNS-ns.solarisXXX.example.com | |
| | * -ns2.solarisXXX.example.com | |
| | | |
| +-----------------------------------+ |
| |
+-----------------------------------------------------------+
(At Master DNS Server)
- Forward Zone File 편집
- Reverse Zone File 편집
(a). Forward Zone File 편집
# vi /var/named/example201.zone
.....
;
; DNS Server(Primary)
;
solaris201.example.com. IN NS ns.solaris201.example.com.
solaris201.example.com. IN NS ns2.solaris201.example.com. <----- 라인 추가
ns IN A 172.16.8.201
ns2 IN A 172.16.8.202 <----- 라인 추가
.....
(b). Reverse Zone File 편집
# vi /var/named/example201.rev
......
8.16.172.IN-ADDR.ARPA. IN NS ns.solaris201.example.com.
8.16.172.IN-ADDR.ARPA. IN NS ns2.solaris201.example.com. <----- 라인 추가
201 IN PTR ns.solaris201.example.com.
202 IN PTR ns2.solaris201.example.com. <----- 라인 추가
......
# pkill -1 in.named
# tail -f /var/adm/messages
(At Slave DNS Server)
- /etc/named.conf 설정
- /var/named 파일 정리
(a). /etc/named.conf 파일 편집
# vi /etc/named.conf
.....
zone "solaris201.example.com" in { <----- 정보 수정(solaris202 -> solaris201)
type slave; <----- 정보 수정(master -> slave)
masters { 172.16.8.201; }; <----- 라인 추가
file "example201_backup.zone"; <----- 정보 수정
(example202.zone -> example201_backup.zone)
};
zone "8.16.172.in-addr.arpa" in {
type slave; <----- 정보 수정(master -> slave)
masters { 172.16.8.201; }; <----- 라인 추가
file "example201_backup.rev"; <----- 정보 수정
(example202.rev -> example201_backup.rev)
};
.....
(b). /var/named 파일 정리
# cd /var/named
# rm example202.zone example202.rev
# tail -f /var/adm/messages
# pkill -1 in.named
# cd /var/named
# ls
(새로 생성된 Zone File 확인)
[Check Point] Slave Server
-> /var/named/(Zone File) 생성 확인
-> /var/adm/messages 로그 기록 정보 확인
(Master / Slave Zone Data Update 설정 테스트)
(At Master DNS Server)
# cd /var/named
# vi example201.zone
......
;--------------------------------
; Configuration for Test Domain
;--------------------------------
[수정전]
test IN A 172.16.8.201
cafe IN A 172.16.8.254
[수정후]
test IN A 172.16.8.201
cafe IN A 172.16.8.254
test1 IN A 172.16.8.254 <----- 라인 추가
......
# pkill -1 in.named
# nslookup test1.solaris201.example.com
-> 출력 화면 확인
(At Slave DNS Server)
# cd /var/named
# grep test example201_backup.zone
test 4 IN A 172.16.8.201
# pkill -1 in.named
# grep test example201_backup.zone
test 4 IN A 172.16.8.201
(At Master DNS Server)
# vi example201.zone
......
20060930 ; serial number (serial number 값을 높였다.)
......
;
; Configuration for Test Domain
;
[수정전]
test IN A 172.16.8.201
cafe IN A 172.16.8.254
test1 IN A 172.16.8.254
[수정후]
test IN A 172.16.8.201
cafe IN A 172.16.8.254
test1 IN A 172.16.8.254
test2 IN A 172.16.8.254 <----- 라인 추가
......
# pkill -1 in.named
(At Slave DNS Server)
# pkill -1 in.named
# grep test example201_backup.zone
test 4 IN A 172.16.8.201
test1 4 IN A 172.16.8.254
test2 4 IN A 172.16.8.254
(4). Caching-Only DNS Server / Forwarding DNS Server 구성
(4-1). Caching Only Server 설정
====== Caching Only Server =======
in.named(53)
/etc/named.conf
- Localhost Zone File(M)
- Zone File for Hint
/var/named/Zone File
- Localhost Zone File
- Zone File for Hint
===================================
[그림] Caching Only DNS Server
(4-2). Forwarding DNS Server 구성
====== Forwarding Server ======= ======== DNS Server ========
in.named(53) in.named(53)
/etc/named.conf /etc/named.conf
- Forward Zone File
- Reverse Zone File
- Localhost Zone File
- Zone File for Hint
/var/named
- Forward Zone File
- Reverse Zone File
- Localhost Zone File
- Zone File for Hint
============================ ==============================
[그림] Forwarding DNS Server
■ Forwarding Server 설정
# vi /etc/named.conf
.....
options {
directory "/var/named";
forwarders { 172.16.10.254; };
forward only;
};
.....
(5). Dynamic Updates 기능 설정
DNS 서버에서 동적 업데이트(Dynamic Updates) 기능은 DHCP 서버로 부터 호스트에 대한
정보를 동적으로 업데이트하는 기능이다. 이 기능을 통해 DHCP 서버로 부터 동적으로 할
당받은 클라이언트들이 관리자의 특별한 설정 없이도 서버 시스템에 접근하거나 서비스를
받을수 있다. Dynamic Update 기능을 설정하기 위해서는 DNS Master Server의 설정을 다음
과 같이 해야 한다.
Dynamic Update 는 해당 도메인의 Authority 를 갖는 네임서버를 통해 Zone 파일을 수정
치 않고도 레코드를 동적으로 원격 갱신할 수 있도록 한다. 도메인 관리를 자동화 하거나,
사용자 별로 접속 도메인을 실시간 변경하여 제공하거나, DHCP에서의 주소-IP 매칭등과
같이 실시간적으로 레코드가 변경, 갱신 될 필요가 있는 서비스에 특히 유용할 수 있다.
Dynamic Update 는 BIND 8 부터 지원이 되며 BIND 9 에서의 변화는 dnssec-key 를 이용한
인증부분의 강화되었다.
■ Master DNS 서버 설정
# vi /etc/named.conf
zone "example.com" in {
type master;
file "example254.zone";
allow-update { 127.0.0.1; 172.16.8.254; };
};
zone "8.16.172.in-addr.arpa" in {
type master;
file "example254.rev";
allow-update { 127.0.0.1; 172.16.8.254; };
};
# pkill -1 in.named
(6). DNS 보안 설정
DNS 서버의 설정은 인증되지 않은 클라이언트에게도 정보가 노출될수 있다. BIND 8.X 버전
부터 /etc/named.conf 파일에 allow-query, allow-transfer 키워드를 통해 보안 설정을 할
수 있다.
allow-query 키워드는 DNS 쿼리를 요청할 수 있는 지역을 IP에 기반해서 설정 할 수 있다.
일반적으로 DNS Server와 DNS Client의 관계를 보안적으로 구성할 수 있다. 일반적으로 회
사내에 존재하는 DNS 서버에 DNS 서버에 쿼리를 요청할 수 있는 클라이언트 대역을 회사내
로 한정하여 설정하는 것을 권장한다.
allow-transfer 키워드는 DNS 존 파일을 전송받을수 있는 지역을 선택할수 있다.
DNS Master Server와 DNS Slave Server의 관계를 보안적으로 구성할 수 있다. 일반적으로
회사내에 존재하는 DNS Master Server에서 allow-transfer를 통해 존 파일을 전송할 수 있
는 DNS Slave Server의 IP를 지정할 것을 권장한다.
■ Security / ACL(Access Control List)
- 데이터 암호화(Data Encryption)
- chroot 환경 설정
- 프로그램 업데이트, 프로그램 패치
- Master => Slave(Zone 파일들이 전달될수 있는 영역 지정)
- Server => Client(Zone File에 대한 Query 영역 지정)
(At Master DNS System)
# vi /etc/named.conf
.....
options {
allow-query { 172.16.0.0/16; 172.17.0.0/16; 192.168.8.0/24 };
.....
};
.....
zone "example.com" in {
type master;
file "exmaple254.zone;
allow-transfer { 172.16.8.253; 192.168.8.252; };
allow-query { 172.16.0.0/16; 172.15.0.0/16; };
}
.....
(7). ndc 명령어
ndc 명령어를 사용하여 DNS Server의 설정을 변경할 수 있고 in.named 데몬을 제어 할 수
있다. 기본의 방식은 in.named 데몬에 대해 SIGHUP, SIGIINT 등과 같은 시그널을 사용해서
제어 했지만 ndc 명령어를 사용하면 좀 더 세세한 정보와 제어가 가능하다. ndc 명령어는
대화형 모드와 비 대화형 모드의 실행이 가능하다. BIND 9.X 버전에서는 rndc 명령어로 변
경이 되었다.
# ndc
Type help -or- /h if you need help.
ndc> /h
/h(elp) this text
/e(xit) leave this program
/t(race) toggle tracing (protocol and system events)
/d(ebug) toggle debugging (internal program events)
/q(uiet) toggle quietude (prompts and results)
/s(ilent) toggle silence (suppresses nonfatal errors)
ndc> help
(builtin) start - start the server
(builtin) restart - stop server if any, start a new one
getpid
status
stop
exec
reload [zone] ...
reconfig [-noexpired] (just sees new/gone zones)
dumpdb
stats [clear]
trace [level]
notrace
querylog
qrylog
help
quit
args
ndc> restart
new pid is 1197
/e <----- '/e' 입력
# ndc
ndc> status
in.named BIND 8.3.3 Thu Jun 16 08:11:42 PDT 2005 Generic Patch-5.9-June 2005
config (/etc/named.conf) last loaded at age: Thu Oct 18 00:11:35 2007
number of zones allocated: 64
debug level: 0
xfers running: 0
xfers deferred: 0
soa queries in progress: 0
query logging is OFF
server is initialising itself
ndc> dumpdb
Database dump initiated.
ndc> /e <----- '/e' 입력
# cd /var/named
# ls -l named_dump.db
-rw-r--r-- 1 root root 2.5K Oct 18 01:45 named_dump.db
[참고] ndc 명령어 사용을 다른 예
ndc> /t
tracing now on
ndc> restart
ndc: [command 'exec']
ndc: [220 BIND 8.3.3]
ndc: [250 Restart initiated.]
ndc: [command 'getpid']
ndc: [220 BIND 8.3.3]
ndc: [250 my pid is <1210>]
pid 1210 is running
new pid is 1210
/e <----- '/e' 입력
# ndc
ndc> /t //trace mode
tracing now on
ndc> /d //usr1 signal
debugging now on
ndc> restart
ndc: [command 'exec']
ndc: [isc/ctl_clnt::new_state: initializing -> connecting]
ndc: [isc/ctl_clnt::new_state: connecting -> connected]
ndc: [isc/ctl_clnt::readable: read 16, used 16]
ndc: [220 BIND 8.3.3]
ndc: [isc/ctl_clnt::readable: read 24, used 24]
ndc: [250 Restart initiated.]
ndc: [isc/ctl_clnt::new_state: connected -> destroyed]
ndc: [command 'getpid']
ndc: [isc/ctl_clnt::new_state: initializing -> connecting]
ndc: [isc/ctl_clnt::new_state: connecting -> connected]
ndc: [isc/ctl_clnt::readable: read 16, used 16]
ndc: [220 BIND 8.3.3]
ndc: [isc/ctl_clnt::readable: read 22, used 22]
ndc: [250 my pid is <1217>]
ndc: [isc/ctl_clnt::new_state: connected -> destroyed]
pid 1217 is running
new pid is 1217
/e <----- '/e' 입력
[참고] ndc 명령어(Non-Interractive Mode) 실행
# ndc getpid in.named 데몬의 PID 번호 보여주기
# ndc status in.named 상태 보기
# ndc reload /etc/named.conf & Zone 파일 다시 읽기
# ndc stats 통계 남기기
# ndc querylog /var/adm/messages 파일에 로그 남기기
nslookup CMD
1. nslookup CMD
_____________________
query name servers interactively
Nslookup is a program to query Internet
domain name servers.
Nslookup has two modes: interactive and non-interactive.
Interactive mode allows the user to query
name servers for
information about various hosts and
domains or to print a
list of hosts in a domain. Non-interactive
mode is used to
print just the name and requested
information for a host or
domain.
Interactive mode is entered in the
following cases:
1. when no arguments are given (the
default name server will
be used)
2. when the first argument is a hyphen (-)
and the second
argument is the host name or Internet
address of a name
server.
Non-interactive mode is used when the name
or Internet
address of the host to be looked up is
given as the first
argument. The optional second argument
specifies the host
name or address of a name server.
Options can also be specified on the
command line if they
precede the arguments and are prefixed
with a hyphen. For
example, to change the default query type
to host
information, and the initial timeout to 10
seconds, type:
2. Name Service Lookup CMD(s)
__________________________________
- dig
- host
- nslookup
(1). dig CMD
dig (domain information groper) is a
flexible tool for
interrogating DNS name servers. It
performs DNS lookups and
displays the answers that are returned
from the name
server(s) that were queried. Most DNS
administrators use dig
to troubleshoot DNS problems because of
its flexibility,
ease of use and clarity of output. Other
lookup tools tend
to have less functionality than dig.
Although dig is normally used with
command-line arguments,
it also has a batch mode of operation for
reading lookup
requests from a file. A brief summary of
its command-line
arguments and options is printed when the
-h option is
given. Unlike earlier versions, the BIND9
implementation of
dig allows multiple lookups to be issued
from the command
line.
Unless it is told to query a specific name
server, dig will
try each of the servers listed in
/etc/resolv.conf.
When no command line arguments or options
are given, will
perform an NS query for "." (the
root).
It is possible to set per-user defaults for
dig via
${HOME}/.digrc. This file is read and any
options in it are
applied before the command line arguments.
# dig www.daum.net
; <<>> DiG 8.3
<<>> www.daum.net
;; res options: init recurs
defnam dnsrch
;; got answer:
;; ->>HEADER<<-
opcode: QUERY, status: NOERROR, id: 2
;; flags: qr rd ra; QUERY: 1,
ANSWER: 9, AUTHORITY: 9, ADDITIONAL: 9
;; QUERY SECTION:
;; www.daum.net, type = A, class = IN
;; ANSWER SECTION:
www.daum.net. 3h47m46s IN CNAME daumtop.daum.akadns.net.
daumtop.daum.akadns.net. 2m58s IN A
211.115.77.211
daumtop.daum.akadns.net. 2m58s IN A
211.115.77.212
daumtop.daum.akadns.net. 2m58s IN A
211.115.77.214
daumtop.daum.akadns.net. 2m58s IN A
211.32.117.30
daumtop.daum.akadns.net. 2m58s IN A
211.115.77.213
daumtop.daum.akadns.net. 2m58s IN A
222.231.51.40
daumtop.daum.akadns.net. 2m58s IN A
211.115.115.211
daumtop.daum.akadns.net. 2m58s IN A
222.231.51.78
;; AUTHORITY SECTION:
akadns.net. 21h47m45s IN NS eur1.akadns.net.
akadns.net. 21h47m45s IN NS za.akadns.org.
akadns.net. 21h47m45s IN NS zd.akadns.org.
akadns.net. 21h47m45s IN NS use4.akadns.net.
akadns.net. 21h47m45s IN NS zc.akadns.org.
akadns.net. 21h47m45s IN NS usw2.akadns.net.
akadns.net. 21h47m45s IN NS asia9.akadns.net.
akadns.net. 21h47m45s IN NS use3.akadns.net.
akadns.net. 21h47m45s IN NS zb.akadns.org.
;; ADDITIONAL SECTION:
asia9.akadns.net. 1d23h48m18s IN A 220.73.220.4
eur1.akadns.net. 1d23h57m54s IN A 213.254.204.197
use3.akadns.net. 1d23h34m19s IN A 204.2.178.133
use4.akadns.net. 1h42m11s IN A
208.44.108.137
usw2.akadns.net. 1d49m46s IN A
63.209.3.132
za.akadns.org. 21h47m45s IN A
195.219.3.169
zb.akadns.org. 21h47m45s IN A
206.132.100.105
zc.akadns.org. 21h47m45s IN A
124.211.40.4
zd.akadns.org. 21h47m45s IN A
63.209.3.132
;; Total query time: 14 msec
;; FROM: solaris254 to SERVER:
default -- 168.126.63.1
;; WHEN: Wed Mar 5 13:43:52 2008
;; MSG SIZE sent: 30
rcvd: 510
[참고]
/root/SERVER/DNS/Reference/dig_활용방법_가이드.pdf
(2). host
host is a simple utility for performing
DNS lookups. It is
normally used to convert names to IP
addresses and vice
versa. When no arguments or options are
given, host prints a
short summary of its command line
arguments and options.
name is the domain name that is
to be looked up. It can also
be a dotted-decimal IPv4 address or a
colon-delimited IPv6
address, in which case host will by
default perform a
reverse lookup for that address. server is an optional
argument which is either the name or IP
address of the name
server that host should query instead of
the server or
servers listed in /etc/resolv.conf.
# host www.daum.net
(3). nslookup
자세한 내용은 "4. nslookup 사용법"를
참고한다.
# nslookup www.daum.net
3. Debugging for DNS
______________________
DNS 서버 설정이 이상이 있는 경우 디버깅하는 방법은
(a)nslookup 명령어를 사용하는 방
법, (b) /var/adm/messages 파일을 활용하는
방법, (c)signal을 사용하는 방법등이 있다.
■ nslookup 명령어를 사용하는 경우
■ /var/adm/messages & SIGHUP
사용하는 경우
■ 시그널 (SIGINT, SIGUSR1) 사용하는 경우
[EX1] nslookup 명령어를 사용하는 방법
# nslookup
> server 172.16.8.XXX (자신의 DNS 서버 지정)
> set
q=NS
> solarisXXX.example.com (자신의 도메인 지정)
> set
q=MX
> solarisXXX.example.com (자신의 메일 서버 도메인 지정)
> set
q=A
> www.solarisXXX.example.com (자신의 웹서버 도메인 지정)
[EX2] /var/adm/messages 파일과
signal(SIGHUP) 사용하는 경우
<TERM1> 관리자 윈도우 1
# tail -f
/var/adm/messages (# mlog)
..... (중략) .....
Jul 1 16:26:37 solaris254 named[189]: [ID 295310
daemon.notice] reloading nameserver
Jul 1 16:26:37 solaris254 named[189]: [ID 295310
daemon.notice] Ready to answer queries.
<TERM2> 관리자 윈도우 2
# pkill -HUP
in.named
[EX3] 다른 시그널을 사용하는 경우
# pkill -INT
in.named
# cat
/var/named/named_dump.db
.... (내용 생략).....
# pkill -USR1
in.named (Debug Mode ON)
# cat
/var/named/named.run
-----------------------------------------------------------------------
Debug level 1
Version = in.named BIND 8.3.3
Thu Jun 16 08:11:42 PDT 2005
Generic Patch-5.9-June 2005
conffile = /etc/named.conf
datagram from
[172.16.8.203].32967, fd 23, len 17
req: nlookup() id 11692 type=2
class=1
req: missed '' as '' (cname=0)
ns_req: answer ->
[172.16.8.203].32967 fd=23 id=11692 size=60 rc=0
prime_cache: priming = 0, root =
0
-----------------------------------------------------------------------
# pkill -USR2 in.named (Debug
Mode OFF)
4. nslookup 사용법
____________________
(1). How to using the nslookup
CMDs
- Non-interractive Mode(비 대화형 모드 실행)
- Interractive Mode(대화형 모드 실행)
EX)
Interractive/Non-interractive Mode
# nslookup www.daum.net
# nslookup
> www.daum.net
(2). nslookup CMD EXAMPLE
(2-1). 비 대화형 모드(Non-interractive Mode) 실행
# nslookup
-query=NS solarisXXX.example.com
# nslookup -q=A
ns.solarisXXX.example.com
# nslookup -q=MX
solarisXXX.example.com
# nslookup -q=PTR
172.16.8.XXX
(2-2). 대화형 모드(Interractive Mode) 실행
# nslookup
> test.solarisXXX.example.com
> 172.16.8.XXX
> ls
solarisXXX.example.com
(1st Style)
> ls -a
www.solarisXXX.example.com (a: alias)
> ls
-d solarisXXX.example.com (d:
detail)
> ls -t MX
solarisXXX.example.com
> ls -t A
www.solarisXXX.example.com
> ls -t PTR 172.16.8.XXX
> ls -t NS
solarisXXX.example.com
(2nd Style)
> set type=MX
> solaris254.example.com
> set type=A
> www.solaris254.example.com
> set type=PTR
> 172.16.8.254
> set type=NS
> solaris254.example.com
(3rd Style)
> set
q=NS (Name Server)
> solarisXXX.example.com
> set
q=MX (Mail Exchange)
> solarisXXX.example.com
> set
q=A (Address)
>
www.solarisXXX.example.com
> set
q=PTR (Address Pointer)
> 172.16.8.XXX
> server
168.126.63.1
> set
q=NS
> kornet.net //도메인 네임
> set
q=MX
> kornet.net //도에인 네임
> set
q=A //adress
> www.kornet.net
> set
q=PTR
> 211.216.50.150
> exit
DNS Server(Domain Name System)
0. DNS 관련 용어(Terms)
_______________________
DNS 서버에 대한 자세한
정보를 논하기 전에 DNS 서버에서 사용하는 도메인에 대한 명확한
용어의 개념을 알아 보자.
URL :
"http://www.itbank.com"
www : Hostname
itbank.com : Domainname
www.itbank.com : FQDN(Fully Qualified
Domain Name)
+------------
itbank.com ------------+
| [DNS
Server] |
| IP1 -->
www X (www) |
| IP2 -->
mail |
| IP3 -->
ftp X (mail) |
| |
| X (ftp) |
| |
+------------------------------------+
[참고] 일반적인
Domainname : www.itbank.com
(1). Host
Name?
인터넷에서 호스트는,
인터넷을 통해 다른 컴퓨터들과 쌍방향 통신이 가능한 컴퓨터를 말
한다. 호스트는 특정한
호스트번호를 갖는데, 이는 네트웍 번호와 합해져서, 고유의 IP
주소를 이루게된다. 인터넷
서비스 제공업체를 통한 PPP 사용자의 경우에는, 접속되어있
는 동안에만 고유한
IP 주소를 갖게되며, 그 시간동안은 해당 사용자의 컴퓨터도 하나의
호스트가 되는 것이다.
이러한 맥락에서 보면, 호스트란 네트웍의 하나의 노드라고 볼 수
도 있다.
(2). Domain
Name?
인터넷에 연결된 다른
컴퓨터와 통신을 하기 위해서는 컴퓨터가 인터넷에 연결되어 있어
야 하고 컴퓨터의 주소를
알고 있어야 한다. 컴퓨터의 주소는 숫자로 표현된 주소와 영문
자로 표현된 주소의
2가지가 있다.
203.247.51.32
(IP주소)
숫자로 표현된 주소는
왼쪽 그림과 같이 점으로 구분되어 4단계로 표시되는데, 점으로 구
분된 각 숫자에는 0
∼ 255 까지의 숫자를 사용할 수 있으며, 전세계적으로 중복되지 않
도록 사용해야 한다.
숫자로 표현된 이러한 주소를 인터넷 공인 IP 주소라고 한다.
그러나 인터넷 사용자들이
다른 컴퓨터와의 통신을 위해 숫자로 표현된 주소를 사용하게
되면, 주소를 이해하거나
기억하기 어렵다는 단점이 있다. 따라서 숫자로 표현된 주소대
신에 영문자로 표현된
주소를 사용할 수 있도록 하였는데, 영문자로 표현된 주소는 우리
가 실생활에서 사용하는
영문단어로 구성되어 인터넷 사용자들이 쉽게 기억할 수 있고 편
리하게 다른 컴퓨터와
통신할 수 있다.
itwill.co.kr
(도메인주소)
1단계: kr
2단계: co
3단계: itwill
영문자로 표현된 주소는
왼쪽 그림과 같이 점으로 구분되어 여러 단계로 구성된다. 각 단
계는 오른쪽 맨 마지막에서부터
1단계, 2단계, 3단계 등으로 불리며, 전세계적으로 중복
되지 않는 고유한 이름이
부여된다. 이를 인터넷 도메인이라고 하는데, 인터넷 도메인 이
름은 인터넷에 연결된
전세계의 어떠한 컴퓨터와도 통신을 가능하게 해준다.
[인터넷 도메인 이름의
부여 원칙]
* 영문자 A~z, 숫자
0~9 또는 하이픈(-)의 조합으로만 표현되며, 영문자의 대, 소문자는
구별하지 않고 같은 것으로 간주한다.
* 첫 글자는 영문자로
시작하여야 하며, 하이픈으로 끝날수 없다 (우리나라에서는 1999년
6월 30일부터 숫자로 시작되는 도메인 이름도 허용되었다).
* 길이는 각 단계별로
최소 2자에서 최대 63자까지 가능하다.
* 컴마(,), 언더바(_)
등의 기호는 사용할 수 없다.
* 전세계적으로 중복되지
않도록 고유해야 한다 (이미 사용되고 있는 도메인 이름은 쓸
수 없다).
(3).
FQDN(Fully Qualified Domain Name)?
FQDN[에프큐디엔]은
시스템을 지칭하는 완전한 이름으로서, 호스트 이름과 그것의 도메인
이름으로 구성된다. 예를
들어, "www"가 호스트 이름이고, "terms.co.kr"이 도메인 이름
이라면, FQDN은
"www.terms.co.kr"가 된다. FQDN은 인터넷상의 특정 호스트를 지칭하기
위한 고유한 인터넷 주소를
가져야한다. 인터넷상에 있지 않지만, 전자우편 주소를 위한
이름공간을 공유하는 일부
호스트를 위해서도, 동일한 이름 구조가 사용된다. FQDN을 가
지고 있지 않은 호스트는
뱅 경로를 사용하여 지칭되어야한다.
모든 인터넷 컴퓨터들과
대부분의 UUCP 사이트들은 1980년부터 작성된 막후의 많은 량의
소프트웨어 덕분에 이제
FQDN을 해석할 수 있다.
(4).
Internet?
인터넷은 전세계적인 컴퓨터
네트웍 시스템으로서, 사용자가 어떤 컴퓨터에 있든지 간에
그가 사용권한을 가지고
있다면 그 어떤 다른 컴퓨터에도 접속해서 정보를 얻을 수 있는
"네트웍의 네트웍"이다.
인터넷은 1969년에 미국 정부의 ARPA (Advanced Research
Projects
Agency)에 의해 태동되었으며, 처음에는 ARPANet으로 알려졌었다. 인터넷의 원
래 목표는 한 대학에
있는 연구용 컴퓨터의 사용자가 다른 대학에 있는 연구용 컴퓨터의
사용자와 "대화할
수 있는" 네트웍을 만드는 것이었다. ARPANet 설계의 부산물 중 하나
는, 메시지가 한 방향
이상으로 나뉘어 전달되거나 또는 다른 길로 전달될 수 있기 때문
에, 적의 군사공격이나
기타 다른 재해로 인해 네트웍의 일부가 파괴된 경우에도 제 기능
을 발휘할 수 있다는
것이다.
오늘날 인터넷은 전세계의
수 십억 인구가 액세스할 수 있는 대중 전체를 위한, 협동적이
며, 스스로 유지되는
자립 설비이다. 인터넷은 물리적으로 기존의 공중 전화망의 전체 자
원의 일부를 활용하고
있으며, 기술적으로는 TCP/IP라고 불리는 일련의 프로토콜들을 사
용함으로써 다른 것들과
구별된다. 인터넷 기술에 있어 최근에 나타난 2개의 변화는, 인
트라넷과 엑스트라넷이며,
이들 역시 TCP/IP 프로토콜을 사용한다.
많은 인터넷 사용자들을
위하여, 전자우편이 짧은 편지의 처리를 위한 우편서비스를 실용
적으로 대체하고 있다.
전자우편은 인터넷에서 가장 널리 사용되는 응용프로그램이다.
사용자는 또한 IRC를
이용하여 다른 컴퓨터의 사용자와 실시간으로 채팅을 할 수 있다.
최근에는 인터넷 전화설비
및 소프트웨어를 이용하여 실시간으로 음성통화까지 가능하게
되었다.
인터넷에서 가장 널리
사용되는 서비스 중의 하나가 월드와이드웹이다. 웹의 가장 두드러
진 특성은 즉시 상호
참조를 할 수 있게 해주는 방법인 하이퍼텍스트인데, 대부분의 웹사
이트들에서 텍스트 내에
다른 색으로 표시되어 있거나 또는 밑줄로 표시되어 있는 단어나
문장이 바로 그 것이다.
사용자가 이러한 단어나 구절을 선택하면, 이것과 관련 있는 사
이트나 페이지로 전환된다.
때로는 이러한 링크는 클릭이 가능하도록 만들어진 이미지
(또는 이미지의 일부)에도
숨겨져 있을 수 있다. 마우스의 포인터를 하이퍼텍스트 링크에
갖다대면, 포인터의 모양이
화살표에서 손 모양으로 바뀌는데, 이것은 다른 사이트나 페이
지로 전환하기 위해 클릭할
수 있다는 것을 가리킨다.
웹을 사용하면 무수히
많은 량의 정보에 쉽게 액세스할 수 있다. 웹 서핑은 웹 브라우저
를 통해 이루어지는데,
유명한 것으로는 넷스케이프 네비게이터와 마이크로소프트의 인터
넷익스플로러가 있다.
특정 웹사이트의 모습은 어떤 브라우저를 사용하느냐에 따라 다소
다르게 보일 수도 있다.
또한 최신 버전의 브라우저들은 애니메이션, 가상현실, 소리, 음
악파일 등에 있어 이전
버전에 비해 더 많은 특수기능들을 제공한다.
(5). ARPANet
(Advanced Research Projects Agency Network)?
아파넷은 인터넷의 기초가
된 네트웍이다. 아파넷은 패킷 스위칭 개념을 이용하여 전용회
선으로 서로 연결된 여러
대의 컴퓨터로 구성되었으며, 주로 미 군당국에서 자금을 지원
하였다.
아파넷은 이후
1980년대에 들어서면서 새로운 군사용 네트웍인 DDF(Defense Data Network)
와 국립과학재단의 후원을
받는 과학 및 학술컴퓨터 네트웍인 NSFNet으로 분리되었다.
1995년에
NSFNet은, 인터넷 백본(vBNS라고 불린다)을 PSINet, UUNET, ANS/AOL, 스프린트,
MCI, 및
AGIS-Net99 등과 같은 상용 백본 제공업체의 컨소시움으로 바꾸기 위해, 차례대
로 단계적 철수를 시작했다.
1. DNS 개요(Concept)
____________________
-
DNS(Domain Name System / Service)
(1). 초기의 도메인
관리
+-------------Domain-----------------+
| |
| SERVER -------+------> SERVERA |
| HOST.txt
| |
| +------> SERVERB |
| | |
| +------> SERVERC |
| | |
| +------> ..... |
| |
+------------------------------------+
[Main
Server] -------------------> [Domin Server]
HOST.TXT
/etc/hosts
(Domain
<--> IP)
[그림] 초기의 도메인 관리
(2). 현재의 도메인
관리
DNS(Domain Name
System), BIND(Berkeley Internet Name Domain)
- BIND 4.X
- BIND 8.X
- BIND 9.X
==== DNS Client
==== ==== DNS Server =====
Resolver in.named(53)
-
/etc/nsswitch.conf
/etc/named.conf
-
/etc/resolv.conf DB :
/var/named/
==================== =====================
Web Browser - Forward Zone
File(D==>IP)
-
http://www.itbank.com - Reverse
Zone File(IP==>D)
- localhost Zone
File(Caching)
- hint
File(named.root, hint)
[그림] BIND 동작
------------------------------------------------------
도메인 설
명
------------------------------------------------------
. - Nameless Root
Domain
.com - 1차 도메인(국가 도메인 포함)
(예) kr, jp,
....
(예) .com,
.org, ....
.itbank.com - 2차 도메인
(예) yahoo.com,
itbank.com, daum.net
.yahoo.co.kr - 3차 도메인
------------------------------------------------------
(예)
www.yahoo.co.kr
A A A
| | |
(a) (b)(c)
(a) : 3차 도메인
(b) : 2차 도메인
(c) : 1차 도메인
[그림] 도메인 이름 체계
* 수업시에 사용하는
도메인 이름 체계
(예)
www.solarisXXX.example.com
[참고] BIND
(Berkeley Internet Name Domain)?
BIND는 BSD 기반의
유닉스 시스템을 위해 설계된 DNS이다. BIND는 서버와 resolver 라이
브러리로 구성되어 있다.
네임서버는 클라이언트들이 이름 자원들이나 객체들에 접근하여,
네트웍 내의 다른 객체들과
함께 이러한 정보를 공유할 수 있게 해주는 네트웍 서비스이
다. 이것은 사실상,
컴퓨터 네트웍 내의 객체들을 위한 분산 데이터베이스 시스템이다.
BIND는 호스트 이름과
주소를 저장하고 검색하는데 사용되기 위한 BSD 네트웍 프로그램
(버전 4.3 이상)에
완전히 통합되어 있다.
시스템 관리자는
BIND를 네트웍 호스트들의 file(/etc/hosts) 내에 있는 호스트 테이블
룩업의 대체용으로 사용하도록
시스템을 설정할 수 있다. BSD의 기본 설정은 BIND를 사용
하는 것이다.
2. Solaris
9 DNS 기본 설정
______________________________________
솔라리스 9에서는 기본적으로
BIND 8.2.X 버전이 설치 되어 있다. 현재 솔라리스 09/05 버
전에는 8.2.4 버전이
설치되어 있다. 기본적으로 설치 되어 있는 Bind 프로그램을 사용하
는 경우 데몬만 존재하고
/etc/named.conf, /var/named/DB 파일들이 존재하지 않기 때문에
생성을 해 줘야 한다.
설정 파일들은 특정한 문법(Syntax)가 존재하기 때문에 매뉴얼 페이
지를 참고하여 작성하여야
한다.
[참고]
/etc/named.conf, /var/named/DB 작성시 주의점
경험상, 설정파일이나
DB 파일들에는 탭이나 스페이스를 모두 사용할 수 있다고 되어 있
지만 탭을 사용하는 경우
알수 없는 에러가 생기는 경우를 많았다. 반드시 스페이스를 사
용하여 필드를 구분하자.
일부 다른 문서에서는(특히나 다른 유닉스) 스페이스 대신해서
탭을 쓸것을 권장하지만
솔라리스의 특성으로 여겨진다. 주의하자.
패키지 :
SUNWinamd
---------------------------------------
==== DNS
Server =====
in.named(53)
/etc/named.conf
DB : /var/named/
=====================
- Forward
Zone File(D==>IP)
- Reverse
Zone File(IP==>D)
- localhost Zone
File(Caching)
- hint
File(named.root, hint)
---------------------------------------
(0). Bind 프로그램
설치 확인
패키지를 살펴 보면 특별한
설정파일은 없고 in.named, in.named-xfer 프로그램만 존재한
다는 것을 확인할 수
있다.
#
pkginfo | grep Domain
system SUNWidnd Internationalized Domain Name Support
Developer Files
system SUNWidnl Internationalized Domain Name Support
Library Files
system SUNWinamd Internet Domain Name Server <----- Bind 프로그램 확인
# pkgchk -v
SUNWidnd
# pkgchk -v
SUNWidnl
#
pkgchk -v SUNWinamd
/usr
/usr/sbin
/usr/sbin/in.named
/usr/sbin/named-xfer
(1). DNS 서비스
데몬 확인
DNS 서비스 데몬
in.named는 기본적으로 설치가 되어 있다.
#
which in.named
/usr/sbin/in.named
#
in.named -v
in.named BIND 8.3.3 Thu Jun 16 08:11:42 PDT 2005
Generic Patch-5.9-June 2005
(2). DNS 서비스
포트 확인
DNS 서비스 포트는
53으로 설정 되어 있다.
#
grep 53 /etc/services
domain 53/udp
domain 53/tcp
(3).
/etc/named.conf, /var/named/* 확인
DNS 서버 주설정 파일인
/etc/named.conf 존재하지 않는다. 또한 /etc/named.conf 파일이
없으므로
/var/named/DB 파일들도 존재하지 않는다.
#
ls -l /etc/named.conf
/etc/named.conf:
No such file or directory
#
ls -ld /var/named
/var/named: No
such file or directory
(4). DNS
Server 설정
DNS 서버 설정을 위해서
/etc/named.conf 파일을 만들고 /var/named/DB 파일들을 생성해
주는 DNS.sh 스크립트를
실행하자. DNS.sh 스크립트는 /etc/named.conf 파일을 생성하고
/var/named 디렉토리를
만든후 그안에 exampleXXX.zone, exampleXXX.rev, localhost.rev
named.root 파일을
생성한다. 또한 /etc/nsswitch.conf, /etc/resolv.conf 파일도 설정
해 준다.
# mkdir /mnt/server
# mount 172.16.8.254:/root/shell /mnt/server
# cd /mnt/server
# ./DNS.sh
(5). DNS
Server 설정 확인
DNS 서버 설정을 다음과
같이 확인하자. in.named 데몬을 띄우고 nslookup 명령어를 통해
확인해 보자. 각 설정
파일의 정보가 정확한지 확인을 해야 한다. in.named 데몬을 띄울때
/var/adm/messages
파일을 모니터링 하는 것을 잊지 말자.
#
ls -l /etc/named.conf
#
ls -l /var/named
#
cat /etc/resolv.conf
#
cat /etc/nsswitch.conf | grep hosts
....
hosts: files dns
....
(6). DNS 서버 실행
#
in.named
#
pgrep -lf in.named
193 /usr/sbin/in.named
#
nslookup www.solarisXXX.example.com
(7). DNS Server 관련 파일들
■
/etc/named.conf DNS
Main Conifguration File
■
/var/named/exampleXXX.zone Forward
Zone File
■
/var/named/exampleXXX.rev Reverse
Zone File
■
/var/named/localhost.rev Localhost
Zone File
■
/var/named/named.root Hint
File
■
/etc/nsswitch.conf DNS
Client File
■
/etc/resolv.conf DNS
Client File
3. Bind
8.2.4(Solaris 9)
각 서버들에 대한 자세한
소개는 "2_DNS8x.txt" 파일에 있다. DNS 서버in.named 데몬은
/etc/named.conf
파일을 설정을 가지고 부팅시에 /etc/rc2.d/S72inetsvc Startup Script
에 의해 설정된다. 솔라리스
9 버전에는 BIND 8.2.X, 또는 BIND 8.3.X 버전이 설치 되어
있다.
(1). 서버의 종류(Server
Types)
서비스를 제공하는 서버의
영역에 따른 분류
■ Root
Servers(Nameless Root)
■ 1차 도메인 서버/2차
도메인 서버/....
서버의 목적에 따른 분류
■ Primary /
Secondary Servers(Master / Slave Servers)
■
Caching-Only Servers
■
Forwarding Servers
(2). 클라언트 쿼리
종류(Answer Types)
Answers that are
returned from DNS servers can be described as authoritative or
non-authoritative.
Answers from authoritative DNS servers are:
* Sourced from a
disk-based file.
* Usually
correct. Because humans administer the DNS, it is possible for
“incorrect” data to enter the DNS database.
Answers from non-authoritative DNS servers are:
* Sourced from a
server cache
* Usually
correct
* Can be
incorrect if the server’s cache contains stale data
[EX] nslookup 명령어 확인(Windows에서 확인)
C:\>
nslookup www.daum.net
Server: kns.kornet.net
Address: 168.126.63.1
Non-authoritative answer:
<----- 출력 정보 확인
Name: daumtop.daum.akadns.net
Addresses: 211.115.77.214, 211.115.77.211,
222.231.51.78, 211.115.115.212
222.231.51.77, 211.115.77.213, 222.231.51.40, 211.115.77.212
#include<iostream>
using std::cout;
using std::cin;
using std::endl;
//////////////////////////////////////////////
class MyClass
{
public:
MyClass operator+(MyClass &my);// 덧셈 함수
MyClass(double _a=0, double _b=0);//디폴트 파라미터를 갖는 생성자( 인수없이 객체 생성시
에 필요)
void Out();//출력 함수
private:
int a,b;
};
//////////////////////////////////////////////
MyClass::MyClass(double _a, double _b):a(_a),b(_b){}
MyClass MyClass::operator+(MyClass &my)
{
MyClass temp;
temp.a = a+my.a;
temp.b = b+my.b;
return temp;
}
void MyClass::Out()
{
cout<<a<<" " <<b<<endl;
}
int main()
{
MyClass m1(1.1,2.2);
MyClass m2(1.1,2.2);
MyClass m3;
// m3= m1.Add(m2);
m3= m1+m2;//내부적으로 변환된 코드 ---> m1.operator+(m2)
//좌측 피연산자 : 호출객체 , 함수 이름: operator[연산자], 우측 피연산자 : 인수
m1.Out();
m2.Out();
m3.Out();
return 0;
}
#include<iostream>
using std::cout;
using std::endl;
///////////////////////////////////////////
class Point
{
public:
//생성자
Point(int _a=0,int _b=0);
//연산자 오버로딩 [==]
bool operator==(Point &po);
//연산자 오버로딩 [+]
Point operator+(Point &pl);
//연산자 오버로딩 [+=]
Point operator+=(Point &pp);
void show()const;
private:
int a,b;
};
///////////////////////////////////////////
Point::Point(int _a,int _b):a(_a),b(_b){}
bool Point::operator==(Point &po)
{
if(a==po.a&&b==po.b)
return true;
else
return false;
}
Point Point::operator+(Point &pl)
{
Point temp;
temp.a=a+pl.a;
temp.b=b+pl.b;
return temp;
}
void Point::show()const
{
cout<<"a : "<<a<<endl;
cout<<"b : "<<b<<endl;
}
Point Point::operator+=(Point &pp)
{
a+=pp.a;
b+=pp.b;
return *this;
}
int main()
{
Point p1(2,1);
Point p2(2,1);
if(p1==p2)
cout<<"같다"<<endl;
else
cout<<"다르다"<<endl;
Point p3;
p3=p1+p2;
p3.show();
p2+=p3;
p2.show();
p1+=p2+=p3;
p1.show();
return 0;
}
IPv6-IPv4-IPv6 Tunnel Configuration
172.16.0.0
------+---------------------------------------+--------
| |
(pcn0) 172.16.8.200 (pcn0) 172.16.8.205
<solaris200> <solaris205>
(pcn0:1)192.168.1.1 (pcn0:1)192.168.2.1
| |
+-192.168.1.2(pcn0) +-192.168.2.2(pcn0)
| |
+-192.168.1.3 +-192.168.2.3
| |
+-192.168.1.4 +-192.168.2.4
| |
+-192.168.1.5 +-192.168.2.5
| |
+-192.168.1.6 +-192.168.2.6
| |
+-192.168.1.7 +-192.168.2.7
| |
+-192.168.1.8 +-192.168.2.8
| |
+-192.168.1.9 +-192.168.2.9
| |
+-192.168.1.10 +-192.168.2.10
[그림] 실습 구성도
(자리배치도)
-----------------------------------
200 201 202 203 204 205
-----------------------------------
206 207 208 209 210 211
-----------------------------------
212 213 214 215 216 217
-----------------------------------
218 219 220 221 222 223
-----------------------------------
224 225 226 227 228 229
-----------------------------------
자리 번호: 201 -> 번호 할당: 2
- pcn0 192.168.1.2
- pcn0:1 192.168.1.202
자리 번호: 203 -> 번호 할당: 2
- pcn0 192.168.2.2
- pcn0:1 192.168.2.202
-------------
1. 공통 작업
-------------
(준비사항) 전체적인 설정
- IPv6 NIC 설정은 없는것으로 한다.
- in.ndpd 데몬이 뜨지 않아야 한다.
- routing table 정보에 default router 설정이 없어야 한다.
- 라우터 설정은 "강사"가 설정한다.
# ls /etc/hostname6.*
# rm /etc/hostname6.pcn0
# ifconfig pcn0 inet6 down unplumb
# ifconfig lo0 inet6 down unplumb
# ifconfig -a
# pgrep -lf in.routed
# pgrep -lf in.rdisc
# pkill -9 in.routed
# pkill -9 in.rdisc
# pgrep -lf in.ndpd
# pkill in.ndpd (# pkill -9 in.ndpd)
# route flush
---------------
2. Router 작업
---------------
(At Router)
■ 인터페이스 설정
■ pcn0 인터페이스(172.16.8.XXX)
■ pcn0:1 가상인터페이스 설정(192.168.[1-2].1)
■ pcn1 unplumb
■ 라우터 설정
■ in.routed -s
■ in.rdisc -r
■ ip_forwarding ON
(1). 인터페이스 설정
(a). pcn0 설정
서버와 통신이 되는지 확인한다. 기존의 설정을 그래도 사용한다.
# ifconfig -a
# ping -s 172.16.8.254
(b). pcn0:1 가상인퍼테이스 설정(192.168.X.1)
# ifconfig pcn0:1 plumb up
# ifcofnig pcn0:1 192.168.[1-2].1 netmask 255.255.255.0 broadcast +
(c). pcn1 unplumb
NAT Device에 연결된 NIC는 unplumb 시켜 놓는다.
# ifconfig pcn1 down unplumb
(2). 라우터 설정
# route flush
# in.routed -s
# in.rdisc -r
# ndd -set /dev/ip ip_forwarding 1
# pgrep -lf in.routed
# pgrep -lf rdisc
# ndd -get /dev/ip ip_forwarding
# netstat -nr
(상대방 라우터가 반드시 보여야 한다.)
(3). 라우터 상태 점검(Router1, 예: 172.16.8.200)
(IP 설정 점검) Router1
# ifconfig -a
lo0: flags=1000849<UP,LOOPBACK,RUNNING,MULTICAST,IPv4> mtu 8232 index 1
inet 127.0.0.1 netmask ff000000
pcn0: flags=1000843<UP,BROADCAST,RUNNING,MULTICAST,IPv4> mtu 1500 index 2
inet 172.16.8.200 netmask ffff0000 broadcast 172.16.255.255
ether 0:c:29:ab:48:bd
pcn0:1: flags=1000843<UP,BROADCAST,RUNNING,MULTICAST,IPv4> mtu 1500 index 2
inet 192.168.1.1 netmask ffffff00 broadcast 192.168.1.255
-> pcn1 unplumb 시킴
-> pcn0:1의 IP를 192.168.1.1로 설정
(Routing Table 점검) Router1
# netstat -nr
Routing Table: IPv4
Destination Gateway Flags Ref Use Interface
-------------------- -------------------- ----- ----- ------ ---------
192.168.1.0 192.168.1.1 U 1 11 pcn0:1
192.168.2.0 172.16.8.205 UG 1 0 pcn0 <----- 정보 확인
172.16.0.0 172.16.8.200 U 1 5 pcn0
224.0.0.0 172.16.8.200 U 1 0 pcn0
127.0.0.1 127.0.0.1 UH 21 5418 lo0
(Router 설정 점검) Router1
# pgrep -lf in.routed
567 in.routed -s
# pgrep -lf in.rdisc
570 in.rdisc -r
# ndd -get /dev/ip ip_forwarding
1
(4). 라우터 상태 점검(Router2, 예: 172.16.8.205)
(IP 설정 점검) Router2
# ifconfig -a
lo0: flags=1000849<UP,LOOPBACK,RUNNING,MULTICAST,IPv4> mtu 8232 index 1
inet 127.0.0.1 netmask ff000000
pcn0: flags=1000843<UP,BROADCAST,RUNNING,MULTICAST,IPv4> mtu 1500 index 2
inet 172.16.8.205 netmask ffff0000 broadcast 172.16.255.255
ether 0:c:29:da:a8:1e
pcn0:1: flags=1000843<UP,BROADCAST,RUNNING,MULTICAST,IPv4> mtu 1500 index 2
inet 192.168.2.1 netmask ffffff00 broadcast 192.168.2.255
-> pcn1 unplumb
-> pcn0:1은 IP가 192.168.2.1 설정
(Routing Table 점검) Router2
# netstat -nr
Routing Table: IPv4
Destination Gateway Flags Ref Use Interface
-------------------- -------------------- ----- ----- ------ ---------
192.168.1.0 172.16.8.200 UG 1 0 pcn0 <----- 설정 확인
192.168.2.0 192.168.2.1 U 1 1 pcn0:1
172.16.0.0 172.16.8.205 U 1 17 pcn0
224.0.0.0 172.16.8.205 U 1 0 pcn0
127.0.0.1 127.0.0.1 UH 45 75281 lo0
(Router 설정 점검) Router2
# pgrep -lf in.routed
2223 in.routed -s
# pgrep -lf in.rdisc
2225 in.rdisc -r
# ndd -get /dev/ip ip_forwarding
1
---------------
3. Host 작업
---------------
(At Client) 예: 192.168.2.2
(가정) 인터페이스는 Bridge Device 연결된 NIC1(pcn0)만 사용하는것으로 가정한다.
- 인터페이스 설정
- pcn0 설정 (예: 192.168.[1-2].X)
- pcn1 unplumb
- Default Router 설정(192.168.[1-2].1)
- 테스트
(1). 인터페이스 설정
(a). pcn0 설정
# ifconfig pcn0 192.168.[1-2].X netmask 255.255.255.0 broadcast + up
(b). pcn1 unplumb
# ifconfig pcn1 down unplumb (-> 솔라리스 CDE 환경에서 작업)
# ifconfig -a
(c). Default Router 설정
# route flush
# route add default 192.168.[1-2].1
# netstat -nr
(2). Host 설정 점검
(IP 설정 점검) 192.168.2.2
# ifconfig -a
lo0: flags=1000849<UP,LOOPBACK,RUNNING,MULTICAST,IPv4> mtu 8232 index 1
inet 127.0.0.1 netmask ff000000
pcn0: flags=1000843<UP,BROADCAST,RUNNING,MULTICAST,IPv4> mtu 1500 index 2
inet 192.168.2.2 netmask ffffff00 broadcast 192.168.2.255
ether 0:c:29:4d:b1:ff
-> pcn1 unplumb
-> pcn0의 IP가 192.168.2.2
(Routing Table 점검) 192.168.2.2
# netstat -nr
Routing Table: IPv4
Destination Gateway Flags Ref Use Interface
-------------------- -------------------- ----- ----- ------ ---------
192.168.2.0 192.168.2.2 U 1 4 pcn0
224.0.0.0 192.168.2.2 U 1 0 pcn0
default 192.168.2.1 UG 1 5 <----- 설정 확인
127.0.0.1 127.0.0.1 UH 20 27673 lo0
(IP 설정 점검) 192.168.1.2
# ifconfig -a
lo0: flags=1000849<UP,LOOPBACK,RUNNING,MULTICAST,IPv4> mtu 8232 index 1
inet 127.0.0.1 netmask ff000000
pcn0: flags=1000843<UP,BROADCAST,RUNNING,MULTICAST,IPv4> mtu 1500 index 2
inet 192.168.1.2 netmask ffffff00 broadcast 192.168.1.255
ether 0:c:29:5d:97:e
(Routing Table 점검) 192.168.1.2
# netstat -nr
Routing Table: IPv4
Destination Gateway Flags Ref Use Interface
-------------------- -------------------- ----- ----- ------ ---------
192.168.1.0 192.168.1.2 U 1 1 pcn0
224.0.0.0 192.168.1.2 U 1 0 pcn0
default 192.168.1.1 UG 1 14 <----- 설정 확인
127.0.0.1 127.0.0.1 UH 35 7139 lo0
192.168.2.2 ------- Router1 ------------------ Router2 ------- 192.168.1.2
192.168.2.1 172.16.8.205 172.16.8.200 192.168.1.1 |
| | | | |
--------------> | | | | |
| | | |
--------------------------> | | | |
| | |
----------------------------------------> | | |
| |
-----------------------------------------------------> | |
|
----------------------------------------------------------------> |
(192.168.2.2) -> (192.168.2.1)
-> (172.16.8.205)
-> (172.16.8.200)
-> (192.168.1.1)
-> (192.168.1.2)
# ping 192.168.2.1
# ping 172.16.8.205
# ping 172.16.8.200
# ping 192.168.1.1
# ping 192.168.1.2
(Trouble Shooting)
라우터에 이상이 있는 경우
- (a). 라우팅 테이블을 확인한다.
- (b). 라우터의 아이피를 재 설정해 본다.
호스트에 이상이 있는 경우
- (a). 아이피를 재 설정 해 본다.
4. Configuring IPv6-Over-IPv4 Tunnels
(1). 가상 NIC 추가 및 IPv6 설정 (예: 192.168.1.202 <----> 192.168.2.202)
- pcn0:1 (192.168.[1-2].20X) : 가상 인터페이스 설정
- pcn0에 IPv6 주소 생성
- ip.tun0 설정
(At 192.168.1.202) 192.168.1.2
(a). pcn0에 IPv6 주소 생성
# ifconfig pcn0 inet6 plumb up
(b). pcn0:1(192.168.1.20X) 설정
# ifconfig pcn0 addif 192.168.1.20X up
# ifconfig -a
lo0: flags=1000849<UP,LOOPBACK,RUNNING,MULTICAST,IPv4> mtu 8232 index 1
inet 127.0.0.1 netmask ff000000
pcn0: flags=1000843<UP,BROADCAST,RUNNING,MULTICAST,IPv4> mtu 1500 index 2
inet 192.168.1.2 netmask ffffff00 broadcast 192.168.1.255
ether 0:c:29:20:b:b6
pcn0:1: flags=1000843<UP,BROADCAST,RUNNING,MULTICAST,IPv4> mtu 1500 index 2
inet 192.168.1.202 netmask ffffff00 broadcast 192.168.1.255 <----- IP 정보 확인
pcn0: flags=2000841<UP,RUNNING,MULTICAST,IPv6> mtu 1500 index 2
ether 0:c:29:20:b:b6
inet6 fe80::20c:29ff:fe20:bb6/10 <----- IPv6 정보 확인
(At 192.168.2.202) 192.168.2.2
(a). pcn0에 IPv6 주소 생성
# ifconfig pcn0 inet6 plumb up
(b). pcn0:1(192.168.2.20X) 설정
# ifconfig pcn0 addif 192.168.2.20X up
# ifconfig -a
lo0: flags=1000849<UP,LOOPBACK,RUNNING,MULTICAST,IPv4> mtu 8232 index 1
inet 127.0.0.1 netmask ff000000
pcn0: flags=1000843<UP,BROADCAST,RUNNING,MULTICAST,IPv4> mtu 1500 index 2
inet 192.168.2.2 netmask ffffff00 broadcast 192.168.1.255
ether 0:c:29:20:b:b6
pcn0:1: flags=1000843<UP,BROADCAST,RUNNING,MULTICAST,IPv4> mtu 1500 index 2
inet 192.168.2.202 netmask ffffff00 broadcast 192.168.1.255 <----- IP 정보 확인
pcn0: flags=2000841<UP,RUNNING,MULTICAST,IPv6> mtu 1500 index 2
ether 0:c:29:20:b:b6
inet6 fe80::20c:29ff:fe20:bb6/10 <----- IPv6 정보 확인
(IP Tunnel 설정) 192.168.1.2 -> 192.168.2.2
192.168.1.202 -> 192.168.2.202
(At 192.168.1.202) 192.168.1.2
# ifconfig ip.tun0 inet6 plumb
# ifconfig ip.tun0 inet6 tsrc 192.168.1.202 tdst 192.168.2.202 up
# ifconfig -a
lo0: flags=1000849<UP,LOOPBACK,RUNNING,MULTICAST,IPv4> mtu 8232 index 1
inet 127.0.0.1 netmask ff000000
pcn0: flags=1000843<UP,BROADCAST,RUNNING,MULTICAST,IPv4> mtu 1500 index 2
inet 192.168.1.2 netmask ffffff00 broadcast 192.168.1.255
ether 0:c:29:20:b:b6
pcn0:1: flags=1000843<UP,BROADCAST,RUNNING,MULTICAST,IPv4> mtu 1500 index 2
inet 192.168.1.202 netmask ffffff00 broadcast 192.168.1.255
pcn0: flags=2000841<UP,RUNNING,MULTICAST,IPv6> mtu 1500 index 2
ether 0:c:29:20:b:b6
inet6 fe80::20c:29ff:fe20:bb6/10
ip.tun0: flags=2200851<UP,POINTOPOINT,RUNNING,MULTICAST,NONUD,IPv6> mtu 1480 index 4
inet tunnel src 192.168.1.202 tunnel dst 192.168.2.202
tunnel hop limit 60
inet6 fe80::c0a8:1ca/10 --> fe80::c0a8:2ca <----- 정보 확인
(IP Tunnel 설정) 192.168.2.2 -> 192.168.1.2
192.168.2.202 -> 192.168.1.202
(At 192.168.2.202) 192.168.2.2
# ifconfig ip.tun0 inet6 plumb tsrc 192.168.2.202 tdst 192.168.1.202 up
# ifconfig -a
lo0: flags=1000849<UP,LOOPBACK,RUNNING,MULTICAST,IPv4> mtu 8232 index 1
inet 127.0.0.1 netmask ff000000
pcn0: flags=1000843<UP,BROADCAST,RUNNING,MULTICAST,IPv4> mtu 1500 index 2
inet 192.168.2.2 netmask ffffff00 broadcast 192.168.2.255
ether 0:c:29:4d:b1:ff
pcn0:1: flags=1000843<UP,BROADCAST,RUNNING,MULTICAST,IPv4> mtu 1500 index 2
inet 192.168.2.202 netmask ffffff00 broadcast 192.168.2.255
pcn0: flags=2000841<UP,RUNNING,MULTICAST,IPv6> mtu 1500 index 2
ether 0:c:29:4d:b1:ff
inet6 fe80::20c:29ff:fe4d:b1ff/10
ip.tun0: flags=2200851<UP,POINTOPOINT,RUNNING,MULTICAST,NONUD,IPv6> mtu 1480 index 6
inet tunnel src 192.168.2.202 tunnel dst 192.168.1.202
tunnel hop limit 60
inet6 fe80::c0a8:2ca/10 --> fe80::c0a8:1ca <----- 정보 확인
# ping fe80::c0a8:1ca
# ping -s fe80::c0a8:1ca
=> 패킷 캡쳐를 통해 확인해 본다.
#include<iostream>
using std::cout;
using std::cin;
using std::endl;
//////////////////////////////////////// class 선언부
//추상 클래스 - 순수 가상 함수를 한개 이상 포함한 클래스
//절대로 객체 생성이 불가능 - 자식을 위해 틀을 만드는 클래스
class Animal
{
public:
Animal()
{
}
//순수 가상함수 - 반드시 오버라이딩해서 써야하는 함수
//선언부만 있고 정의부는 없는 함수
virtual void Speak()=0;
virtual void Walk();
//부모 클래스에 가상 함수가 포함되었다면 반드시 소멸자를 가상으로 추가해야한다.
virtual ~Animal()
{
cout<<"~Animal소멸자"<<endl;
}
};
class Dog : public Animal
{
public:
virtual void Speak();
~Dog()
{
cout<<"~Dog 소멸자"<<endl;
}
};
class Cat : public Animal
{
public:
virtual void Speak();
~Cat()
{
cout<<"~Cat 소멸자"<<endl;
}
};
class Pig: public Animal
{
public:
virtual void Speak();
~Pig()
{
cout<<"~Pig 소멸자"<<endl;
}
};
class Duck: public Animal
{
public:
virtual void Speak();
virtual void Walk();
~Duck()
{
cout<<"~Duck 소멸자"<<endl;
}
};
//////////////////////////////////////////// 정의부
//void Animal::Speak(){ cout<<"기본 울음 소리";}
void Animal::Walk(){ cout<<"네발로 걷는다"<<endl;}
////////////////////
void Dog::Speak(){ cout<<"왈 왈 "<<endl;}
///////////////////
void Cat::Speak(){ cout<<"야옹"<<endl;}
//////////////////
void Pig::Speak(){ cout<<"꿀꿀"<<endl;}
//////////////////
void Duck::Speak(){ cout<<"꽥꽥"<<endl;}
void Duck::Walk(){ cout<<"두발로 걷는다"<<endl;}
int main()
{
Animal *ptr; // 객체 포인터
//ptr=new Animal;
int n;
while(1)
{
cout<<"\n1. dog 2.cat 3.pig 4.duck 5.exit\n";
cout<<"choice :";
cin>>n;
switch(n)
{
case 1:
ptr= new Dog;
break;
case 2:
ptr= new Cat;
break;
case 3:
ptr= new Pig;
break;
case 4:
ptr= new Duck;
break;
default:
exit(0);
}
ptr-> Speak();
ptr->Walk();
delete ptr; //동적 객체 해제 => 소멸자 호출
}
return 0;
}
[첫번째그림] IP Autoconfiguration
---------------------------------------- Router
| |
ClientA ClientB
(1). EUI-64 생성
7번째 bit toggle
중간에 ffeb 삽입
(2). Link-Local Address 생성
Fe80| | eui -64삽입
(3). Prefix 설정(Global Address 생성)
prefix | eui - 64
[두번째그림] Router Prfix Modification
---------------------------------------- Router
| | Prefix 1 -> Prefix 2
ClientA ClientB
prefix1|mac1 prefix1|mac2
(1). 라우터 Prefix 변경
prefix1 -> prefix2
(2). Unycast Address 설정
prefix2|mac1,2
[세번째그림] IP Duplicated Address Detection
---------------------------------------- Router
| |
ClientA ClientB
in.ndpd in.ndpd
- IP1 - IP1 or IP2
(1). NDP Messages 1(ARP Request와 비슷)
(2). NDP Messages 2(ARP Reply와 비슷)
 Prev
Prev
 Rss Feed