portsentry , IDS
portsentry 는 host기반 침입 탐지 시스템으로 열려 있는 모든 포트를 모니터링 할 수 있는 것이 특징이다.
포트 스캔 공격을 받았을 경우 방화벽과 연동하여 보안정책을 구성 할 수 있다.
특징 ( 차단방법)
----------------------------------------------------------------------------------------------------
호스트로 들어오는 모든 패킷을 ROUTE명으로 DROP시킬 수 있다.
xinetd 기반의 서비스에 접근하지 못하도록 /etc/hosts.deny 파일을 갱신 할 수 있다. (tcpd)
연결을 막지 위해 iptables와 연동가능
----------------------------------------------------------------------------------------------------
다운로드
----------------------------------------------------------------------------------------------------
http://rpm.pbon.net
# wget ftp://ftp.pbone.net/mirror/ftp.falsehope.net/home/tengel/centos/4/te/i386/RPMS/portsentry-1.2-1.te.i386.rpm // centos용
http://rpmfind.net
http://centos.org
----------------------------------------------------------------------------------------------------
설치
----------------------------------------------------------------------------------------------------
portsentry 실행파일
portsentry.conf 환경설정 파일
portsenty.history 거부된 host정보 저장
portsenty.ignor 감시예외파일
----------------------------------------------------------------------------------------------------
실행 모드
----------------------------------------------------------------------------------------------------
portsentry 는 스캔 공격자가 스캔을 하기 위해 사용하는 다양한 공격에 대비하여 탐지하고 싶은 공격에 따라서 여러가지 방법으로 실행가능
----------------------------------------------------------------------------------------------------
실행 옵션
----------------------------------------------------------------------------------------------------
-tcp / -udp : 표준 tcp/udp host기반 IDS로 동작
-stcp / -sudp : 스텔스 tcp/udp 스캔 감시
-atcp / -audp : portsentry.conf 파일에 지정한 port 에 어떤 host도 접근하지 못하도록 설정
----------------------------------------------------------------------------------------------------
----------------------------------------------------------------------------------------------------
[fedora]
위에서 받은 rpm 패키지를 설치 하자
# rpm -Uvh portsentry
# rpm -ql portsentry
# cd /etc/portsentry
# ls
portsentry.conf portsentry.ignore portsentry.modes
# vi portsentry.conf

42 ###########################################
43 # Advanced Stealth Scan Detection Options #
44 ###########################################
58 ADVANCED_PORTS_TCP="1024"
59 ADVANCED_PORTS_UDP="1024"
// 스텔스 스캔 포트 감시영역
72 # Default TCP ident and NetBIOS service
73 ADVANCED_EXCLUDE_TCP="21,22,25,53,80,110,113,135,137,138,139,443"
74 # Default UDP route (RIP), NetBIOS, bootp broadcasts.
75 ADVANCED_EXCLUDE_UDP="520,517,518,513,138,137,123,68,67,53"
// 감시제외 포트
78 ######################
79 # Configuration Files#
80 ######################
81 #
82 # Hosts to ignore
83 IGNORE_FILE="/etc/portsentry/portsentry.ignore" // 각 파일 위치
84 # Hosts that have been denied (running history)
85 HISTORY_FILE="/etc/portsentry/portsentry.history"
86 # Hosts that have been denied this session only (temporary until next re start)
87 BLOCKED_FILE="/etc/portsentry/portsentry.blocked"
89 ##############################
90 # Misc. Configuration Options#
91 ##############################
96 RESOLVE_HOST = "1" : DNS 사용안함 ' 0' 으로 수정
109 ##################
110 # Ignore Options #
111 ##################
128 # 0 = Do not block UDP/TCP scans. : 차단 안함
129 # 1 = Block UDP/TCP scans. : 차단
130 # 2 = Run external command only (KILL_RUN_CMD) : 역해킹
// ?????
135 ###################
136 # Dropping Routes:#
137 ###################
160 #KILL_ROUTE="/sbin/route add $TARGET$ 333.444.555.666" // route 명령어로 차단
205 # iptables support for Linux
206 KILL_ROUTE="/sbin/iptables -I INPUT -s $TARGET$ -j DROP"
// iptables로 차단 시킴
220 ###############
221 # TCP Wrappers#
222 ###############
229 #KILL_HOSTS_DENY="ALL: $TARGET$"
282 SCAN_TRIGGER="2" : 스캔 간격 딜레이 ' 0 '
이상 conf 파일을 둘러 봤지만 집중하지 않아서 그런지 그냥 넘어간 부분이 있다 이해해주길
----------------------------------------------------------------------------------------------------
실행
----------------------------------------------------------------------------------------------------
# portsentry --help
# portsentry -stcp
# ps ax | grep port
# iptables -F
# iptables -P INPUT ACCEPT // free nmap으로는 DROP상태에서 안됨
[Centos]
# yum -y install nmap
# nmap -v -sS -o 192.168.10.10 // fedora 스캔하다 멈추고
[fedora]
# iptables -L
192.168.10.20 즉 centos 에 대한 차단 룰이 적용되어 있는것을 볼 수 있다.
----------------------------------------------------------------------------------------------------
----------------------------------------------------------------------------------------------------
----------------------------------------------------------------------------------------------------
----------------------------------------------------------------------------------------------------
----------------------------------------------------------------------------------------------------
----------------------------------------------------------------------------------------------------
----------------------------------------------------------------------------------------------------
portsentry 는 host기반 침입 탐지 시스템으로 열려 있는 모든 포트를 모니터링 할 수 있는 것이 특징이다.
포트 스캔 공격을 받았을 경우 방화벽과 연동하여 보안정책을 구성 할 수 있다.
특징 ( 차단방법)
----------------------------------------------------------------------------------------------------
호스트로 들어오는 모든 패킷을 ROUTE명으로 DROP시킬 수 있다.
xinetd 기반의 서비스에 접근하지 못하도록 /etc/hosts.deny 파일을 갱신 할 수 있다. (tcpd)
연결을 막지 위해 iptables와 연동가능
----------------------------------------------------------------------------------------------------
다운로드
----------------------------------------------------------------------------------------------------
http://rpm.pbon.net
# wget ftp://ftp.pbone.net/mirror/ftp.falsehope.net/home/tengel/centos/4/te/i386/RPMS/portsentry-1.2-1.te.i386.rpm // centos용
http://rpmfind.net
http://centos.org
----------------------------------------------------------------------------------------------------
설치
----------------------------------------------------------------------------------------------------
portsentry 실행파일
portsentry.conf 환경설정 파일
portsenty.history 거부된 host정보 저장
portsenty.ignor 감시예외파일
----------------------------------------------------------------------------------------------------
실행 모드
----------------------------------------------------------------------------------------------------
portsentry 는 스캔 공격자가 스캔을 하기 위해 사용하는 다양한 공격에 대비하여 탐지하고 싶은 공격에 따라서 여러가지 방법으로 실행가능
----------------------------------------------------------------------------------------------------
실행 옵션
----------------------------------------------------------------------------------------------------
-tcp / -udp : 표준 tcp/udp host기반 IDS로 동작
-stcp / -sudp : 스텔스 tcp/udp 스캔 감시
-atcp / -audp : portsentry.conf 파일에 지정한 port 에 어떤 host도 접근하지 못하도록 설정
----------------------------------------------------------------------------------------------------
----------------------------------------------------------------------------------------------------
[fedora]
위에서 받은 rpm 패키지를 설치 하자
# rpm -Uvh portsentry
# rpm -ql portsentry
# cd /etc/portsentry
# ls
portsentry.conf portsentry.ignore portsentry.modes
# vi portsentry.conf

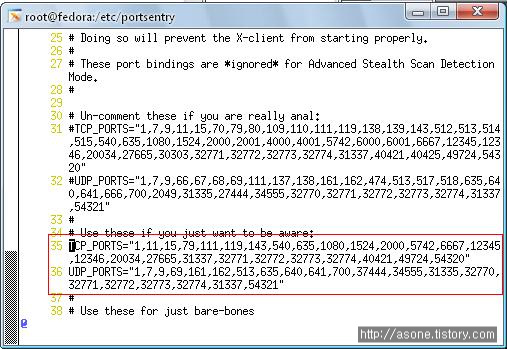
35~36 라인에 감시할 포트를 추가할 수 있다.최대64
42 ###########################################
43 # Advanced Stealth Scan Detection Options #
44 ###########################################
58 ADVANCED_PORTS_TCP="1024"
59 ADVANCED_PORTS_UDP="1024"
// 스텔스 스캔 포트 감시영역
72 # Default TCP ident and NetBIOS service
73 ADVANCED_EXCLUDE_TCP="21,22,25,53,80,110,113,135,137,138,139,443"
74 # Default UDP route (RIP), NetBIOS, bootp broadcasts.
75 ADVANCED_EXCLUDE_UDP="520,517,518,513,138,137,123,68,67,53"
// 감시제외 포트
78 ######################
79 # Configuration Files#
80 ######################
81 #
82 # Hosts to ignore
83 IGNORE_FILE="/etc/portsentry/portsentry.ignore" // 각 파일 위치
84 # Hosts that have been denied (running history)
85 HISTORY_FILE="/etc/portsentry/portsentry.history"
86 # Hosts that have been denied this session only (temporary until next re start)
87 BLOCKED_FILE="/etc/portsentry/portsentry.blocked"
89 ##############################
90 # Misc. Configuration Options#
91 ##############################
96 RESOLVE_HOST = "1" : DNS 사용안함 ' 0' 으로 수정
109 ##################
110 # Ignore Options #
111 ##################
128 # 0 = Do not block UDP/TCP scans. : 차단 안함
129 # 1 = Block UDP/TCP scans. : 차단
130 # 2 = Run external command only (KILL_RUN_CMD) : 역해킹
// ?????
135 ###################
136 # Dropping Routes:#
137 ###################
160 #KILL_ROUTE="/sbin/route add $TARGET$ 333.444.555.666" // route 명령어로 차단
205 # iptables support for Linux
206 KILL_ROUTE="/sbin/iptables -I INPUT -s $TARGET$ -j DROP"
// iptables로 차단 시킴
220 ###############
221 # TCP Wrappers#
222 ###############
229 #KILL_HOSTS_DENY="ALL: $TARGET$"
282 SCAN_TRIGGER="2" : 스캔 간격 딜레이 ' 0 '
이상 conf 파일을 둘러 봤지만 집중하지 않아서 그런지 그냥 넘어간 부분이 있다 이해해주길
----------------------------------------------------------------------------------------------------
실행
----------------------------------------------------------------------------------------------------
# portsentry --help
# portsentry -stcp
# ps ax | grep port
# iptables -F
# iptables -P INPUT ACCEPT // free nmap으로는 DROP상태에서 안됨
[Centos]
# yum -y install nmap
# nmap -v -sS -o 192.168.10.10 // fedora 스캔하다 멈추고
[fedora]
# iptables -L
192.168.10.20 즉 centos 에 대한 차단 룰이 적용되어 있는것을 볼 수 있다.
----------------------------------------------------------------------------------------------------
----------------------------------------------------------------------------------------------------
----------------------------------------------------------------------------------------------------
----------------------------------------------------------------------------------------------------
----------------------------------------------------------------------------------------------------
----------------------------------------------------------------------------------------------------
----------------------------------------------------------------------------------------------------

 Rss Feed