'mysql'에 해당되는 글 3건
- 2008.12.20 웹서버 구축관리 / Apache , PHP , MySQL 설치 설정
- 2008.07.18 linux - snort , DB 연동 , apache . webserver 연동
- 2008.07.17 linux - snort , DB 연동
■ 아파치 서버 설정
■ 설치전 준비 사항
■ 패키지 준비
0. httpd
0. php
0. mysql
0. gcc 관련 패키지
0. libjpeg , libpng , freetype , gd
0. php
0. mysql
0. gcc 관련 패키지
0. libjpeg , libpng , freetype , gd
■ 소스 다운로드
// 아파치
www.apache.org --> http server --> from a mirror --> unix source
# cd /usr/src
# wget http://mirror.apache-kr.org/httpd/httpd-2.2.11.tar.gz
// php
www.php.net --> downloads --> php 5.x.x -
# wget http://kr2.php.net/get/php-5.2.8.tar.gz/from/this/mirror
// mysql
www.mysql.org or mysql.com --> downloads --> Compressed GNU TAR archive (tar.gz)
--> pick a mirror -- >
# wget http://dev.mysql.com/get/Downloads/MySQL-5.1/mysql-5.1.30.tar.gz/from/http://mysql.byungsoo.net/
# ls -l
-rw-r--r-- 1 root root 6806786 12월 13 23:35 httpd-2.2.11.tar.gz
-rw-r--r-- 1 root root 29050568 11월 20 08:19 mysql-5.1.30.tar.gz
-rw-r--r-- 1 root root 12427411 12월 8 04:43 php-5.2.8.tar.gz
■ 라이브러리, 컴파일러 확인
# yum -y install gcc cpp gcc-c++ compat-gcc-32-g77 flex
# rpm -qa gcc* cpp* compat-gcc* flex*
gcc-c++-4.1.2-42.el5
gcc-objc++-4.1.2-42.el5
gcc-objc-4.1.2-42.el5
compat-gcc-34-3.4.6-4
gcc-java-4.1.2-42.el5
flex-2.5.4a-41.fc6
cpp-4.1.2-42.el5
compat-gcc-34-g77-3.4.6-4
gcc-gfortran-4.1.2-42.el5
gcc-4.1.2-42.el5
gcc-gnat-4.1.2-42.el5
# yum -y install libjpeg-devel libpng-devl freetype-devel gd-devel
# rpm -qa libjpeg* libpng* freetype* gd-*
libpng-1.2.10-7.1.el5_0.1
libjpeg-6b-37
gd-devel-2.0.33-9.4.el5_1.1
libjpeg-devel-6b-37
freetype-devel-2.2.1-20.el5_2
freetype-2.2.1-20.el5_2
libpng-devel-1.2.10-7.1.el5_0.1
■ MySQL 설치
# tar xvfz mysql-5.1.30.tar.gz
# useradd -M -s /bin/false mysql
# ./configure \
--prefix=/usr/local/mysql \
--with-charset=utf8 \
--with-extra-charsets=all
....
MySQL has a Web site at http://www.mysql.com/ which carries details on the
latest release, upcoming features, and other information to make your
work or play with MySQL more productive. There you can also find
information about mailing lists for MySQL discussion.
Remember to check the platform specific part of the reference manual for
hints about installing MySQL on your platform. Also have a look at the
files in the Docs directory.
hints about installing MySQL on your platform. Also have a look at the
files in the Docs directory.
Thank you for choosing MySQL!
# make && make install
....
# echo $?
0
#
// 환경 설정파일 복사 , 소스 폴더내에 있다.
# make && make install
....
# echo $?
0
#
// 환경 설정파일 복사 , 소스 폴더내에 있다.
# cp support-files/my-large.cnf /etc/my.cnf
my-huge.cnf 1~2G
my-large.cnf 512M
my-medium.cnf 128M~ 256M
my-small.cnf 64M 이하
초기 샘플 파일에 대해서..
vmware상에서 구현중 메모리 512로 잡고 하지만 vmware상 문제인지 small외에 사용하면
아래 install db가 되지 않는다.
또한 mysqld 시작시 위 파일들 때문에 시작이 안된다.. 혹시 안되는 분들이 있다면
rm -f /etc/my.cnf 하고 작업을 진행 하길. 문제 해결을 위해 검색 중이나
마땅히 해결책이 보이질 않고 있음..(vmware상의 문제로 보여짐)
my-large.cnf 512M
my-medium.cnf 128M~ 256M
my-small.cnf 64M 이하
초기 샘플 파일에 대해서..
vmware상에서 구현중 메모리 512로 잡고 하지만 vmware상 문제인지 small외에 사용하면
아래 install db가 되지 않는다.
또한 mysqld 시작시 위 파일들 때문에 시작이 안된다.. 혹시 안되는 분들이 있다면
rm -f /etc/my.cnf 하고 작업을 진행 하길. 문제 해결을 위해 검색 중이나
마땅히 해결책이 보이질 않고 있음..(vmware상의 문제로 보여짐)
// 기본 DB생성
# cd /usr/local/mysql
# cd bin
# ls
# ./mysql_install_db --user=mysql
Installing MySQL system tables...
OK
Filling help tables...
OK
To start mysqld at boot time you have to copy
support-files/mysql.server to the right place for your system
PLEASE REMEMBER TO SET A PASSWORD FOR THE MySQL root USER !
To do so, start the server, then issue the following commands:
/usr/local/bin/mysqladmin -u root password 'new-password'
/usr/local/bin/mysqladmin -u root -h fedora password 'new-password'
Alternatively you can run:
/usr/local/bin/mysql_secure_installation
which will also give you the option of removing the test
databases and anonymous user created by default. This is
strongly recommended for production servers.
See the manual for more instructions.
You can start the MySQL daemon with:
cd /usr/local ; /usr/local/bin/mysqld_safe &
You can test the MySQL daemon with mysql-test-run.pl
cd /usr/local/mysql-test ; perl mysql-test-run.pl
Please report any problems with the /usr/local/bin/mysqlbug script!
The latest information about MySQL is available at http://www.mysql.com/
Support MySQL by buying support/licenses from http://shop.mysql.com/
# echo $?
0
// 디렉토리 권한 설정
# chown -R mysql:mysql .
// 환경변수 등록
# vi ~/.bash_profile
PATH=$PATH:$HOME/bin:/usr/local/mysql/bin
# source ~/.bash_profile < 로긴 과정 없이 적용 >
//자동실행 설정
# cp share/mysql/mysql.server /etc/init.d/mysqld
# chkconfig --add mysqld
# chkconfig --list mysqld
// mysqld 시작
# /etc/init.d/mysqld start
Starting MySQL. [ OK ]
# mysql
Welcome to the MySQL monitor. Commands end with ; or \g.
Your MySQL connection id is 1
Server version: 5.1.30 Source distribution
Type 'help;' or '\h' for help. Type '\c' to clear the buffer.
mysql> exit
Bye
// 암호 설정
# mysqladmin -u root password ****
# # mysql -u root -p
Enter password:
Welcome to the MySQL monitor. Commands end with ; or \g.
Your MySQL connection id is 4
Server version: 5.1.30 Source distribution
Type 'help;' or '\h' for help. Type '\c' to clear the buffer.
mysql> exit
■ APACHE 설치
# cd /usr/src
# ls
httpd-2.2.11.tar.gz
# tar xvfz httpd-2.2.11.tar.gz
# cd httpd-2.2.11
# ls
# ./configure --prefix=/usr/local/apache --enable-mods-shared=all --enable-so --enable-rewrite
// prefix ( 위치 ), enable-mods-shared=all (모든 모듈을 DSO로)
// enable-so (DSO 모드 활성)
// enable-rewrite ( URL 재작성 모듈 활성)
# echo $?
# make && make install
# echo $?
■ 자동실행 스크립트 정의
■ httpd.conf 환경 설정
웹브라우저에서 접속 테스트
# ls
httpd-2.2.11.tar.gz
# tar xvfz httpd-2.2.11.tar.gz
# cd httpd-2.2.11
# ls
# ./configure --prefix=/usr/local/apache --enable-mods-shared=all --enable-so --enable-rewrite
// prefix ( 위치 ), enable-mods-shared=all (모든 모듈을 DSO로)
// enable-so (DSO 모드 활성)
// enable-rewrite ( URL 재작성 모듈 활성)
# echo $?
# make && make install
# echo $?
■ 자동실행 스크립트 정의
# cp /usr/local/apache/bin/apachectl /etc/init.d/httpd
# chkconfig --add httpd
안됨
# vi /etc/init.d/httpd
#!/bin/sh
# chkconfig: 2345 90 90
# description: init file for Apache server daemon
# processname: /usr/local/apache/bin/apachectl
# config: /usr/local/apache/conf/httpd.conf
# pidfile: /usr/lcoal/apache/logs/httpd.pid
....
# chkconfig --add httpd
# chkconfig --list httpd
httpd 0:off 1:off 2:on 3:on 4:on 5:on 6:off
# chkconfig --add httpd
안됨
# vi /etc/init.d/httpd
#!/bin/sh
# chkconfig: 2345 90 90
# description: init file for Apache server daemon
# processname: /usr/local/apache/bin/apachectl
# config: /usr/local/apache/conf/httpd.conf
# pidfile: /usr/lcoal/apache/logs/httpd.pid
....
# chkconfig --add httpd
# chkconfig --list httpd
httpd 0:off 1:off 2:on 3:on 4:on 5:on 6:off
■ httpd.conf 환경 설정
# vi /usr/local/apache/conf/httpd.conf
#ServerName << 주석 해체
# /etc/init.d/httpd restart
#ServerName << 주석 해체
# /etc/init.d/httpd restart
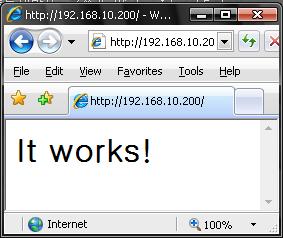
웹브라우저에서 접속 테스트
■ PHP 설치
# cd /usr/src
# ls
php-5.2.8.tar.gz
# tar xvzf php-5.2.8.tar.gz
# cd php-5.2.8
# ./configure --prefix=/usr/local/php --with-apxs2=/usr/local/apache/bin/apxs --with-mysql=/usr/local/mysql --with-config-file-path=/usr/local/apache/conf --disable-debug --enable-safe-mode --enable-track-vars --enable-sockets --enable-mod-charset --with-charset=utf8 --with-xml --with-language=korean --enable-mailparse --enable-calendar --enable-sysvsem=yes --enable-sysvshm=yes --enable-ftp --enable-magic-quotes --enable-gd-native-ttf --enable-url-includes --enable-trans-id --enable-inline-optimization --enable-bcmath --with-jpeg --with-png --with-zlib --with-jpeg-dir=/usr --with-png-dir=/usr/lib --with-freetype-dir=/usr --with-libxml-dir=/usr --enable-exif --with-gd --with-ttf --with-gettext --enable-sigchild --enable-mbstring
....
+--------------------------------------------------------------------+
| License: |
| This software is subject to the PHP License, available in this |
| distribution in the file LICENSE. By continuing this installation |
| process, you are bound by the terms of this license agreement. |
| If you do not agree with the terms of this license, you must abort |
| the installation process at this point. |
+--------------------------------------------------------------------+
# ls
php-5.2.8.tar.gz
# tar xvzf php-5.2.8.tar.gz
# cd php-5.2.8
# ./configure --prefix=/usr/local/php --with-apxs2=/usr/local/apache/bin/apxs --with-mysql=/usr/local/mysql --with-config-file-path=/usr/local/apache/conf --disable-debug --enable-safe-mode --enable-track-vars --enable-sockets --enable-mod-charset --with-charset=utf8 --with-xml --with-language=korean --enable-mailparse --enable-calendar --enable-sysvsem=yes --enable-sysvshm=yes --enable-ftp --enable-magic-quotes --enable-gd-native-ttf --enable-url-includes --enable-trans-id --enable-inline-optimization --enable-bcmath --with-jpeg --with-png --with-zlib --with-jpeg-dir=/usr --with-png-dir=/usr/lib --with-freetype-dir=/usr --with-libxml-dir=/usr --enable-exif --with-gd --with-ttf --with-gettext --enable-sigchild --enable-mbstring
prefix ( 위치)
with-apxs2 (아파치의 apxs를 이용해 아파치에 모듈적재)
with-mysql (mysql과 연동)
with-config-file-path ( php 의 환경설정 파일인 php.ini가 생성될 위치)
이하 라이브러리 포함 위치
with-apxs2 (아파치의 apxs를 이용해 아파치에 모듈적재)
with-mysql (mysql과 연동)
with-config-file-path ( php 의 환경설정 파일인 php.ini가 생성될 위치)
이하 라이브러리 포함 위치
....
+--------------------------------------------------------------------+
| License: |
| This software is subject to the PHP License, available in this |
| distribution in the file LICENSE. By continuing this installation |
| process, you are bound by the terms of this license agreement. |
| If you do not agree with the terms of this license, you must abort |
| the installation process at this point. |
+--------------------------------------------------------------------+
Thank you for using PHP.
Notice: Following unknown configure options were used:
--enable-track-vars
--with-charset=utf8
--with-xml
--with-language=korean
--enable-mailparse
--enable-calender
--enable-url-includes
--enable-trans-id
--with-jpeg
--with-png << 없는 옵션일 경우 출력됨
--with-charset=utf8
--with-xml
--with-language=korean
--enable-mailparse
--enable-calender
--enable-url-includes
--enable-trans-id
--with-jpeg
--with-png << 없는 옵션일 경우 출력됨
Check './configure --help' for available options
# echo $?
0
# make && make install
<IfModule dir_module>
DirectoryIndex index.html index.html index.php
</IfModule>
<IfModule mime_module>
AddType application/x-httpd-php .php
AddType application/x-httpd-php-source .phps
</IfModule>
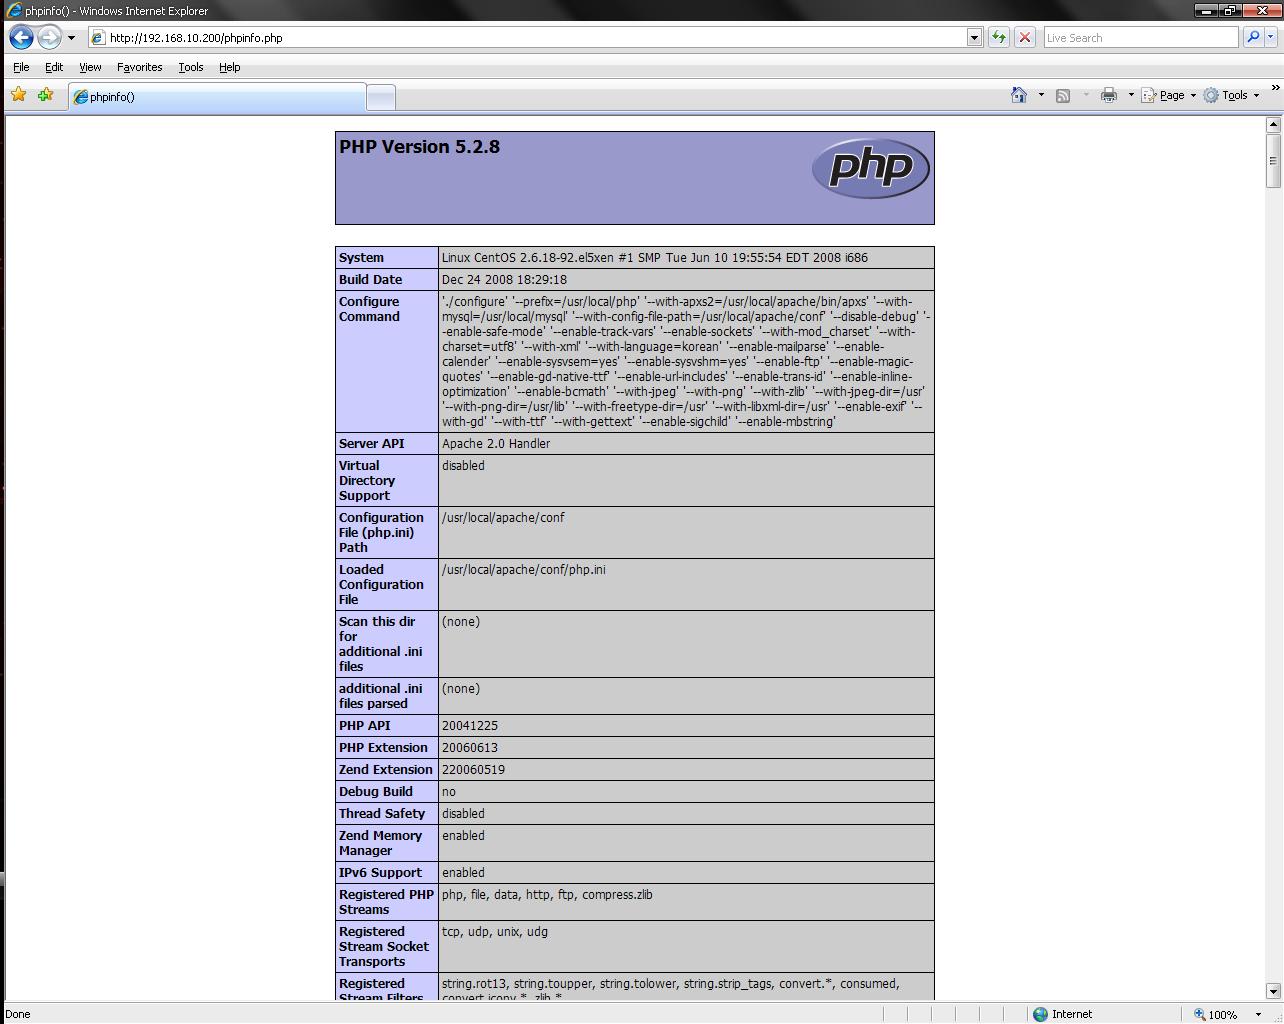
# vi /usr/local/apache/htdocs/phpinfo.php
<? phpinfo(); ?>
# /etc/init.d/httpd restart
웹브라우저에서 확인
# echo $?
0
# make && make install
# cp php.ini-dist /usr/local/apache/conf/php.ini
# vi /usr/local/apache/conf/httpd.conf<IfModule dir_module>
DirectoryIndex index.html index.html index.php
</IfModule>
<IfModule mime_module>
AddType application/x-httpd-php .php
AddType application/x-httpd-php-source .phps
</IfModule>
# vi /usr/local/apache/htdocs/phpinfo.php
<? phpinfo(); ?>
# /etc/init.d/httpd restart
웹브라우저에서 확인
■ apache 환경 설정 ( # vi /usr/local/bin/apache/conf/httpd.conf )
ServerRoot "/usr/local/apache"
# 아파치 웹서버가 설치된 디렉토리
# 아파치 웹서버가 설치된 디렉토리
Listen 80
# 아파치가 사용할 포트번호
# 아파치가 사용할 포트번호
LoadModule authn_file_module modules/mod_authn_file.so
LoadModule authn_dbm_module modules/mod_authn_dbm.so
LoadModule authn_anon_module modules/mod_authn_anon.so
# 아파치에 등록된 모듈목록
LoadModule authn_dbm_module modules/mod_authn_dbm.so
LoadModule authn_anon_module modules/mod_authn_anon.so
# 아파치에 등록된 모듈목록
<IfModule !mpm_netware_module>
<IfModule !mpm_winnt_module>
User daemon
Group daemon
</IfModule>
</IfModule>
# 아파치 데몬은 root권한 그 자식 프로세스는 위에서 지정된 이름으로 실행된다.
<IfModule !mpm_winnt_module>
User daemon
Group daemon
</IfModule>
</IfModule>
# 아파치 데몬은 root권한 그 자식 프로세스는 위에서 지정된 이름으로 실행된다.
DocumentRoot "/usr/local/apache/htdocs"
# 아파치서버의 웹문서가 있는 경로 설정
# 아파치서버의 웹문서가 있는 경로 설정
<Directory />
Options FollowSymLinks
AllowOverride None
Order deny,allow
Deny from all
</Directory>
# 해당 디렉토리 이하의 웹문서를 어떻게 제어할 것인가를 설정
Options FollowSymLinks
AllowOverride None
Order deny,allow
Deny from all
</Directory>
# 해당 디렉토리 이하의 웹문서를 어떻게 제어할 것인가를 설정
-AllowOverride 는 디렉토리 인증 관련 AccessFileName과 관련
-Order 는 차단 허용에 대한 기본값 설정
<IfModule dir_module>
DirectoryIndex index.html index.html index.php
</IfModule>
# 클라이언트가 파일이름없이 접근시 나열된 파일을 순서대로 검색하여 보여준다.
<FilesMatch "^\.ht">
Order allow,deny
Deny from all
Satisfy All
</FilesMatch>
# 특정한 파일형식을 정규표현식으로 지정해서 해당 파일에 대한 접근 제어을 설정할때 사용
ErrorLog "logs/error_log"
# 에러로그파일 위치
LogLevel warn
# 에러로그레벨 지정
<IfModule log_config_module>
LogFormat "%h %l %u %t \"%r\" %>s %b \"%{Referer}i\" \"%{User-Agent}i\"" combined
LogFormat "%h %l %u %t \"%r\" %>s %b" common
<IfModule logio_module>
LogFormat "%h %l %u %t \"%r\" %>s %b \"%{Referer}i\" \"%{User-Agent}i\" %I %O" combinedio
</IfModule>
CustomLog "logs/access_log" common
</IfModule>
# 웹서버 로그 포멧 지정
<IfModule alias_module>
ScriptAlias /cgi-bin/ "/usr/local/apache/cgi-bin/"
</IfModule>
# Redirect지시어는 앞에 지정한 주소로 접속하면 뒤에 지정한 URL로 이동한다.
# Alias 지시어는 경로를 짧게 줄이거나 DocumentRoot 외에 다른곳에 있는 디렉토리 접근
# ScriptAlias 는 서버 스크립트를 포함한다.
<IfModule cgid_module>
#Scriptsock logs/cgisock
</IfModule>
# CGI 데몬과 통신을 위해 사용할 소켓의 이름 지정
<Directory "/usr/local/apache/cgi-bin">
AllowOverride None
Options None
Order allow,deny
Allow from all
</Directory>
# cgi 스크립트가 있는 디렉토리의 설정내용
DefaultType text/plain
# 웹서버가 데이터를 전송하는 문서 형식 지정, mime.types파일에 정의되지않는 형식을 표시
<IfModule mime_module>
TypesConfig conf/mime.types
# 웹서버의 mime type을 지정한 파일을 지정
# Addtype 특정 확장자 지정
# AddEncoding 특정 확장자를 가진 파일을 특정 형식으로 인코딩
# AddHandler 특정 확장자를 가진 파일의 핸들러를 지정한다.
#AddType application/x-gzip .tgz
#AddEncoding x-compress .Z
#AddEncoding x-gzip .gz .tgz
AddType application/x-compress .Z
AddType application/x-gzip .gz .tgz
AddType application/x-httpd-php .php
AddType application/x-httpd-php-source .phps
#AddHandler cgi-script .cgi
# For type maps (negotiated resources):
#AddHandler type-map var
#AddType text/html .shtml
#AddOutputFilter INCLUDES .shtml
</IfModule>
#MIMEMagicFile conf/magic
# RFC 형식이 지정되어있지 않을때 파일의 내용을 통해 자동적으로 결정하게 되는데 해당 지시어를 # 통해서 conf/magic 파일을 힌트 삼아서 문서 형식을 결정
#ErrorDocument 500 "The server made a boo boo."
#ErrorDocument 404 /missing.html
#ErrorDocument 404 "/cgi-bin/missing_handler.pl"
#ErrorDocument 402 http://www.example.com/subscription_info.html
# 에러 발생시 응답 페이지
#EnableMMAP off
#EnableSendfile off
# 메모리 대응 or 메모리 매핑
#Include conf/extra/httpd-mpm.conf
# 다중 처리 모듈
#Include conf/extra/httpd-multilang-errordoc.conf
# 에러메시지 다중언어 지원
#Include conf/extra/httpd-autoindex.conf
# 클라에게 보여줄 디렉토리 목록 설정
#Include conf/extra/httpd-languages.conf
# 다중 언어를 지원키 위한 설정 파일
# 다중 언어를 지원키 위한 설정 파일
# User home directories
#Include conf/extra/httpd-userdir.conf
# 사용자 홈 디렉토리 설정 파일
#Include conf/extra/httpd-userdir.conf
# 사용자 홈 디렉토리 설정 파일
# Real-time info on requests and configuration
#Include conf/extra/httpd-info.conf
# 아파치 웹서버의 상태와 환경설정 제공 파일
#Include conf/extra/httpd-info.conf
# 아파치 웹서버의 상태와 환경설정 제공 파일
# Virtual hosts
#Include conf/extra/httpd-vhosts.conf
# 가상호스트 설정파일
#Include conf/extra/httpd-vhosts.conf
# 가상호스트 설정파일
# Local access to the Apache HTTP Server Manual
#Include conf/extra/httpd-manual.conf
# 아파치 메뉴얼
#Include conf/extra/httpd-manual.conf
# 아파치 메뉴얼
# Distributed authoring and versioning (WebDAV)
#Include conf/extra/httpd-dav.conf
# 웹사이트 개발도구 WebDAV 지원 모듈
#Include conf/extra/httpd-dav.conf
# 웹사이트 개발도구 WebDAV 지원 모듈
# Various default settings
#Include conf/extra/httpd-default.conf
# 아파치 기본 설정 파일
#Include conf/extra/httpd-default.conf
# 아파치 기본 설정 파일
# Secure (SSL/TLS) connections
#Include conf/extra/httpd-ssl.conf
# 보안 소켓 레이어
#
# Note: The following must must be present to support
# starting without SSL on platforms with no /dev/random equivalent
# but a statically compiled-in mod_ssl.
#
<IfModule ssl_module>
SSLRandomSeed startup builtin
SSLRandomSeed connect builtin
</IfModule>
# 보안 소켓 레이어 모듈이 Load되어질때, 인터넷을 통해 비공개문서를 전송키위해 사용
snort , DB , apache
---------------------------------------------------------------------------------------------------------
snort 에 의해 생긴 자료를 DB와 연동 시켜 보았지만 이를 분석 하기가 상당히? 까다롭다 .
해서 웹상에서 간편히 볼 수 있도록 웹서버와 연동시켜 보자.
---------------------------------------------------------------------------------------------------------
아파치 서버 설치
---------------------------------------------------------------------------------------------------------
아파치를 돌리기 위해서는 APM ( httpd, php-gd, php-mysql)관련 패키지가 필요하다.
또한 adodb, base source 도 필요하다.
[centos]
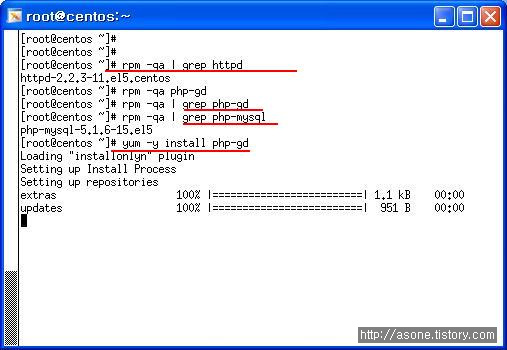 필요한 패키지를 yum을 이용해 설치 하자.
역시 adodb, base source도 받자
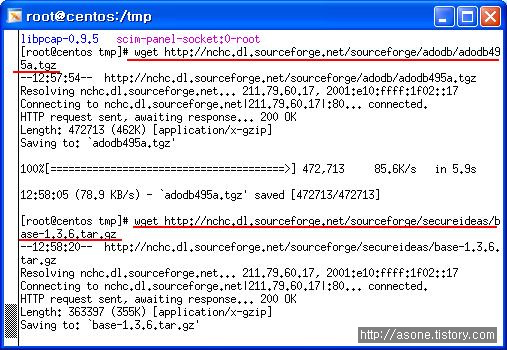 # tar xvfz adodb495a.tgz -C /var/www
# tar xvfz base-1.3.6.tar.gz -C /var/www/html // -C 풀릴 위치 지정
# cd /var/www ; ls
adodb cgi-bin error html icons //adodb
# cd html ; ls
base-1.3.6
# mv base-1.3.6/ base
# cd base
# ls
# cp base_conf.php.dist base_conf.php
# vi base_conf.php
48 $BASE_urlpath = '/base';
70 $DBlib_path = '/var/www/adodb';
92 $alert_dbname = 'snort';
95 $alert_user = 'base';
96 $alert_password = 'base123'; // 각각 수정
# service httpd start // 웹데몬 시작 . mysql 이 정지 되어있다면 시작시켜야한다.
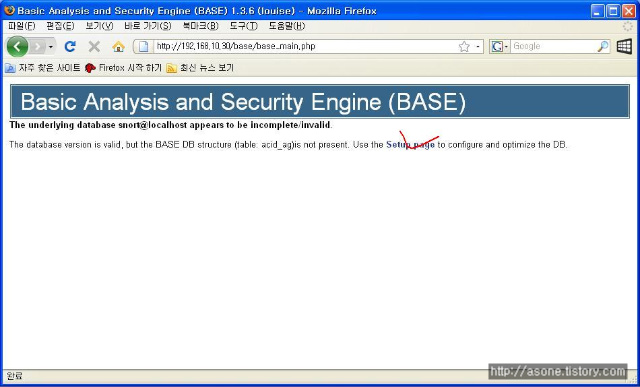 인터넷 창을 열어 확인
setup page 광클
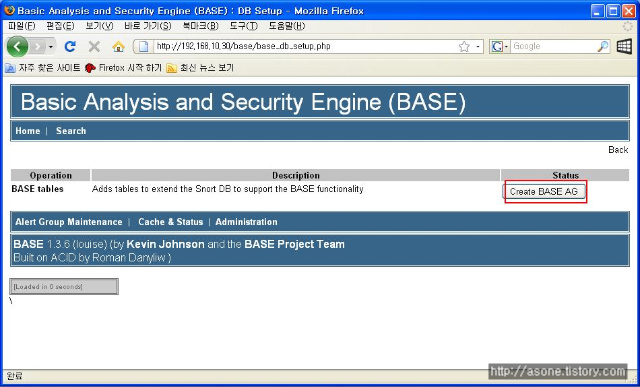
create BASE AG를 누르게 되면 DB를 바탕으로 웹페이지가 생성 된다.
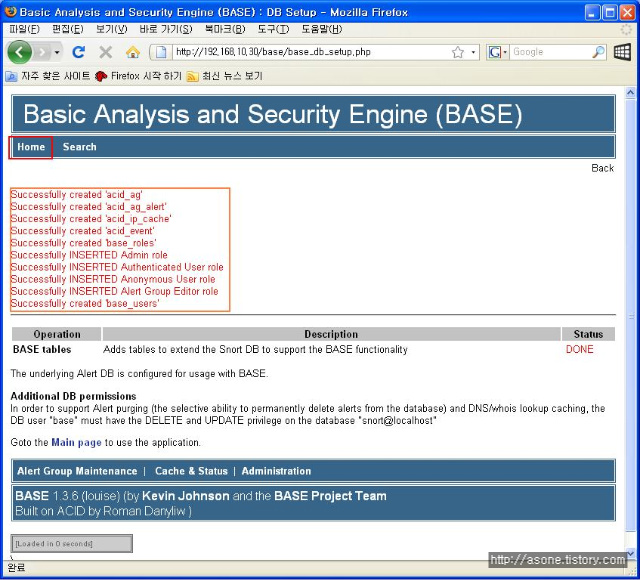
여기서 HOME을 눌른 다음 그 페이지에서 각각 끌리는? 것에 눌러 보면 /var/log/snort에서 본 정보가
일목 요연? 하에 보여진다는 것을 알 수 있다.
---------------------------------------------------------------------------------------------------------
snort 에 의해 생긴 자료를 DB와 연동 시켜 보았지만 이를 분석 하기가 상당히? 까다롭다 .
해서 웹상에서 간편히 볼 수 있도록 웹서버와 연동시켜 보자.
---------------------------------------------------------------------------------------------------------
아파치 서버 설치
---------------------------------------------------------------------------------------------------------
아파치를 돌리기 위해서는 APM ( httpd, php-gd, php-mysql)관련 패키지가 필요하다.
또한 adodb, base source 도 필요하다.
[centos]
역시 adodb, base source도 받자
# tar xvfz base-1.3.6.tar.gz -C /var/www/html // -C 풀릴 위치 지정
# cd /var/www ; ls
adodb cgi-bin error html icons //adodb
# cd html ; ls
base-1.3.6
# mv base-1.3.6/ base
# cd base
# ls
# cp base_conf.php.dist base_conf.php
# vi base_conf.php
48 $BASE_urlpath = '/base';
70 $DBlib_path = '/var/www/adodb';
92 $alert_dbname = 'snort';
95 $alert_user = 'base';
96 $alert_password = 'base123'; // 각각 수정
# service httpd start // 웹데몬 시작 . mysql 이 정지 되어있다면 시작시켜야한다.
setup page 광클
create BASE AG를 누르게 되면 DB를 바탕으로 웹페이지가 생성 된다.
여기서 HOME을 눌른 다음 그 페이지에서 각각 끌리는? 것에 눌러 보면 /var/log/snort에서 본 정보가
일목 요연? 하에 보여진다는 것을 알 수 있다.
snort LOG를 DB로
-----------------------------------------------------------------------------------------------------------------------------------------------------------------------------------------------------------------------------------------
DB를 생각 하면 머리에 쥐가..쳇..
DB언어
DDL ( 정의어 ) : create, drop, alter
DML ( 조작어 ) : select, insert, update, delete(데이터만 삭제)
DCL ( 제어어 ) : grant, reboke , deny
성능에 따라
IBMDB2 > Oracle > MS- SQL > Access > excel > my- sql
순으로 성능이 좋고 가격도 좋다? 비싸다 ㅡㅡㅋ
--------------------------------------------------------------------------------------------------------
실습
--------------------------------------------------------------------------------------------------------
[centos]
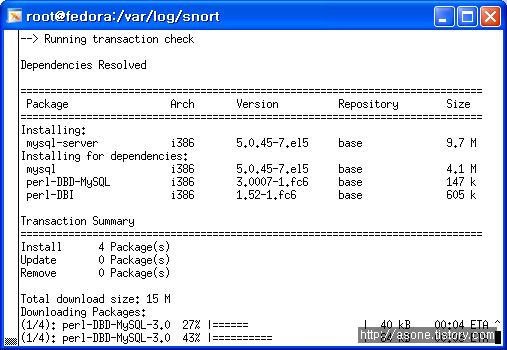
[root@centos ~]# rpm -qa | grep sql
sqlite-3.3.6-2
python-sqlite-1.1.7-1.2.1
hsqldb-1.8.0.4-3jpp.4
mysql-5.0.22-2.2.el5_1.1
php-mysql-5.1.6-15.el5
postgresql-libs-8.1.9-1.el5
mysql-server-5.0.22-2.2.el5_1.1 // mysql-server가 있따.
없다면
# yum -y install mysql-server // 의존성 패키지 (mysql, perl-DBD-MYSQL, perl-DBI)
 //fedora 가 아닌 centos다 이미지의 제목이랑 다르다..잠결에 엉뚱한데다....
[root@centos ~]# service mysqld start
어찌 됐는 okok 뜨면서 실행 된다. ㅡㅡ/
# netstat -ntlp // 3306 포트 확인
# /usr/bin/mysqladmin -u root password '123456'
// 처음 접속시 관리자 계정과 패스워드를 설정해줘야 한다.
mysql> show databases;
mysql> create database snort;
mysql> use snort;
mysql> show tables;
[fedora]
// snort를 받아 압축을 푼 폴더로 이동
# cd /tmp/snort
# make clean // 컴파일된 파일 삭제
# reset // 메모리 올려진 컴파일 삭제
// 재 컴파일 하자
# ./configure --prefix=/etc/snort --with-mysql && make && make install
or
# ./configure --with-mysql && make && make install
// 여기서 주의할 점은 나중에 # snort -c snort.conf 로 실행 했을때 에러가 뜨면
위의 작업을 다시 해야한다. --prefix 부분을 삭제하고 다시 하자.
# ehco $?
0
# vi /etc/snort/snort.conf
/mysql
830
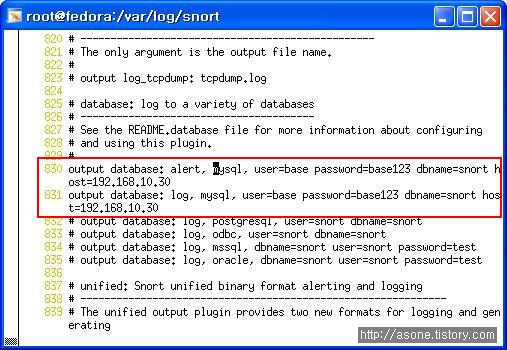 output database 부분을 수정하자
alert 와 log를 mysql 로 내보낼때 쓰인다.
user snort가 DB에 쓸때 쓰일 계정이다. 임의로 해도 된다 . 단 mysql에서 맞춰우어야 하낟.
dbname - snort가 데이터가 들어갈 db
host db가 저장될 host
수정후 저장
/tmp/snort-2.6.1.5/schemas 로 이동 후
# pwd
/tmp/snort-2.6.1.5/schemas
# ls
Makefile Makefile.in create_mssql create_oracle.sql
Makefile.am create_db2 create_mysql create_postgresql
# more create_mysql // snort에 쓰일 db구문이 있다.
# scp create_mysql root@192.168.10.30 //centos로 이동
[centos]
다른 터미널로 로긴
# mysql -u root -p snort < create_mysql // 리다이렉션을 이용 snort 테이블에 대해 create_mysql문 적용
sql접속되어있는 터미널에서
mysql> shoq tables;
mysql> select * from data;
mysql> select * from signature; // data, sig 둘다 비어있다.
mysql> use mysql;
mysql> select host,user,password form user;
계정에 권한을 주자
mysql> grant CREATE,SELECT,INSERT,UPDTE,DELETE on snort.* to base@localhost;
//base@localhost 에게 CREATE ~~등등의 권한 할당
mysql> set password for base@localhost=PASSWORD('base123');
// 암호 설정
mysql> grant CREATE,SELECT,INSERT,UPDATE,DELETE on snort.* to base@192.168.10.10;
//base@192.168.10.10 에게 CREATE ~~등등의 권한 할당
mysql> set password for base@192.168.10.10=PASSWORD('base123');
//암호설정
mysql> select host,user,passwrod from user;
// 권한이 grant되어진것을 확인 할 수 있다.
[fedora]
# snort -c /etc/snort/snort.conf
정상 실행 되는지 확인해보자
만약 메모리가 모자르다면 일단 필요없는 프로세스 를 잠깐 끄자.
ctrl +z
# pkill -9 snort
# snort -c /etc/snort/snort.conf -D
[centos]
# nmap -sS -O -v 192.168.10.10 // 스캔
sql이 켜진 터미널로 이동
mysql> user snort;
mysql> select * from data;
mysql> select * from signature; // 데이터가 생성 된것을 볼 수 있다.!!!!!!!!!!!!!!!!!!!!!!!!!!!!!
-----------------------------------------------------------------------------------------------------------------------------------------------------------------------------------------------------------------------------------------
DB를 생각 하면 머리에 쥐가..쳇..
DB언어
DDL ( 정의어 ) : create, drop, alter
DML ( 조작어 ) : select, insert, update, delete(데이터만 삭제)
DCL ( 제어어 ) : grant, reboke , deny
성능에 따라
IBMDB2 > Oracle > MS- SQL > Access > excel > my- sql
순으로 성능이 좋고 가격도 좋다? 비싸다 ㅡㅡㅋ
--------------------------------------------------------------------------------------------------------
실습
--------------------------------------------------------------------------------------------------------
[centos]
[root@centos ~]# rpm -qa | grep sql
sqlite-3.3.6-2
python-sqlite-1.1.7-1.2.1
hsqldb-1.8.0.4-3jpp.4
mysql-5.0.22-2.2.el5_1.1
php-mysql-5.1.6-15.el5
postgresql-libs-8.1.9-1.el5
mysql-server-5.0.22-2.2.el5_1.1 // mysql-server가 있따.
없다면
# yum -y install mysql-server // 의존성 패키지 (mysql, perl-DBD-MYSQL, perl-DBI)
yum설치 하면 잘됩니다.
[root@centos ~]# service mysqld start
어찌 됐는 okok 뜨면서 실행 된다. ㅡㅡ/
# netstat -ntlp // 3306 포트 확인
# /usr/bin/mysqladmin -u root password '123456'
// 처음 접속시 관리자 계정과 패스워드를 설정해줘야 한다.
mysql> show databases;
mysql> create database snort;
mysql> use snort;
mysql> show tables;
[fedora]
// snort를 받아 압축을 푼 폴더로 이동
# cd /tmp/snort
# make clean // 컴파일된 파일 삭제
# reset // 메모리 올려진 컴파일 삭제
// 재 컴파일 하자
# ./configure --prefix=/etc/snort --with-mysql && make && make install
or
# ./configure --with-mysql && make && make install
// 여기서 주의할 점은 나중에 # snort -c snort.conf 로 실행 했을때 에러가 뜨면
위의 작업을 다시 해야한다. --prefix 부분을 삭제하고 다시 하자.
# ehco $?
0
# vi /etc/snort/snort.conf
/mysql
830
alert 와 log를 mysql 로 내보낼때 쓰인다.
user snort가 DB에 쓸때 쓰일 계정이다. 임의로 해도 된다 . 단 mysql에서 맞춰우어야 하낟.
dbname - snort가 데이터가 들어갈 db
host db가 저장될 host
수정후 저장
/tmp/snort-2.6.1.5/schemas 로 이동 후
# pwd
/tmp/snort-2.6.1.5/schemas
# ls
Makefile Makefile.in create_mssql create_oracle.sql
Makefile.am create_db2 create_mysql create_postgresql
# more create_mysql // snort에 쓰일 db구문이 있다.
# scp create_mysql root@192.168.10.30 //centos로 이동
[centos]
다른 터미널로 로긴
# mysql -u root -p snort < create_mysql // 리다이렉션을 이용 snort 테이블에 대해 create_mysql문 적용
sql접속되어있는 터미널에서
mysql> shoq tables;
mysql> select * from data;
mysql> select * from signature; // data, sig 둘다 비어있다.
mysql> use mysql;
mysql> select host,user,password form user;
계정에 권한을 주자
mysql> grant CREATE,SELECT,INSERT,UPDTE,DELETE on snort.* to base@localhost;
//base@localhost 에게 CREATE ~~등등의 권한 할당
mysql> set password for base@localhost=PASSWORD('base123');
// 암호 설정
mysql> grant CREATE,SELECT,INSERT,UPDATE,DELETE on snort.* to base@192.168.10.10;
//base@192.168.10.10 에게 CREATE ~~등등의 권한 할당
mysql> set password for base@192.168.10.10=PASSWORD('base123');
//암호설정
mysql> select host,user,passwrod from user;
// 권한이 grant되어진것을 확인 할 수 있다.
[fedora]
# snort -c /etc/snort/snort.conf
정상 실행 되는지 확인해보자
만약 메모리가 모자르다면 일단 필요없는 프로세스 를 잠깐 끄자.
ctrl +z
# pkill -9 snort
# snort -c /etc/snort/snort.conf -D
[centos]
# nmap -sS -O -v 192.168.10.10 // 스캔
sql이 켜진 터미널로 이동
mysql> user snort;
mysql> select * from data;
mysql> select * from signature; // 데이터가 생성 된것을 볼 수 있다.!!!!!!!!!!!!!!!!!!!!!!!!!!!!!
 Prev
Prev
 Rss Feed